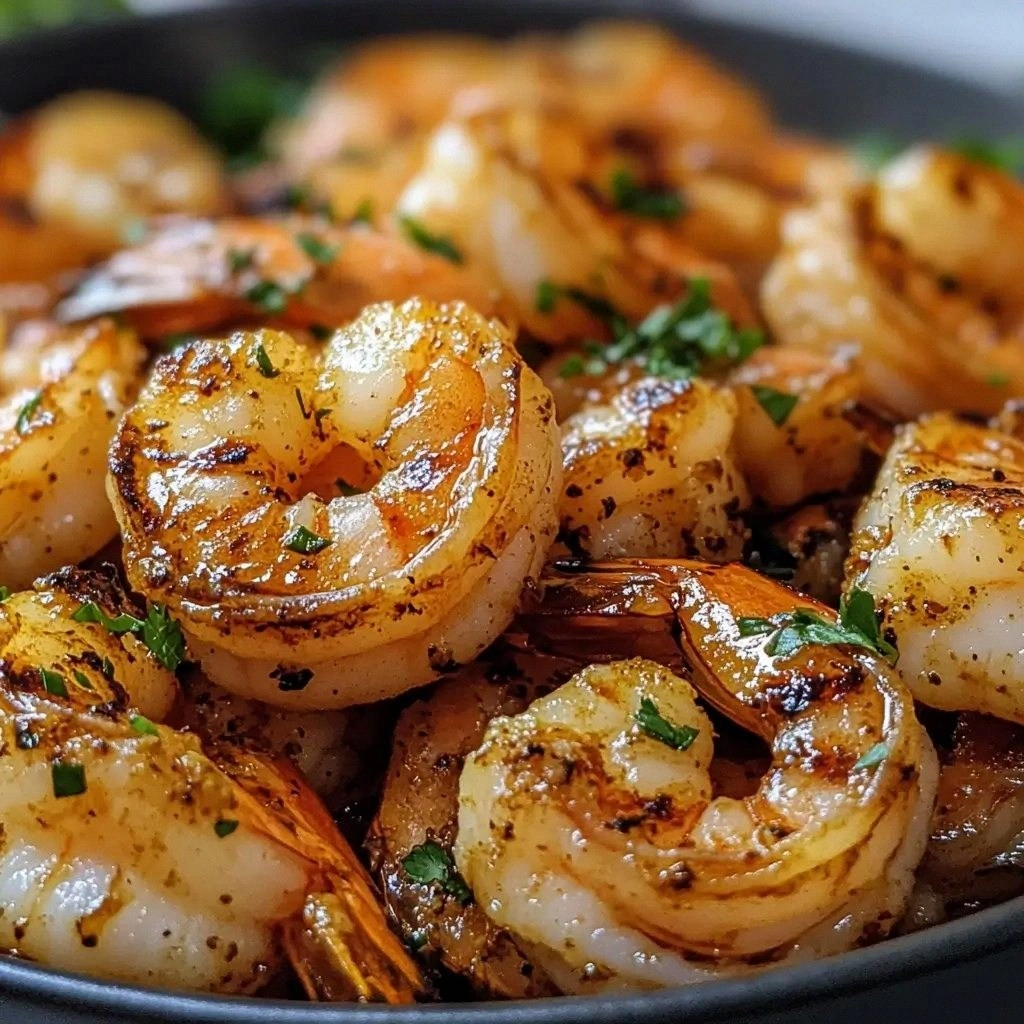
I remember the night I first stumbled upon this shrimp recipe like a culinary revelation. The kitchen was a mess of half‑cooked seafood, a burnt garlic paste, and a frantic search for a sauce that would salvage the evening. My friend dared me to whip up something that would make the entire apartment smell like a summer beach, and I didn’t even know how to start. The moment I saw the sizzling shrimp hit the grill, the aroma exploded—bright citrus, smoky char, and a whisper of heat that made my taste buds dance. I could almost hear the ocean waves, feel the sun on my skin, and taste the salt of the sea in every bite.
Picture this: a skillet, a cast‑iron pan, and a handful of plump, pink shrimp that seem to glow in the light. The sound of the first sizzle is a drumbeat, the heat is a gentle hug, and the scent is an invitation to indulge. The texture of the shrimp is a paradox—tender yet firm, buttery inside with a slightly crisp exterior that crackles when you bite. The flavor profile is a bright, zesty burst of lemon and lime, balanced by a subtle heat from chili flakes and a whisper of garlic that lingers on the tongue. Every bite is a mini celebration, a reminder that simple ingredients can create something truly extraordinary.
What makes this version stand out is that it’s not just another grilled shrimp recipe; it’s a carefully orchestrated symphony of taste, texture, and aroma that leaves a lasting impression. The combination of fresh citrus juices with a touch of butter creates a silky coating that clings to the shrimp, while the chili flakes add a gentle kick that doesn’t overpower the delicate seafood. The use of parsley not only adds a pop of color but also brings a fresh, herbaceous note that brightens the dish. The grill marks are not just visual; they add a smoky depth that elevates the overall flavor profile. This recipe is hands down the best version you’ll ever make at home because it balances simplicity with culinary artistry.
And here’s the kicker: I’ll be honest—after tasting the first batch, I ate half of it before anyone else even had a chance to try it. I dare you to taste this and not go back for seconds. The next section will walk you through every single step, and by the end, you’ll wonder how you ever made grilled shrimp any other way. Let’s dive in.
What Makes This Version Stand Out
- Flavor: The citrus blend lifts the shrimp’s natural sweetness, while the butter adds a velvety richness that coats each piece like velvet.
- Texture: The grill marks create a slight char that gives a smoky crunch, balanced by the shrimp’s tender interior that melts in your mouth.
- Ease: All you need is a skillet and a few pantry staples; no fancy equipment or complicated steps.
- Versatility: Serve it over rice, toss it with pasta, or plate it on a bed of greens—every option works wonderfully.
- Crowd‑pleaser: The bright, zesty flavor and eye‑catching presentation make it a hit at parties and family dinners alike.
- Freshness: The recipe uses fresh citrus and herbs, ensuring each bite bursts with natural flavor rather than artificial seasonings.
- Make‑ahead potential: The shrimp can be marinated in advance and grilled just before serving, saving you time on busy nights.
- Health factor: Low in carbs, high in protein, and packed with vitamin C from the citrus, this dish is both tasty and nutritious.
Inside the Ingredient List
The Flavor Base
Olive oil is the unsung hero of this dish, acting as the medium that carries the citrus juices and garlic across the shrimp. It also helps prevent the shrimp from sticking to the pan, ensuring a perfect sear. If you’re looking for a slightly sweeter profile, swap the olive oil for avocado oil, which has a higher smoke point and a mild flavor. The key is to use a good quality oil; a cheap, low‑grade oil will leave a bitter aftertaste that ruins the delicate balance of flavors.
Garlic, minced to a fine consistency, releases its oils and aroma, creating a fragrant base that permeates every shrimp. The freshness of the garlic matters—stale garlic can taste metallic. If you’re allergic or simply don’t like garlic, you can reduce the amount by half or replace it with a pinch of garlic powder, though the fresh flavor will be noticeably different. When using fresh garlic, a quick blanch in boiling water before mincing can mellow its sharpness, giving you a subtler yet still aromatic base.
The Citrus Duo
Lemon juice provides a bright, tangy punch that cuts through the richness of the shrimp and butter, while lime juice adds a subtle herbal undertone. Freshly squeezed juice is essential; bottled citrus juices often contain preservatives that alter the flavor profile. To maximize freshness, squeeze the lemons and limes just before marinating the shrimp. If you’re short on time, a splash of bottled lime juice can work, but the result will be less vibrant.
The citrus not only flavors the shrimp but also acts as a tenderizer. The acids in the juice break down the proteins on the shrimp’s surface, making them more succulent. However, be careful not to marinate for too long—over‑marinating can turn the shrimp mushy. A 15‑minute window is ideal; it’s enough to infuse flavor without compromising texture.
The Unexpected Star
Chili flakes introduce a gentle heat that balances the citrusy brightness. They also contribute a subtle depth of flavor that is often missing in simple shrimp recipes. If you prefer a milder dish, reduce the chili flakes to a pinch or omit them entirely. For those who love heat, add a dash of cayenne pepper or a splash of hot sauce to intensify the kick.
Sea salt is the foundation of seasoning; it enhances the shrimp’s natural sweetness and brings out the flavors of the other ingredients. Use a flaky sea salt for a more refined taste, or switch to kosher salt for a slightly different texture. Salt also helps create a crust on the shrimp’s surface when grilled, adding a pleasant crunch. If you’re watching sodium intake, consider using a low‑sodium salt alternative, but be mindful that it may alter the flavor slightly.
The Final Flourish
Fresh parsley adds a burst of green color and a herbaceous note that lifts the dish. The parsley’s mild peppery flavor contrasts nicely with the citrus and shrimp. For a different twist, try cilantro or basil; each will bring its own unique aroma to the dish. Parsley also provides a fresh, clean finish that balances the richness of the butter and the heat of the chili flakes.
Melted butter is the final touch that adds a silky, buttery finish. The butter coats the shrimp, preventing them from drying out and creating a glossy sheen that makes the dish look restaurant‑quality. If you’re aiming for a lower‑fat version, replace half the butter with extra olive oil, or use a light butter alternative. The key is to allow the butter to melt slowly, so it doesn’t burn and become bitter.
Everything’s prepped? Good. Let’s get into the real action.
The Method — Step by Step
- Start by rinsing the shrimp under cold water and patting them dry with paper towels. The drier the shrimp, the better the sear. Use a sharp knife to remove the shell and devein the shrimp, if you haven’t already done so. This step ensures a clean, uniform texture that cooks evenly. The shrimp should be plump, pink, and slightly translucent when you touch them.
- In a mixing bowl, combine the olive oil, minced garlic, lemon juice, lime juice, chili flakes, sea salt, and black pepper. Whisk until the ingredients are fully emulsified and the garlic is evenly distributed. The mixture should have a glossy sheen that indicates the oil and citrus are well blended. This is your flavor base, and it’s crucial for a consistent taste across all shrimp.
- Add the shrimp to the bowl and toss gently to coat each piece with the marinating sauce. Make sure every shrimp is evenly coated; this ensures that each bite has the same burst of citrus and heat. Let the shrimp sit for 15 minutes—no more, no less. This window allows the acids to tenderize without breaking down the protein structure. While marinating, you can preheat your skillet on medium‑high heat.
- Heat a cast‑iron skillet or a heavy‑bottom pan until it’s smoking hot. A hot pan is essential for that beautiful sear and the signature grill marks. Add a splash of olive oil to the pan, swirling to coat the bottom. When the oil shimmers, it’s ready for the shrimp.
- Place the shrimp in a single layer in the hot skillet, making sure not to crowd them. Overcrowding lowers the pan’s temperature, leading to steaming instead of searing. Let the shrimp cook undisturbed for 2 minutes, allowing the edges to crisp and the juices to caramelize. You’ll hear a satisfying sizzle that signals the shrimp is ready to flip.
- Flip each shrimp carefully with tongs, and cook for an additional 1–2 minutes on the other side. The shrimp should turn a deep pink color and develop a slightly charred crust. At this point, add the melted butter to the pan, swirling it around so it coats the shrimp. The butter will create a glossy finish and add a buttery richness that balances the citrus.
- Once the shrimp are cooked, remove them from the skillet and transfer them to a serving platter. Sprinkle fresh parsley over the top, allowing the herbs to release their aroma. The parsley not only adds color but also provides a fresh, green contrast to the warm shrimp. If you like, you can drizzle a little extra citrus juice over the shrimp for an extra burst of brightness.
- Serve immediately while the shrimp are hot and juicy. Pair them with a side of grilled vegetables, a light salad, or a bed of fluffy rice. The shrimp’s bright flavor pairs beautifully with a crisp white wine or a chilled rosé. If you’re feeling adventurous, toss the shrimp with a simple pasta or serve them over a bed of quinoa for a protein‑packed meal.
- If you’re not serving the shrimp right away, let them cool to room temperature, then cover them with a clean towel and refrigerate for up to 2 hours. When reheating, simply warm them in a skillet over low heat for a few minutes, or microwave for 30 seconds—just enough to bring the shrimp back to life without overcooking.
- Enjoy the burst of citrus, the subtle heat, and the buttery finish that make this dish unforgettable. Take a moment to savor the aroma, the sizzle, and the texture that make every bite a celebration. If you’re sharing, watch as friends and family’s eyes light up with anticipation. Remember, the key to success lies in the quality of ingredients and the precision of timing.
That’s it — you did it. But hold on, I've got a few more tricks that'll take this to another level.
Insider Tricks for Flawless Results
The Temperature Rule Nobody Follows
Many home cooks assume that a lower heat is better for shrimp, but that’s a myth. Shrimp need a high, steady heat to develop a beautiful char without drying out. The trick is to preheat your skillet until it’s smoking hot; this ensures an instant sear that locks in juices. If your stove runs hot, you can reduce the heat slightly after adding the shrimp, but keep it high enough to maintain that sizzle. Remember, a hotter pan means a faster cook, so you’ll finish in less time and preserve the shrimp’s natural tenderness.
Why Your Nose Knows Best
You might think you can judge doneness by sight alone, but your nose is a more reliable indicator. As shrimp cook, they emit a sweet, slightly briny aroma that signals they’re ready to be flipped. If you notice a faint, metallic scent, the shrimp are overcooked. Trust your sense of smell; it will guide you to the perfect texture every time. I once had a friend who flipped shrimp too early and ended up with a rubbery mess—never again.
The 5‑Minute Rest That Changes Everything
After cooking, let the shrimp rest for five minutes before plating. This brief pause allows the juices to redistribute, resulting in a more succulent bite. If you skip this step, the shrimp may release water when you cut into them, giving a watery texture. I’ve seen people serve shrimp immediately and get a dry, uneven result. The rest is a simple, yet essential, trick that elevates the dish.
Pre‑Marinating for Flavor Depth
Marinating the shrimp for a longer period—up to 30 minutes—can deepen the flavor profile. The citrus acids penetrate further, while the garlic and chili flakes infuse the shrimp with more complexity. However, be careful not to over‑marinate; too long and the shrimp can become mushy. I’ve experimented with a 30‑minute marination and the result was a richer, more layered taste that still kept the shrimp firm.
Using Fresh vs. Frozen Shrimp
Fresh shrimp have a brighter, more delicate flavor and a firmer texture. If you opt for frozen shrimp, thaw them in cold water for 15 minutes, then pat them dry thoroughly. This removes excess moisture that can prevent a proper sear. Frozen shrimp can be just as tasty if handled correctly, but fresh is the gold standard for the best flavor.
Creative Twists and Variations
This recipe is a playground. Here are some of my favorite ways to switch things up:
Smoky Chipotle Twist
Swap the chili flakes for finely ground chipotle pepper and add a splash of chipotle adobo sauce. The smoky heat pairs wonderfully with the citrus, creating a complex flavor profile that feels like a smoky beach bar. Serve over a bed of cilantro‑lime rice for a full, satisfying meal.
Herb‑Infused Mediterranean
Replace the parsley with a mixture of chopped oregano, thyme, and basil. Add a drizzle of extra‑virgin olive oil and a squeeze of lemon at the end for a Mediterranean vibe. Pair with a Greek salad or roasted vegetables for a light, refreshing dinner.
Spicy Thai Fusion
Incorporate a tablespoon of Thai red curry paste into the marination and finish with a splash of coconut milk. The creamy coconut balances the heat, while the lime juice keeps the dish bright. Serve over jasmine rice and garnish with fresh cilantro and sliced red chilies.
Garlic Butter Royale
Increase the butter to 2 tablespoons and add a pinch of smoked paprika. The butter will coat the shrimp more heavily, giving it a luxurious, velvety finish. This version is perfect for a fancy dinner party where you want to impress your guests with a buttery, garlicky delight.
Asian Glaze Variation
Replace the lemon and lime juice with a mixture of rice vinegar and a touch of honey. Add a dash of soy sauce and finish with toasted sesame seeds. The sweet‑savory glaze gives the shrimp an Asian flair, and the sesame seeds add a pleasant crunch.
Storing and Bringing It Back to Life
Fridge Storage
Store leftover shrimp in an airtight container in the refrigerator for up to 2 days. The shrimp will retain its flavor and texture if kept chilled. When you’re ready to reheat, bring it to room temperature for 10 minutes, then warm it in a skillet over low heat until heated through. This method preserves the juiciness and prevents the shrimp from drying out.
Freezer Friendly
If you need to store shrimp for longer, freeze them in a single layer on a baking sheet before transferring to a freezer bag. This prevents the shrimp from sticking together. They can stay frozen for up to 3 months. When you’re ready to use them, thaw in the refrigerator overnight, then proceed with the reheating steps above.
Best Reheating Method
The secret to reheated shrimp is gentle heat and a splash of moisture. Add a teaspoon of water or broth to the skillet, cover, and heat over low heat for 2–3 minutes. The steam will revive the shrimp’s tenderness and keep them from drying out. Finish with a quick squeeze of fresh lemon to restore the bright citrus flavor.