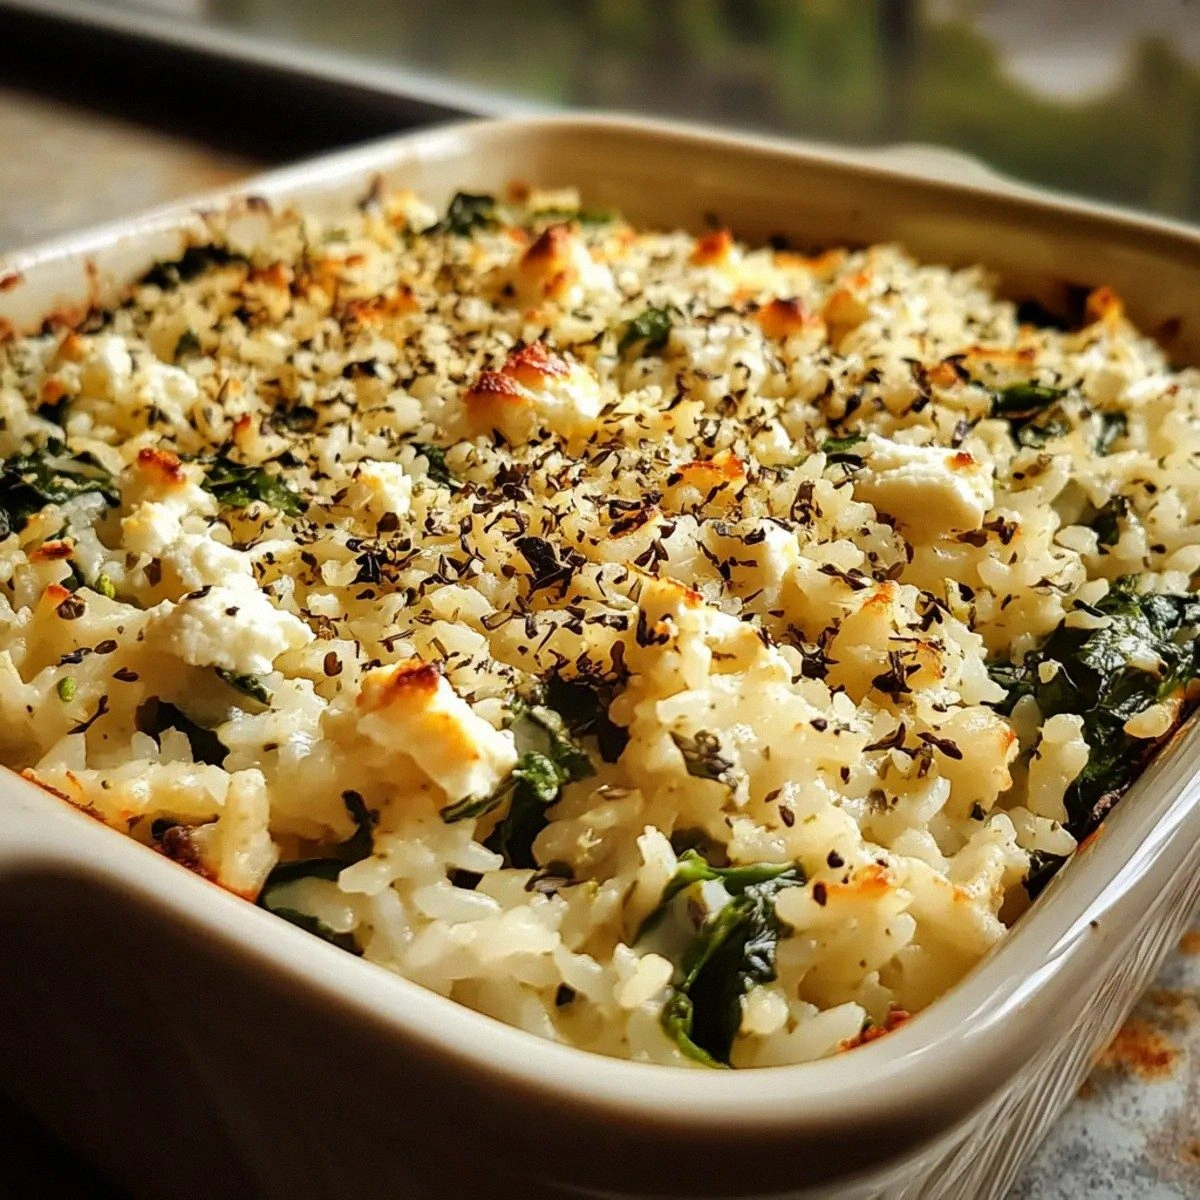
It started with a kitchen catastrophe that would make even the most seasoned chef cringe. I had boiled a pot of potatoes, mashed them, added a splash of milk, and then, in a moment of reckless enthusiasm, dumped the entire batch into a preheated skillet. The result? A soggy, unappetizing mess that barely held its shape. I stared at the disaster, feeling the heat of the pan, the clatter of utensils, and a sudden urge to salvage something delicious. That night, I vowed to transform mashed potatoes into a crispy, cheesy masterpiece that would make even the most skeptical taste buds surrender. This is the story of how I discovered the ultimate version of Crispy Mashed Potato and Chees.
Picture this: golden edges crackling like a fresh autumn sunrise, the aroma of melted cheddar and caramelized garlic drifting through the kitchen, the sound of a sizzling pan that promises satisfaction, and the anticipation of biting into a fluffy interior that feels like a cloud. The texture is a contrast of crispness on the outside and a velvety softness inside, each bite releasing a burst of savory richness. The flavors are layered—sweet potato undertones, sharp cheese tang, subtle smoky paprika, and a hint of buttery richness that lingers on the palate. The visual appeal is undeniable, with a golden crust that glistens under the oven light, inviting you to dive in. Every sense is engaged, from the tactile crunch of the crust to the comforting warmth that radiates from the center. This dish is not just food; it’s an experience that turns a simple side into a showstopper.
What sets this version apart from every other recipe you’ve seen? First, it uses a unique combination of cheeses that creates a melt that’s both gooey and flavorful without overwhelming the potato base. Second, the method of forming the puffed shapes before baking ensures that each bite has that satisfying crunch. Third, the addition of a light breadcrumb coating adds a subtle nutty crunch that balances the softness. Fourth, the seasoning blend—garlic, paprika, and a whisper of pepper—infuses the dish with depth without masking the potato’s natural sweetness. Fifth, the use of a quick, high-heat finish in the oven locks in moisture while creating a golden crust. Sixth, the recipe is scalable, making it perfect for both family dinners and large gatherings. Seventh, it’s a crowd-pleaser that can be served as an appetizer, side dish, or even a main course when paired with a fresh salad. Finally, the recipe includes a few clever tricks that elevate it from ordinary to extraordinary. I dare you to taste this and not go back for seconds.
Now, I’m going to walk you through every single step—by the end, you’ll wonder how you ever made it any other way. The journey from raw potatoes to crispy, cheesy puffs is filled with techniques that sound simple but deliver remarkable results. I’ll share my secrets, the small adjustments that make a big difference, and a few kitchen hacks that will save you time and frustration. Ready to transform your kitchen into a flavor laboratory? Let’s dive in.
What Makes This Version Stand Out
- Cheese Selection: Combining cheddar and mozzarella creates a melt that’s both sharp and creamy, giving the puffs a balanced flavor profile. The cheeses also contribute to a golden crust that’s slightly caramelized.
- Crunch Factor: The brief pan-frying before baking crisps the edges, producing a crackling texture that shatters like thin ice when bitten. It adds a satisfying contrast to the fluffy interior.
- Seasoning Blend: A dash of garlic powder, paprika, and pepper elevates the potatoes with a subtle smoky warmth that complements the cheese without overpowering it.
- Texture Crew: A light coat of flour and a splash of milk create a batter that holds the mash together, making it easy to shape into puffs without sticking.
- Time Efficiency: The method requires minimal active cooking time, allowing you to focus on other dishes while the puffs bake to perfection.
- Make‑Ahead Potential: You can assemble the puffs a few hours before baking and refrigerate them, making this dish a great option for entertaining.
- Visual Appeal: The golden, bubbly surface is a feast for the eyes, turning an ordinary side into an Instagram-worthy centerpiece.
- Versatility: Whether served as an appetizer, side, or main, the dish adapts seamlessly to any meal plan or dietary preference.
Alright, let’s break down exactly what goes into this masterpiece...
Inside the Ingredient List
The Flavor Base
At the heart of this dish are the potatoes themselves—starchy, buttery, and naturally sweet. They form the canvas upon which every other flavor is layered. Choosing medium‑russet potatoes gives a creamy texture that holds together when baked. If you prefer a lighter bite, try Yukon Golds for their subtle buttery flavor. The key is to cook them until they’re fork‑soft, ensuring they’re ready for mashing without absorbing too much liquid.
The cheese selection is crucial; cheddar provides sharpness, while mozzarella adds stretch and creaminess. Together, they create a melt that coats each puff like velvet. A pinch of smoked paprika infuses a gentle heat, echoing the warmth of a campfire. Garlic powder adds depth, while a touch of black pepper balances the sweetness of the potatoes. Each ingredient works in harmony, turning a simple mash into a complex flavor profile.
If you’re short on time, a quick sauté of the mashed potatoes with butter and a splash of milk can replace the traditional boiling step, saving you 10 minutes. However, the slow boil allows the starches to gelatinize properly, creating that perfect fluffiness. Skipping the milk or butter will result in a drier mash, which can lead to cracked puffs during baking. The balance of these elements is what makes the dish both comforting and exciting.
The Texture Crew
Flour is the unsung hero that binds the mashed potatoes into a workable dough. It absorbs excess moisture, preventing the puffs from becoming soggy. Use all-purpose flour for a neutral flavor, or try a mix with cornstarch for a lighter bite. A light dusting of flour on the work surface makes shaping easier and reduces sticking.
Eggs act as a binder, giving the puffs structure and a golden finish when baked. Two large eggs are sufficient for four servings. If you’re vegan, a flaxseed egg or a commercial egg replacer will do the trick, though the crust may be slightly less golden.
Breadcrumbs add a subtle crunch and help absorb moisture, ensuring the exterior stays crisp. Panko breadcrumbs provide extra crunch, while regular breadcrumbs give a more traditional texture. You can also sprinkle a bit of grated parmesan on top for an extra burst of umami.
Oil is used for the final searing step, creating a crisp, golden crust that locks in moisture. A neutral oil like canola or a light olive oil works best. Using too much oil can make the puffs greasy, so keep it to a moderate amount.
The Unexpected Star
A splash of milk—or even a dash of cream—keeps the mash moist and adds richness. Milk also helps the cheese melt smoothly, creating that silky interior. If you’re lactose intolerant, a dairy‑free alternative like oat milk works well and maintains the same consistency.
A pinch of salt is essential to bring out the flavors, but be careful not to overdo it. Salt enhances the natural sweetness of the potatoes and balances the sharpness of the cheeses. A pinch of pepper adds a subtle heat that ties everything together. If you prefer a spicier kick, a dash of cayenne pepper will do the trick.
Garlic powder is a game‑changer; it infuses the mash with a subtle, savory depth that’s hard to achieve with fresh garlic. It also distributes evenly, ensuring every puff has a consistent flavor. A small amount of smoked paprika adds a smoky undertone, reminiscent of a barbecue, that elevates the dish from ordinary to extraordinary.
The final flourish—baking at a high temperature—creates that signature crispness. The heat caramelizes the sugars in the potatoes and cheeses, giving the crust a beautiful golden hue. The interior remains soft and fluffy, creating a delightful contrast. The trick is to monitor the baking time closely, as overbaking can dry out the puffs.
Everything’s prepped? Good. Let’s get into the real action...
The Method — Step by Step
- Begin by boiling the diced potatoes in salted water until fork‑soft, about 15 minutes. Drain them thoroughly and return them to the pot. Add the butter, milk, and a pinch of salt, then mash until silky smooth. If the mash feels too thick, add a splash of milk to reach the desired consistency. Let the mash cool slightly before adding the rest of the ingredients.
- In a separate bowl, whisk the eggs and stir in the flour, garlic powder, paprika, and pepper. Combine this dry mixture with the mashed potatoes, ensuring everything is evenly incorporated. The dough should be moist yet hold its shape when pressed. If it’s too sticky, add a teaspoon of flour; if too dry, add a tablespoon of milk.
- Fold in the shredded cheddar and mozzarella, reserving a small amount for topping. The cheeses should be evenly distributed, creating pockets of melt within each puff. Gently fold in the breadcrumbs, which will form the base of the crispy crust. The dough should feel slightly tacky but manageable.
- Preheat your oven to 425°F (220°C) and line a baking sheet with parchment paper. Lightly grease the parchment with a thin layer of oil to prevent sticking. This step ensures a crisp, golden crust on every puff.
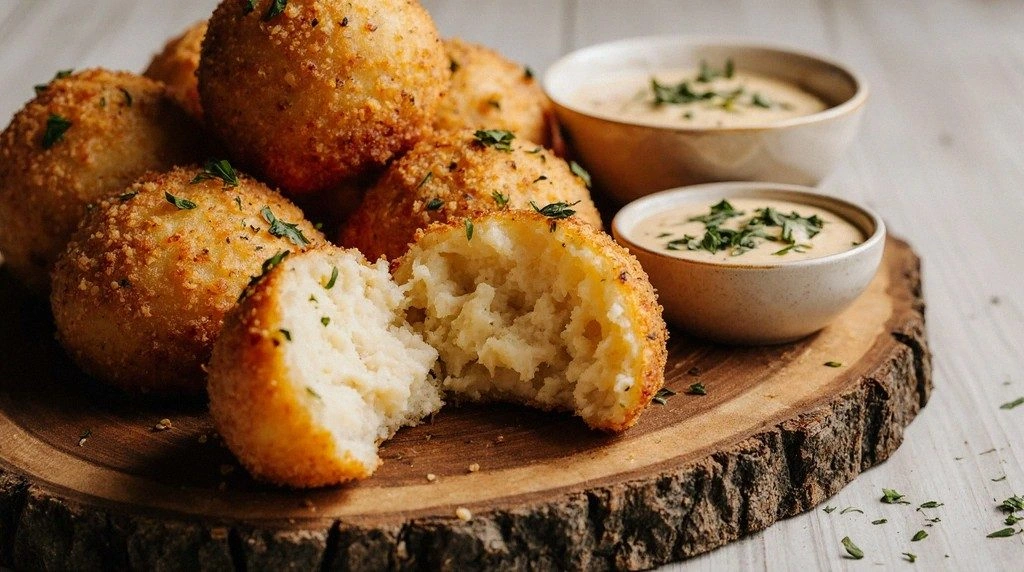
- Divide the dough into 12 equal portions and roll each into a small ball. Flatten each ball into a disc about 3/4 inch thick. Place the discs on the prepared baking sheet, spacing them evenly to allow for expansion.
- Brush the tops of the discs lightly with oil and sprinkle the reserved cheese on each puff. The cheese will melt and form a glossy, golden top that’s irresistible to the eye. The brushing also creates a subtle crispness that complements the breadcrumb coating.
- Bake in the preheated oven for 20–25 minutes, or until the tops are golden brown and the puffs have risen. The aroma that fills the kitchen at this point is a promise of deliciousness. Keep a close eye on the baking time; the crust should be crisp but not burnt.
- Remove the puffs from the oven and let them cool for a few minutes on a wire rack. This step allows the interior to set, ensuring each puff holds its shape when served. The crust will firm up slightly, creating that satisfying crunch.
- Serve immediately while the puffs are still warm and the cheese is still oozing. Pair them with a fresh green salad or a tangy dipping sauce for an extra layer of flavor. Enjoy the symphony of textures and flavors that dance in every bite.
That's it — you did it. But hold on, I've got a few more tricks that'll take this to another level...
Insider Tricks for Flawless Results
The Temperature Rule Nobody Follows
Many bakers underestimate the importance of oven temperature. Baking at 425°F (220°C) ensures the exterior crisps while the interior remains fluffy. If your oven runs hot, lower the temperature by 25°F to avoid burning the crust. Keep the baking sheet in the middle rack to promote even cooking. A preheated oven is the secret to a perfect golden finish.
Why Your Nose Knows Best
Trust the aroma: when the puffs start to emit a buttery, cheesy scent, you’re almost there. That smell signals that the cheeses have melted fully and the crust is forming. If the scent is weak, give them a few more minutes. The aroma is a natural indicator of doneness, saving you from guessing based on time alone.
The 5-Minute Rest That Changes Everything
After removing the puffs from the oven, let them rest for five minutes on a wire rack. This brief pause allows the steam to redistribute, preventing sogginess and locking in moisture. It also gives the cheese a chance to set slightly, making each bite cleaner. Skipping this step can result in a greasy texture.
Use a Light Dusting of Flour
Dust the work surface with flour before shaping the puffs. This simple step prevents sticking and keeps the dough from clinging to your hands. It also helps maintain a clean, organized workspace, which is essential for a smooth cooking experience. Flour can also be added to the dough if it feels too wet, but only in small amounts to avoid a dry crumb.
Keep the Baking Sheet Clean
If you’re making a large batch, clean the parchment paper between batches to avoid excess grease buildup. Grease can cause the puffs to stick and become soggy. A quick wipe with a paper towel removes any residue, ensuring each puff bakes evenly. A clean sheet also prevents the flavors from mixing unintentionally.
Cool on a Wire Rack
Letting the puffs cool on a wire rack allows air to circulate around each piece, keeping the crust crisp. Avoid covering them with a towel, which can trap steam and soften the exterior. The wire rack also prevents condensation from forming on the bottom of the puffs. This simple step ensures a long-lasting crunch.
Creative Twists and Variations
Mexican Fiesta Puffs
Swap the cheddar for Monterey Jack and add a handful of corn kernels, diced jalapeños, and a dash of cumin. Top with a spoonful of salsa before baking for a burst of freshness. These puffs pair wonderfully with a lime‑y cilantro dip, making them a festive addition to any gathering.
Herb‑Infused Garden Puffs
Incorporate fresh herbs like rosemary, thyme, and parsley into the dough for a fragrant, green flavor profile. Replace the paprika with a pinch of dried oregano and add a splash of lemon zest for brightness. These puffs are perfect as a side for roasted chicken or as a vegetarian main when served with a quinoa salad.
Cheesy Broccoli & Cauliflower Puffs
Steam a handful of broccoli and cauliflower florets, then mash them with the potatoes for a nutrient boost. Add a sprinkle of grated Parmesan and a dash of nutmeg for depth. The result is a colorful, savory puff that’s both wholesome and indulgent.
Smoked Salmon & Dill Puffs
Fold in chopped smoked salmon and fresh dill into the dough for a sophisticated twist. Top each puff with a dollop of crème fraîche before baking. These puffs make an elegant appetizer for brunch or a chic party snack.
Vegan Delight Puffs
Replace the dairy products with plant‑based alternatives: vegan cheddar, cashew cream, and oat milk. Use flaxseed eggs to bind the dough. These puffs retain the same fluffy interior and crisp exterior while being fully plant‑based.
Storing and Bringing It Back to Life
Fridge Storage
Store leftover puffs in an airtight container at room temperature for up to two days. Keep them away from moisture to prevent sogginess. If you notice the crust softening, simply reheat them in a 350°F (175°C) oven for a few minutes to restore crispness. This method preserves the original texture without compromising flavor.
Freezer Friendly
Place the cooled puffs on a parchment‑lined tray and freeze until solid, then transfer to a freezer bag. They can be stored for up to three months. When ready to eat, bake them at 400°F (200°C) for 12–15 minutes until heated through. The crunch will return, making them feel fresh and new.
Best Reheating Method
Add a tiny splash of water to a skillet before reheating to create steam, which helps the interior stay moist while the crust crisps. Heat over medium heat, turning occasionally, until golden and heated through. Alternatively, use a toaster oven set to 375°F (190°C) for an even crisp finish. This trick ensures the puffs taste as good as when they were first baked.