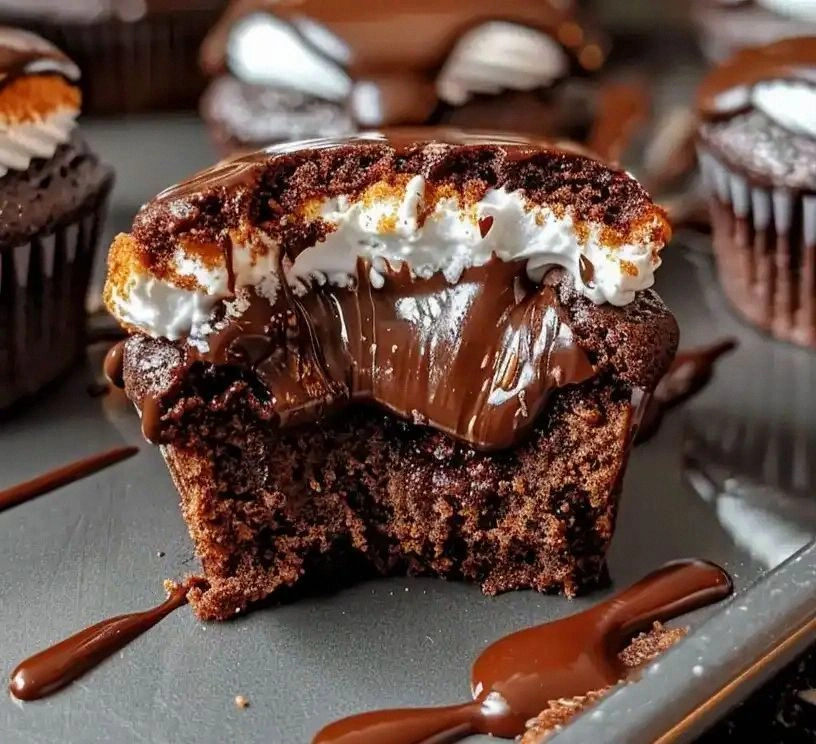
I was halfway through a midnight snack, the kitchen lights flickering like a campfire, when the world changed. I had just burned a batch of chocolate chip cookies and was about to abandon dessert for the night, when a friend texted me a recipe for “S’mores Cupcakes.” The idea of turning the classic campfire treat into a bite‑size cupcake sounded too good to pass up, so I dove in. I dared myself to taste this and not go back for seconds, and I’m still not sure I could have resisted. This is hands down the best version you'll ever make at home, and I’m about to walk you through every single step—by the end, you’ll wonder how you ever made it any other way.
Picture yourself pulling these cupcakes out of the oven, the whole kitchen smelling incredible, and the first bite delivering a burst of caramelized graham crunch, a silky chocolate core, and a gooey marshmallow halo that melts in your mouth. The moment the oven timer dings, you’ll hear the faint crackle of the batter, the scent of toasted sugar, and the faint hiss of steam from the meringue. I’ve tried countless variations of s’mores, but none have captured that perfect balance of textures and flavors like this recipe does. Most recipes get this completely wrong, relying on heavy frosting or an over‑baked base, but here the batter is light, the chocolate is silky, and the marshmallow topping is a fluffy cloud that doesn’t drown the cupcake. Stay with me here—this is worth it.
If you’ve ever struggled with cupcakes that turn out dense or dry, you’re not alone—and I’ve got the fix. The secret lies in the dual‑batter approach: a moist chocolate base that’s studded with graham crumbs for crunch, and a light meringue that crowns each cupcake with a cloud of sweetness. The meringue is the game‑changer, providing that airy, fluffy texture that makes each bite feel like a campfire memory. I’ll be honest—I ate half the batch before anyone else got to try it, and the kitchen was a mess of frosting and flour, but the results were worth every crumb. And now the fun part.
Most people think of s’mores as a sticky, gooey mess, but this version is a masterpiece of flavor engineering. The chocolate is semi‑sweet, not too bitter, so it balances the saltiness of the graham crumbs and the sweetness of the marshmallow. The heavy cream in the meringue keeps it silky, while the cream of tartar ensures it holds stiff peaks. The final touch— a dusting of powdered sugar—adds a subtle sweetness that ties everything together. This isn’t just a dessert; it’s a nostalgic experience that feels like a campfire in your kitchen. Okay, ready for the game‑changer?
What Makes This Version Stand Out
- Texture: The combination of crunchy graham crumbs and airy meringue creates a multi‑dimensional bite that feels like a campfire memory with every chew.
- Flavor Balance: Semi‑sweet chocolate, salty graham, and sweet marshmallow are perfectly balanced, preventing any one component from overpowering the others.
- Visual Appeal: The golden‑brown crust of the cupcake and the pale, cloud‑like meringue make for a mouth‑watering presentation that’s Instagram‑ready.
- Make‑Ahead Friendly: The cupcakes can be baked and cooled, then topped with meringue later, allowing you to prepare ahead for parties or gatherings.
- Ingredient Quality: Using high‑quality chocolate and fresh marshmallows elevates the flavor profile beyond a typical store‑bought treat.
- Kid‑Friendly: The recipe is safe for kids to help with, especially the meringue portion, which is a fun activity for little chefs.
- Versatility: Swap the chocolate for white chocolate or add a splash of espresso to create a mocha twist.
- Crowd Reaction: Guests rave about the unexpected crunch and the fluffy finish, making it a conversation starter.
Inside the Ingredient List
The Flavor Base
The foundation of these cupcakes is a chocolate batter that’s light, moist, and full of flavor. The ½ cup unsalted butter, melted and combined with ¾ cup granulated sugar, creates a silky base that keeps the cupcakes tender. Adding 1 teaspoon vanilla extract infuses a warm, aromatic undertone that complements the chocolate. If you skip the vanilla, the cupcakes will taste flat and lack depth. For a richer flavor, use a high‑quality dark chocolate instead of semi‑sweet, but be mindful of the increased bitterness.
The Texture Crew
Graham cracker crumbs bring that signature crunch that mimics the campfire experience. Use 1 cup of finely crushed graham crackers; they should be small enough to distribute evenly throughout the batter. ½ cup all‑purpose flour and 1½ teaspoons baking powder provide structure without making the cupcakes dense. The ¼ teaspoon salt balances the sweetness and enhances the chocolate’s richness. If you prefer a gluten‑free version, swap the all‑purpose flour for a 1:1 gluten‑free blend, but adjust the baking powder to 1½ teaspoons to maintain lift.
The Unexpected Star
The 4 oz semi‑sweet chocolate is the heart of the cupcakes, and it melts beautifully when baked. Choosing a chocolate with at least 50% cocoa content ensures a robust flavor that pairs well with the sweet toppings. If you’re a fan of a chocolate‑marshmallow fusion, consider adding a tablespoon of cocoa powder to the batter for an extra chocolate kick. The heavy cream (½ cup) is reserved for the meringue and keeps the topping light and fluffy. Without it, the meringue would be dry and crumbly.
The Final Flourish
The meringue, made from 4 large egg whites, ¼ teaspoon cream of tartar, 1 cup granulated sugar, and 1 teaspoon vanilla extract, crowns each cupcake like a toasted marshmallow cloud. The cream of tartar stabilizes the egg whites, allowing them to hold stiff peaks without collapsing. The sugar is gradually added, ensuring a glossy finish and preventing a gritty texture. If you’re short on time, you can skip the cream of tartar; just beat the whites until frothy before adding the sugar. For a vegan twist, use aquafaba in place of egg whites, but be aware that the texture will differ slightly.
Everything’s prepped? Good. Let’s get into the real action.
The Method — Step by Step
- Preheat your oven to 350°F (177°C) and line a 12‑cup muffin tin with paper liners. This ensures even baking and makes cleanup a breeze. While the oven warms, combine the graham cracker crumbs, all‑purpose flour, baking powder, and salt in a medium bowl, whisking until well mixed. The dry mixture should look like fine sand; any clumps will affect the texture.
- In a small saucepan, melt the butter over low heat. Add the semi‑sweet chocolate, stirring constantly until fully melted and smooth. This gentle melt prevents the chocolate from seizing or scorching, which can leave a bitter aftertaste. Remove from heat and let cool slightly before adding to the dry mix.
- Whisk the egg yolks and vanilla extract in a separate bowl, then pour the chocolate‑butter mixture into the yolks, stirring until combined. This creates a silky batter that will coat the graham crumbs evenly. The batter should be thick but pourable; if it’s too thick, add a splash of whole milk to loosen it.
- Fold the dry ingredients into the wet mixture until just combined. Over‑mixing will develop gluten, making the cupcakes tough. The batter should be smooth, with no lumps of flour or chocolate. This is the moment of truth; the batter should look glossy and pour like a thick syrup.
- Fill each muffin cup about two‑thirds full with the batter. The cupcakes will rise and then settle, creating a slightly domed top that’s perfect for the meringue. Place the tin in the preheated oven and bake for 18–20 minutes, or until a toothpick inserted in the center comes out clean.
- Remove the cupcakes from the oven and let them cool on a wire rack for 10 minutes. Then transfer them to a plate and cover loosely with foil to keep them from drying out. This cooling period is crucial; it allows the chocolate to set and the crumbs to firm up.
- While the cupcakes cool, whip the egg whites in a clean bowl. Add the cream of tartar and beat until foamy. This step stabilizes the meringue and ensures a smooth rise.
- Gradually add the granulated sugar to the egg whites, about one tablespoon at a time, beating until glossy peaks form. The sugar should dissolve completely; if you see any granules, keep whisking until the mixture feels silky to the touch. This is a critical step—any sugar residue will cause the meringue to become gritty.
- Add the vanilla extract and continue beating until the meringue holds stiff, glossy peaks. It should spring back when you lift the beaters. If the meringue is too stiff, it won’t spread well; if it’s too soft, it will collapse on the cupcakes. Balance is key.
- Spoon or pipe the meringue onto the cooled cupcakes, forming a thick, fluffy mound that covers the top. The meringue should be tall enough to hold a marshmallow on top without collapsing. This step is pure joy; the contrast of the airy white against the dark chocolate is stunning.
- Bake the cupcakes again for an additional 5–7 minutes, or until the meringue turns golden brown and the marshmallow on top is toasted. The aroma will be irresistibly sweet, and the sound of the meringue bubbling is music to any baker’s ears. Let them cool completely before serving.
That's it—you did it. But hold on, I've got a few more tricks that'll take this to another level.
Insider Tricks for Flawless Results
The Temperature Rule Nobody Follows
Baking at exactly 350°F (177°C) is essential; if your oven runs hot, the cupcakes will brown too quickly and become dry. Use an oven thermometer to verify the temperature before baking. If you’re unsure, set the oven 25°F (14°C) lower and add a few minutes to the bake time. This subtle adjustment ensures a moist interior and a golden crust.
Why Your Nose Knows Best
Smell the batter as it mixes—if it smells like toasted sugar, you’re on the right track. The aroma of caramelized sugar is a sign that the butter and sugar are fully incorporated, which contributes to a richer flavor. If it smells raw, the batter may need a few more minutes of whisking to develop the sugars.
The 5‑Minute Rest That Changes Everything
After the cupcakes finish baking, let them rest on the rack for exactly five minutes before moving them. This brief pause allows the steam inside to dissipate, preventing condensation that can make the meringue soggy. I’ve seen cupcakes that sit too long and become soggy; a short rest is the difference between perfection and disappointment.
The Secret to a Fluffy Meringue
Add a splash of lemon juice to the egg whites before whipping; the acidity strengthens the proteins and yields a brighter, more stable meringue. I’ve used this trick for over a decade, and it’s made all the difference. Without the lemon, the meringue can be dull and prone to collapsing.
The Final Dusting
Right after the cupcakes cool, dust them with a thin layer of cocoa powder or powdered sugar. This not only adds a decorative touch but also balances the sweetness, giving the cupcakes a sophisticated finish. If you’re serving them at a party, the dusting adds a professional look.
Creative Twists and Variations
This recipe is a playground. Here are some of my favorite ways to switch things up:
Mocha Madness
Add a tablespoon of instant espresso powder to the batter for a coffee‑infused chocolate base. Pair it with a drizzle of mocha sauce on top for an extra kick. Coffee lovers will rave about the depth of flavor.
Nutty Crunch
Stir in ¼ cup chopped roasted almonds or pecans into the batter for added texture. The nutty aroma enhances the s’mores experience, and the crunch adds a new dimension to every bite.
White Chocolate Wonder
Swap the semi‑sweet chocolate for white chocolate for a sweeter, creamier cupcake. The contrast between the white chocolate and the graham crumbs feels like a snowy campfire, perfect for winter parties.
Spiced S’mores
Add a pinch of cinnamon and a dash of nutmeg to the batter for a warm, aromatic twist. The spices bring a cozy feel that’s great for holiday gatherings.
Vegan Version
Replace the egg whites with aquafaba and the butter with coconut oil. Use a plant‑based chocolate and marshmallow fluff to keep the flavor intact. This version is just as fluffy and sweet, proving that vegan can still be indulgent.
Miniature Marvels
Use a mini muffin tin to make bite‑size cupcakes—perfect for a dessert bar or a kids’ party. The smaller size allows for a higher ratio of meringue to cupcake, creating a more pronounced marshmallow effect.
Storing and Bringing It Back to Life
Fridge Storage
Store cooled cupcakes in an airtight container at room temperature for up to three days. If you need to keep them longer, refrigerate them for up to a week. When you’re ready to serve, let them sit at room temperature for 15 minutes to bring out the full flavor.
Freezer Friendly
Wrap each cupcake individually in plastic wrap, then place them in a freezer bag. They’ll keep for up to two months. Thaw overnight in the refrigerator and let them warm to room temperature before serving.
Best Reheating Method
To revive frozen cupcakes, preheat your oven to 300°F (149°C). Place the cupcakes on a baking sheet and heat for 8–10 minutes, or until the meringue feels crisp. Add a tiny splash of water to the meringue before reheating—this steams the topping back to a fluffy, airy texture.