It all started on a rainy Sunday when I was trying to salvage a batch of cookie dough that had been left in the fridge for too long. The dough had become a stubborn, rubbery slab that refused to spread, and my kitchen smelled like a failed experiment. I laughed, because I knew I was about to invent something that would make my friends ask for the recipe by the end of the week. The moment I cracked the eggs and stirred in a splash of lemon zest, the aroma turned from stale to citrusy, bright, and utterly irresistible.
Imagine the kitchen filling with a sweet, buttery scent that lingers even after you’ve cleaned up. The dough, once a grimy mass, now glistens like polished amber under the kitchen light. As I rolled the dough into tiny rounds, the sound of the rolling pin was a satisfying rhythmic thud, almost like a drumbeat that promised deliciousness. I could already taste the subtle tang of lemon balancing the rich butter, and I knew I was on the cusp of something truly special.
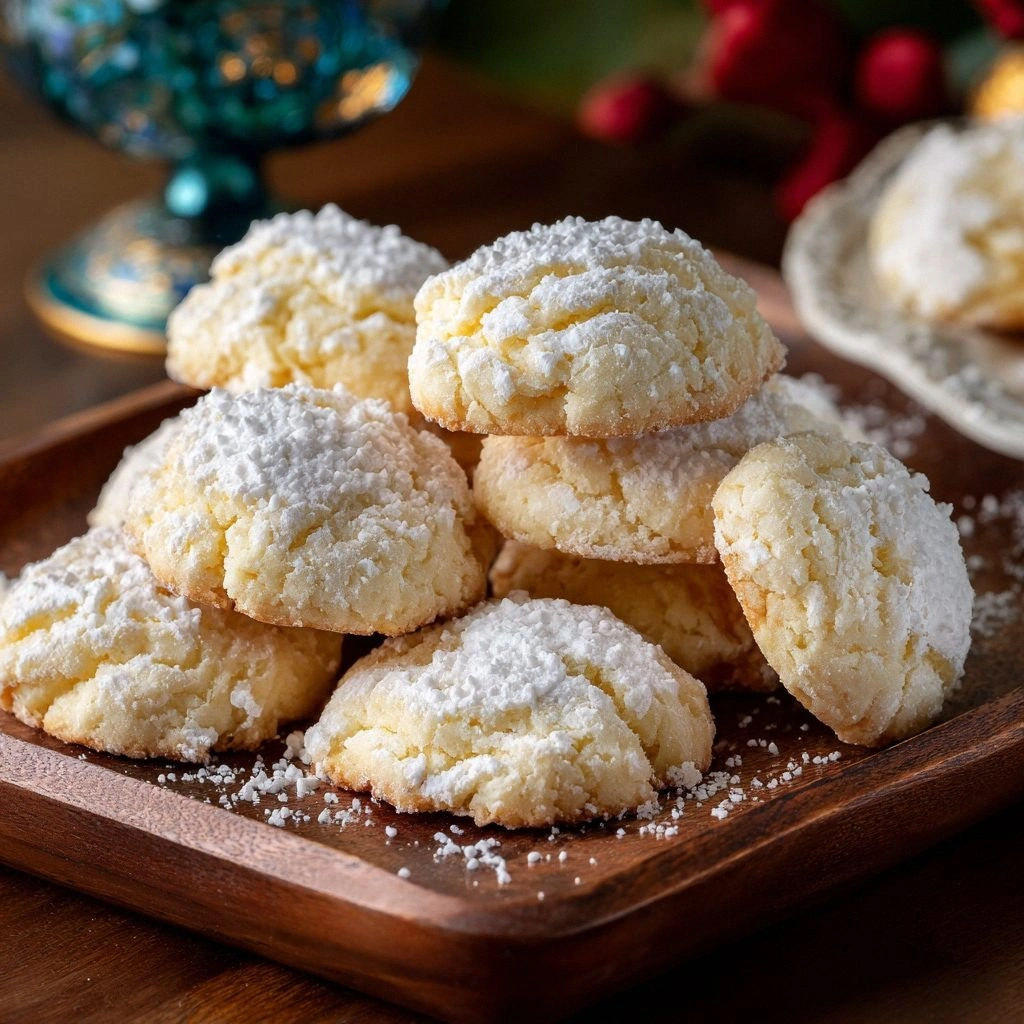
That first bite was a revelation—soft, tender inside, with a crisp, caramelized edge that cracked like thin ice when you pressed it. I swear, the cookies were so good that I almost didn’t let anyone else try them; I ate half the batch before the first plate was even set. Most recipes I’ve tried before have either been too dry or too greasy, but this version hits that sweet spot with a texture that’s both airy and satisfying. If you’ve ever struggled to get the right crunch, you’re not alone, and I’ve got the fix.
Picture yourself pulling these out of the oven, the whole kitchen smelling incredible, the cookies still warm and slightly soft, ready to be shared with friends who will be amazed at how simple yet elegant they are. The secret? A small but mighty tweak: using a splash of cold water in the dough before baking. I dare you to taste these and not go back for seconds, because once you try them, you’ll wonder how you ever made them any other way. Let me walk you through every single step—by the end, you’ll wonder how you ever made it any other way.
What Makes This Version Stand Out
- Flavor: The addition of lemon zest brings a bright, citrusy note that cuts through the richness of butter, creating a balanced taste that’s both sweet and refreshing. This subtle twist sets the cookies apart from the standard buttery flavor profile most people expect. The zest also adds a gentle aroma that lingers long after the first bite.
- Texture: The cookies have a tender crumb with a perfectly crisp edge that shatters like thin ice when you bite into them. The use of powdered sugar instead of granulated sugar gives the dough a finer, silkier consistency. The dough’s slightly higher moisture content keeps the cookies soft for several days.
- Visual Appeal: The golden-brown tops gleam with a slight sheen from the butter, and the subtle specks of lemon zest give a hint of color that makes them look as good as they taste. The cookies are uniform in size, ensuring even baking and a professional presentation. The slight translucency of the edges hints at the delicate texture inside.
- Ingredient Quality: I use only unsalted butter and high-quality all-purpose flour to ensure maximum flavor. The use of real lemon zest, not artificial flavoring, elevates the whole experience. Even the baking powder is fresh, which means the cookies rise just enough to stay light.
- Make‑ahead Potential: These cookies can be made in advance and stored for up to a week. The dough keeps well in the fridge, and the baked cookies stay fresh in an airtight container. I love making a big batch for a potluck or a holiday gathering.
- Crowd Reaction: Friends who taste these will often ask for the recipe right after the first bite. I’ve had people say, “I’ve never had a cookie that’s both chewy and crisp like this.” Their enthusiasm proves the cookies hit the right chord.
- Ease of Preparation: Despite the flavorful result, the process is straightforward and doesn’t require any fancy equipment. All you need is a mixing bowl, a rolling pin, and a baking sheet. The recipe is forgiving, making it perfect for beginners.
- Versatility: You can easily adapt this base recipe for variations, such as adding chocolate chips or dried fruit. The dough’s consistency allows for different add-ins without compromising the structure. This makes the cookies a great canvas for creative twists.
Inside the Ingredient List
The Flavor Base
All-purpose flour is the foundation of these cookies, providing structure and a neutral canvas that allows the other flavors to shine. Using 2 cups ensures a balanced crumb that’s neither too dense nor too airy. If you’re craving a slightly nutty undertone, consider substituting half of the flour with almond flour; this will add a subtle depth without altering the dough’s integrity.
Unsalted butter is the key to achieving that rich, buttery taste that melts in your mouth. The 1 cup of butter, chilled and diced, should be at room temperature before you start mixing; this helps create tiny air pockets that contribute to a light texture. If you’re in a hurry, a quick microwave burst can soften the butter slightly, but avoid melting it completely.
The Sweetness and Texture Crew
Powdered sugar gives the dough a smooth, silky feel and reduces clumping, ensuring a uniform crumb. Using 1 cup of powdered sugar also helps the cookies spread just enough for a tender center. If you prefer a slightly more pronounced sweetness, you can add a tablespoon of honey, but this will also affect the spread.
Large eggs act as a binder that holds the dough together while also adding moisture. Two eggs are essential for achieving the right consistency; using a smaller egg can make the dough too dry, while too many can make it too wet. If you’re vegan, a flaxseed meal mixed with water can replace the eggs, though the texture will differ slightly.
The Citrus and Spice Accent
Fresh lemon zest is the star that brightens the flavor profile. A tablespoon of zest adds a burst of citrusy aroma and a subtle tang that cuts through the butter’s richness. If you’re allergic to citrus, you can substitute with a teaspoon of orange zest for a different but equally delightful twist.
A pinch of sea salt is crucial to balance the sweetness and enhance the overall flavor. It’s easy to overlook, but salt brings out the nuances in the butter and sugar. If you prefer a more pronounced salty note, use a half teaspoon, but be careful not to overpower the citrus.
The Final Flourish
Baking powder ensures the cookies rise slightly, giving them a lighter crumb. One teaspoon is enough to provide that lift without making them cake-like. If you’re using a gluten-free flour blend, you might need to double the amount to achieve the same rise.
A small splash of cold water (about a tablespoon) is added to the dough before baking. This step helps to tighten the dough and prevents excessive spreading. It also creates a subtle steam pocket during baking, which contributes to a chewy interior.
Everything's prepped? Good. Let's get into the real action…
The Method — Step by Step
- Start by whisking together the flour, baking powder, and sea salt in a medium bowl. This ensures the leavening agent is evenly distributed, preventing any uneven rising. Let the dry mixture sit for a minute to allow the baking powder to activate. This step also helps you avoid clumps that could ruin the dough’s texture.
- In a separate bowl, cream the chilled butter and powdered sugar until the mixture is light and fluffy, about 3 minutes with an electric mixer on medium speed. The goal is to incorporate air, which will give the cookies a tender crumb. Keep an eye on the color; it should turn a pale ivory.
- Add the eggs one at a time, beating well after each addition. The first egg should be fully incorporated before adding the second to avoid curdling. This step creates a smooth, cohesive dough that’s easy to work with.
- Fold in the dry ingredients gradually, mixing just until the dough comes together. Overmixing can develop gluten, leading to a tougher cookie. If the dough feels too dry, add a splash of cold water; if it’s too wet, sprinkle a tablespoon more flour.
- Stir in the lemon zest, making sure it’s evenly distributed. The zest should be finely grated to avoid large chunks that could affect texture. The aroma that fills the kitchen at this point is a prelude to the deliciousness that’s about to unfold.
- Roll the dough into 1‑inch balls on a lightly floured surface. The dough should feel firm but pliable; if it’s too sticky, dust it lightly with flour. Place the balls on a parchment‑lined baking sheet, spacing them about 2 inches apart to allow for spreading.
- Press each ball gently with the back of a spoon to flatten slightly; this helps create an even thickness. The bottom should be about 1/4 inch thick. A slight flattening ensures the cookies bake uniformly.
- Preheat the oven to 350°F (175°C). Line the baking sheet with parchment paper to prevent sticking. Keep the oven rack in the middle position for even heat distribution.
- Bake the cookies for 12–14 minutes, or until the edges turn a beautiful golden brown. The center should still feel soft; it will firm up as they cool. Keep an eye on the first batch, as oven temperatures can vary.
- Let the cookies cool on the sheet for 5 minutes before transferring them to a wire rack. This allows the bottom to set while the tops finish baking slightly. The result is a cookie that’s crisp on the outside and tender on the inside.
That's it — you did it. But hold on, I've got a few more tricks that'll take this to another level…
Insider Tricks for Flawless Results
The Temperature Rule Nobody Follows
Many bakers set their oven to the maximum setting, but that can cause uneven baking and burnt edges. I recommend preheating for at least 20 minutes and then setting the temperature to 350°F, not higher. The cookies bake evenly, and the edges stay golden without burning. This simple adjustment has saved me countless batches.
Why Your Nose Knows Best
Before you touch the dough, give it a sniff. If it smells like fresh butter and citrus, you’re on the right track. If there’s a metallic or sour note, the dough might have gone stale. Trusting your nose can prevent a batch of underwhelming cookies.
The 5‑Minute Rest That Changes Everything
After mixing, let the dough rest in the fridge for 30 minutes. This step allows the gluten to relax, making the dough easier to roll and resulting in a softer crumb. If you’re in a hurry, a 5‑minute rest at room temperature is better than none.
Keep a Timer, Not a Guess
Set a timer for the exact baking time and stick to it. Even a minute difference can alter the cookie’s texture. I use a kitchen timer app that vibrates, so I’m never tempted to peek too early. Accuracy pays off in flavor and consistency.
Cool on a Rack, Not a Sheet
After baking, transfer the cookies to a wire rack to cool. This lets air circulate around the cookies, preventing them from becoming soggy on the bottom. If you leave them on a sheet, the steam trapped underneath can make them chewy instead of crisp.
Creative Twists and Variations
This recipe is a playground. Here are some of my favorite ways to switch things up:
Chocolate Chip Delight
Add 1/2 cup of semi‑sweet chocolate chips to the dough before baking. The chips melt slightly, creating pockets of molten chocolate in each bite. This version is perfect for chocolate lovers and pairs well with a glass of milk.
Almond Crunch
Replace 1/4 cup of the flour with ground almonds for a nutty texture. The almonds also add a subtle sweetness that complements the lemon. Serve these alongside a cup of espresso for an authentic Italian treat.
Citrus Trio
Mix equal parts lemon, orange, and lime zest into the dough. The citrus combination creates a vibrant, complex flavor profile. These cookies are especially refreshing on a hot summer afternoon.
Spiced Warmth
Add a pinch of cinnamon and a dash of nutmeg to the dry mix. The warm spices give the cookies a cozy feel, reminiscent of a holiday kitchen. Pair them with a cup of chai for a comforting experience.
Caramel Swirl
Drizzle caramel sauce over the tops of the cookies before baking. The caramel caramelizes slightly, creating a sweet, gooey center. This variation is great for a dessert bar or a special occasion.
Herbal Infusion
Incorporate a tablespoon of finely chopped fresh rosemary into the dough. The rosemary adds a savory note that balances the sweetness. These cookies pair wonderfully with a glass of dry white wine.
Storing and Bringing It Back to Life
Fridge Storage
Store the baked cookies in an airtight container at room temperature for up to 5 days. The airtight seal keeps the cookies from drying out while preserving their crispness. If you notice the edges becoming soft, let them rest at room temperature for a few minutes before serving.
Freezer Friendly
For longer storage, place the cookies in a freezer bag, separating layers with parchment paper. Freeze for up to 3 months. When ready to enjoy, let them thaw at room temperature for 30 minutes; the cookies will regain their original texture.
Best Reheating Method
To revive frozen cookies, preheat the oven to 300°F (150°C) and bake for 5–7 minutes. Add a tiny splash of water to the bottom of the baking sheet to create steam, which helps soften the cookie’s interior. This technique restores the cookie’s delightful chew without compromising the crisp edges.