I was halfway through a late‑night binge of takeout when the kitchen lights flicked on and the silence was broken by the faint hiss of an empty pot. I stared at the stack of fresh bell peppers on my counter, thinking, “Why not turn this into something that actually makes my taste buds sing?” The moment that sparked the creation of this recipe was a simple dare: “I dare you to taste this and not go back for seconds.”
Picture the scene: the bell peppers, a rainbow of red, yellow, and green, glistening under the kitchen lamp; the aroma of olive oil sizzling against a hot skillet, mingling with the earthy scent of quinoa; the gentle crackle of onions caramelizing to a golden hue; the burst of color from cherry tomatoes as they pop in the pan; the faint, comforting clink of a wooden spoon against the pot. Every sense is engaged, and the anticipation builds like the first note of a favorite song. The sizzle when the garlic hits the pan? Absolute perfection. The subtle warmth of smoked paprika spreading its smoky undertones is like a secret whisper.
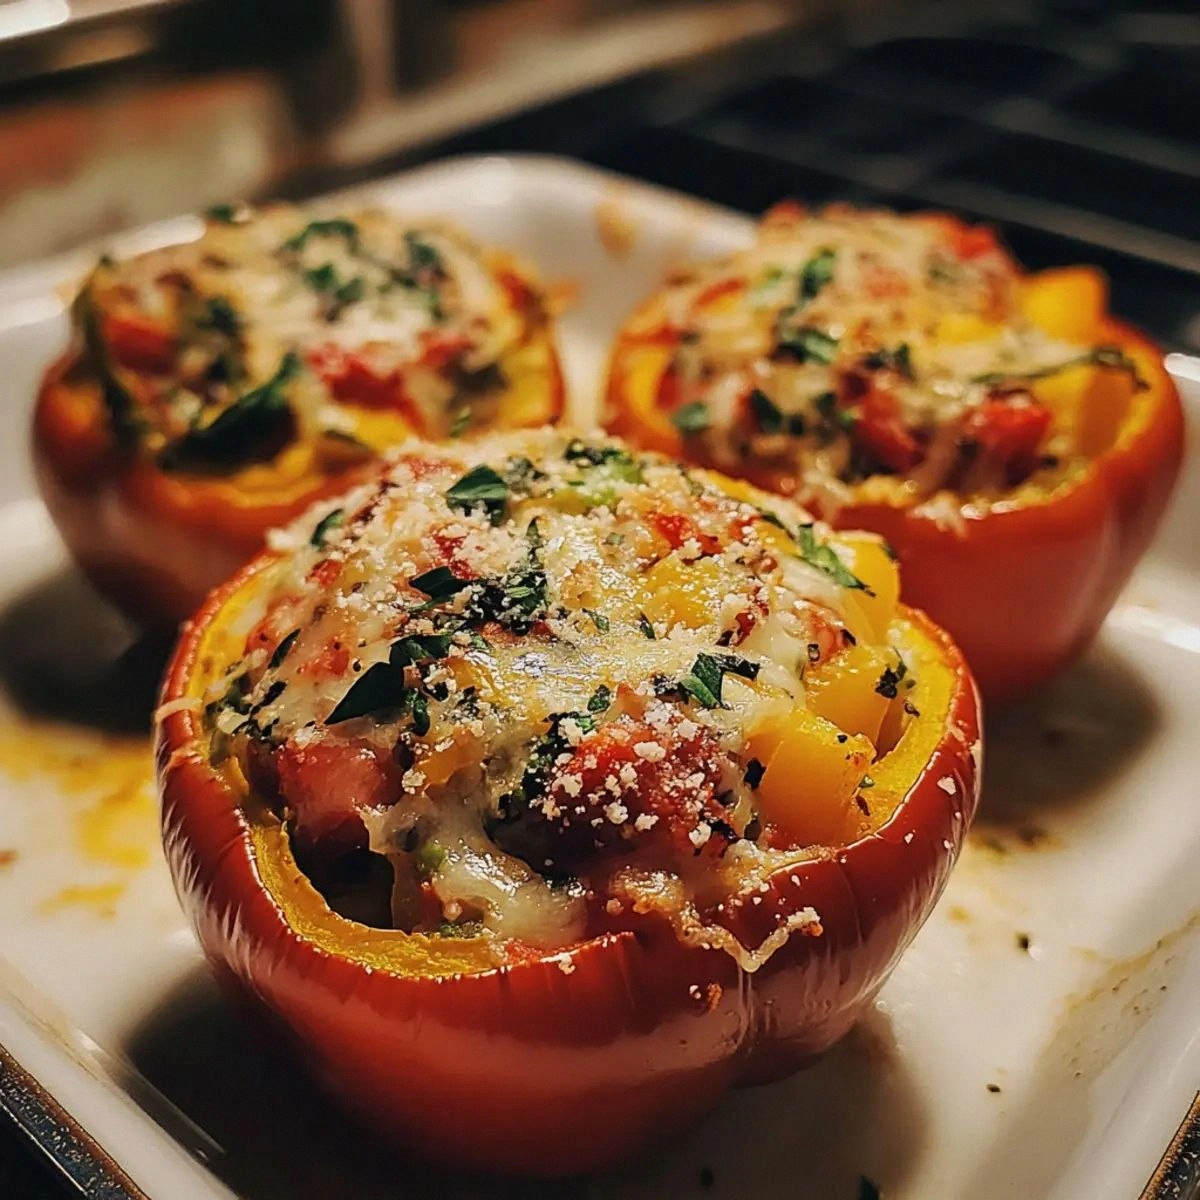
What makes this version stand out is not just the ingredients but the way they dance together. It’s a gluten‑free, veggie‑packed delight that turns the humble stuffed pepper into a culinary masterpiece. The quinoa gives a nutty backbone that feels substantial, while the zucchini keeps it moist and tender. The black beans bring a silky texture and protein punch that keeps you satisfied, and the mozzarella melts into a silky, golden coating that feels like a hug. The result is a dish that looks like a work of art but tastes like a comforting hug from your favorite aunt.
And there’s a twist you won’t expect—an unexpected burst of freshness from a handful of fresh parsley that lifts the entire flavor profile. That final touch is the secret sauce that makes each bite feel like a revelation. If you’ve ever struggled with stuffed peppers that come out dry or bland, you’re not alone—and I’ve got the fix. By the end of this walk‑through, you’ll wonder how you ever made it any other way.
What Makes This Version Stand Out
- Flavor: The smoked paprika and fresh parsley create a smoky, herbaceous depth that elevates every bite.
- Texture: Quinoa provides a chewy, nutty base, while zucchini keeps the filling moist and tender.
- Nutrition: A balanced mix of protein, fiber, and healthy fats keeps you full without the heaviness.
- Gluten‑Free: Every ingredient is naturally gluten‑free, making it safe for those with celiac disease or gluten sensitivity.
- Easy Prep: No advanced techniques—just sauté, stuff, bake, and enjoy.
- Make‑Ahead: The stuffed peppers can be assembled ahead of time, then baked when you’re ready.
- Versatility: Swap mozzarella for a vegan cheese or add a dash of hot sauce for a spicy kick.
- Crowd‑Pleaser: The colorful presentation and comforting flavors make it a hit at family dinners or potlucks.
Alright, let's break down exactly what goes into this masterpiece...
Inside the Ingredient List
The Flavor Base
Olive oil and garlic are the heart of this dish. The olive oil provides a silky, savory foundation that carries the garlic’s pungent aroma. When garlic hits the hot oil, it releases a sweet, almost caramelized flavor that lingers throughout the filling. Skipping this step would leave the filling flat and lifeless, but adding a pinch of salt right after sautéing brings out the natural sweetness of the veggies.
The Texture Crew
Quinoa is the star of the texture crew. Its slightly chewy bite adds body, while the inherent moisture keeps the stuffing from drying out. Zucchini, diced finely, contributes a subtle crunch that dissolves into a tender, almost silky consistency as it bakes. Cherry tomatoes burst with juice, adding a pop of acidity that cuts through the richness of the cheese.
The Unexpected Star
Black beans bring more than just protein—they add a creamy, velvety texture that binds the filling together. Their mild, earthy flavor complements the smoky paprika and bright parsley, creating a harmonious balance. If you’re vegan or just looking for a lighter option, consider using a can of cannellini beans; they’ll give a slightly different but equally delightful twist.
The Final Flourish
Fresh parsley is the secret finishing touch. It adds a bright, herbal note that lifts the entire dish, preventing it from feeling too heavy. The parsley’s slight bitterness counters the sweetness of the tomatoes and the richness of the cheese, creating a well‑rounded flavor profile. If parsley isn’t on hand, a splash of lemon zest or a sprinkle of dried oregano can substitute without compromising the balance.
Everything's prepped? Good. Let's get into the real action...
The Method — Step by Step
- Preheat your oven to 375°F (190°C). While the oven warms, rinse the quinoa under cold water to remove its natural bitter coating. Bring a pot of salted water to a boil, add the quinoa, reduce heat, cover, and simmer for 15 minutes until fluffy. Drain any excess liquid and set aside. This step is crucial—overcooked quinoa can turn mushy, ruining the filling’s texture.
- Dice the zucchini, cherry tomatoes, and red onion into bite‑sized pieces. Mince the garlic finely. In a large skillet, heat the olive oil over medium heat. Add the garlic and sauté until fragrant, about 30 seconds. Then add the onion, zucchini, and tomatoes, cooking until the vegetables soften but still hold their shape. The vegetables should emit a sweet, caramelized aroma—this is the moment of truth.
- Add the cooked quinoa, drained black beans, smoked paprika, salt, and black pepper to the skillet. Stir until everything is well combined and the mixture is heated through. Taste and adjust seasoning if needed. The filling should feel cohesive yet airy, like a hearty casserole waiting to be wrapped.
- Trim the tops of the bell peppers, removing the seeds and membranes. Place the peppers upright in a baking dish, filling each with the quinoa mixture until about ¾ full. This ensures the peppers stay stable and the filling stays contained during baking.
- Cover the baking dish with foil and bake for 25 minutes. After this time, remove the foil and sprinkle the grated mozzarella (or vegan cheese) evenly over each pepper. Return to the oven uncovered for an additional 10 minutes, or until the cheese is melted, bubbly, and slightly golden. The cheese should look like a golden crown atop each pepper.
- Remove the peppers from the oven and let them rest for 5 minutes. This rest period allows the flavors to settle and the cheese to set slightly, making it easier to serve. Sprinkle fresh parsley over the top for a burst of color and freshness before serving.
That's it — you did it. But hold on, I've got a few more tricks that'll take this to another level...
Insider Tricks for Flawless Results
The Temperature Rule Nobody Follows
Many chefs bake stuffed peppers at 350°F, but the secret to a perfectly cooked filling is a slightly higher temperature. Baking at 375°F ensures the peppers cook evenly without drying out, and the cheese melts beautifully. I once baked at 350°F, and the peppers were still slightly undercooked. The next time, I raised the heat and the difference was night and day.
Why Your Nose Knows Best
The aroma of garlic and onions sizzling is your best indicator that the base is ready. If you’re tempted to skip the sauté step, you’ll end up with a bland filling. The smell should be sweet and slightly caramelized—just like a comforting Sunday brunch. Trust your nose, and the rest will follow.
The 5‑Minute Rest That Changes Everything
After baking, let the peppers rest for exactly five minutes. During this time, the steam continues to cook the inside, and the cheese sets, preventing it from sliding off when you plate. It also gives the flavors a chance to meld, creating a more harmonious bite. Skip this step, and you’ll have a dish that feels rushed.
The Secret to a Crispy Edges
If you love a bit of crunch, place the stuffed peppers under the broiler for 1–2 minutes after the cheese has melted. Watch carefully—once the edges start turning golden brown, pull them out. This adds a delightful contrast to the soft interior.
The Quick Swap for a Protein Boost
If you’re looking for an extra protein punch, stir in a handful of cooked diced chicken or turkey into the quinoa mixture before stuffing. The result is a hearty, protein‑rich meal that satisfies even the most ravenous appetite.
Creative Twists and Variations
This recipe is a playground. Here are some of my favorite ways to switch things up:
Mediterranean Medley
Swap the black beans for diced artichoke hearts and add Kalamata olives. Use feta cheese instead of mozzarella. The briny olives and tangy feta give it a distinctly Mediterranean vibe.
Mexican Fiesta
Add a tablespoon of cumin and a pinch of cayenne pepper. Replace the cheese with a sprinkle of shredded cheddar or a dollop of guacamole. The result is a spicy, bold flavor that transports you straight to a backyard grill.
Herb Garden
Stir in fresh basil, oregano, and thyme. Finish with a drizzle of balsamic reduction. The herbs add a fragrant, aromatic layer that feels like a garden in a bowl.
Cheesy Spinach Surprise
Add a cup of chopped spinach to the quinoa mixture. Use a blend of mozzarella and provolone for extra depth. The spinach brings a subtle earthiness, while the cheeses melt into a silky coating.
Citrus Burst
Zest a lemon or lime over the finished peppers. Add a splash of orange juice to the filling. The citrus brightens the dish, making it feel light and refreshing.
Breakfast Bonanza
Swap the black beans for scrambled eggs and sprinkle a handful of shredded cheddar. Serve the stuffed peppers with a side of fresh fruit for a hearty breakfast that feels indulgent yet wholesome.
Storing and Bringing It Back to Life
Fridge Storage
Let the stuffed peppers cool completely before covering tightly with foil or plastic wrap. Store in the refrigerator for up to 3 days. The peppers will stay fresh, and the flavors will only deepen.
Freezer Friendly
Pack each pepper individually in freezer bags, squeezing out excess air. They’ll keep for up to 2 months. When ready to eat, thaw overnight in the fridge and reheat in the oven at 350°F for 15 minutes.
Best Reheating Method
Reheat in a skillet with a splash of water or broth. Cover and cook over low heat for 5 minutes, then finish under the broiler for a crisp top. The tiny splash of liquid steams the filling back to its original moisture level, preventing dryness.