I was halfway through a disastrous attempt at a chocolate trifle when my phone buzzed with a friend’s dare: “Make the best no‑bake bar ever and show me.” The kitchen smelled of melted butter and burnt sugar, and I was ready to quit. Instead, I grabbed a tub of vanilla ice cream, a jar of hot fudge, and a bag of crunchy red‑skin peanuts. I set my sights on turning that chaos into a masterpiece that would have you shouting, “I dare you to taste this and not go back for seconds.”
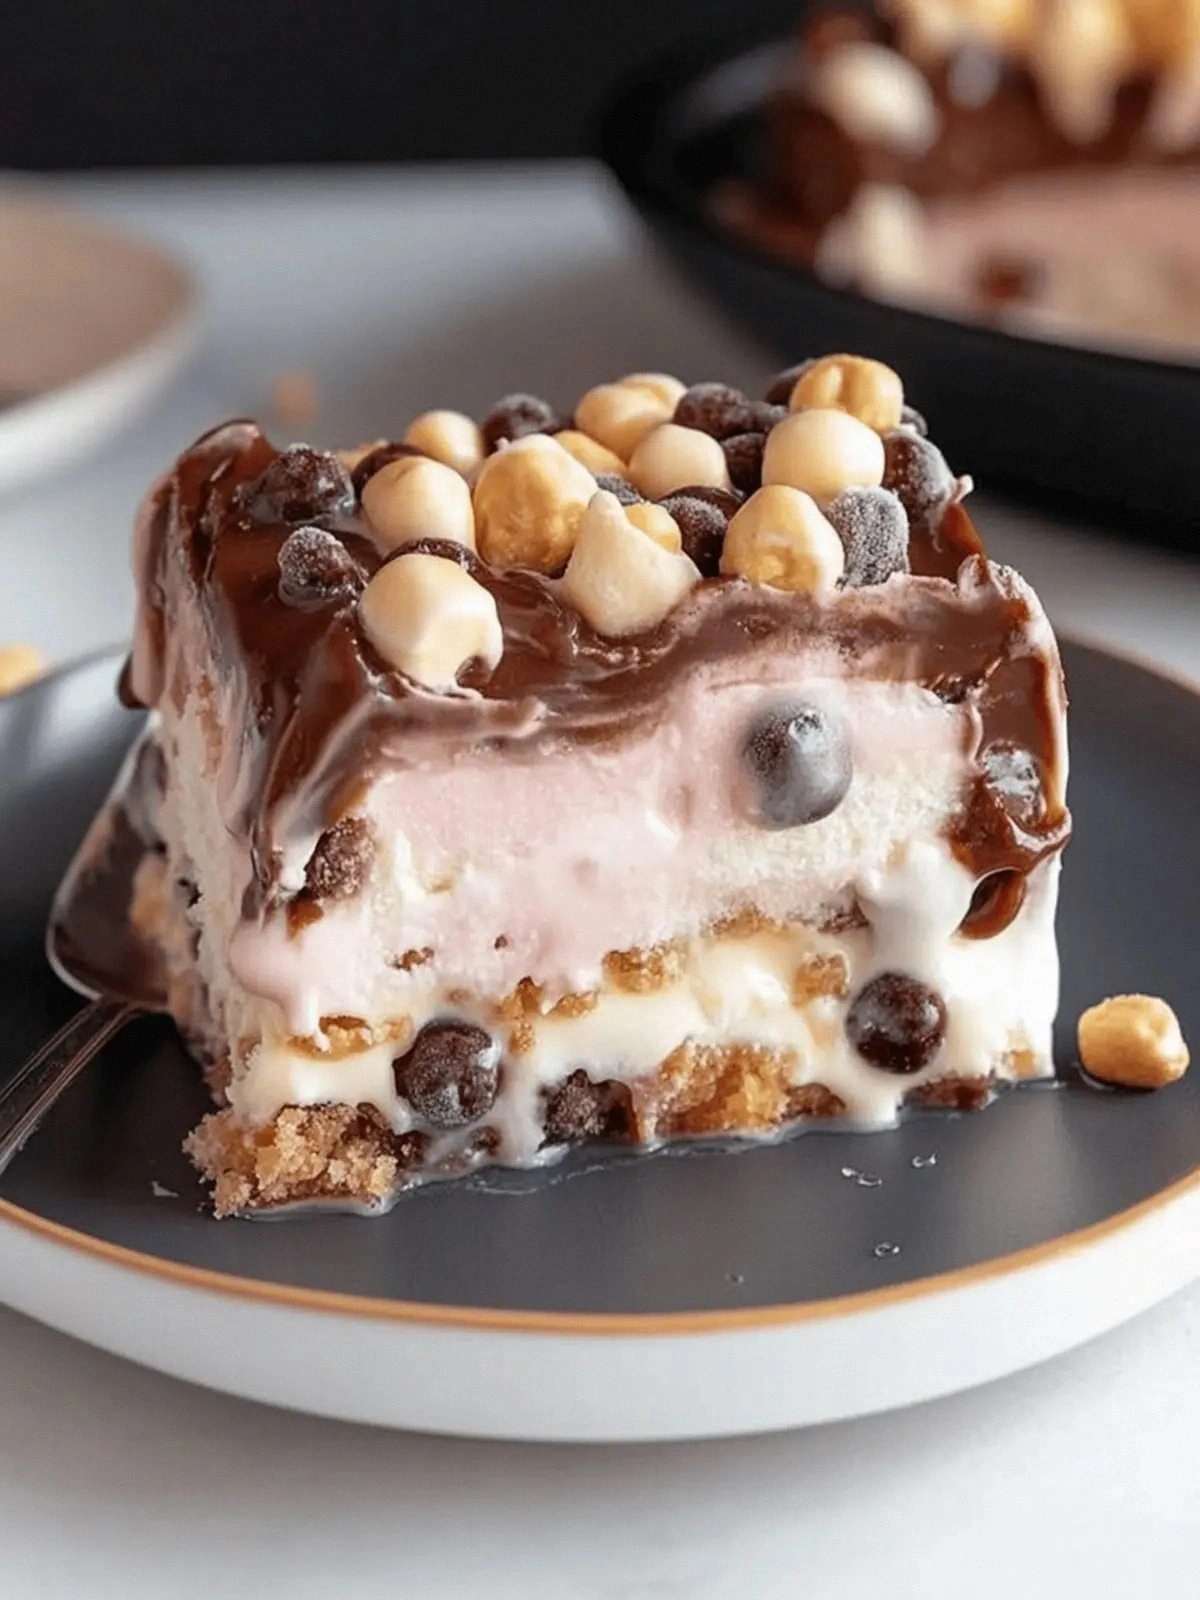
Picture the moment: a bowl of silky vanilla ice cream, a drizzle of glossy hot fudge that glistens like liquid velvet, and a scattering of chocolate graham crackers that crackle with each bite. The aroma is a sweet, buttery wave that rolls across the countertop, making even the most skeptical taste buds tingle. The texture? Imagine a creamy center that melts in your mouth, surrounded by a crunchy shell that snaps like thin ice when you bite through it. The flavor profile is a harmonious blend of chocolate, peanut, and vanilla, with a subtle caramel undertone from the hot fudge.
This isn’t just another no‑bake dessert. It’s a symphony of flavors that dance on the tongue, a textural contrast that satisfies cravings, and a recipe that’s so simple you’ll wonder how you ever made it any other way. The secret? A single, unexpected ingredient that ties everything together: Magic Shell chocolate coating. It gives the bar a glossy finish that’s almost too pretty to eat, while adding a hint of caramelized sugar that elevates the taste to new heights.
By the end of this post, you’ll have a bar that feels indulgent yet surprisingly easy to make—perfect for midnight cravings or a sweet party finale. And if you’re wondering how to keep it from melting too quickly, stay tuned for the insider tricks that will keep your creation firm until the last bite. Let me walk you through every single step — by the end, you’ll wonder how you ever made it any other way.
What Makes This Version Stand Out
- Flavor Depth: The combination of vanilla ice cream, hot fudge, and Magic Shell creates a layered taste that’s richer than a classic chocolate bar. Each bite offers a new nuance, from the creamy vanilla to the caramelized sugar finish.
- Texture Contrast: The crisp graham crackers provide a satisfying crunch that contrasts beautifully with the smooth ice cream center. The peanuts add a nutty chew, while the chocolate coating offers a glossy snap.
- Ease of Preparation: No oven, no stove, just a handful of ingredients and a few minutes of mixing. Even novice bakers can pull this off without a single mistake.
- Make‑Ahead Friendly: Once assembled, the bars can be refrigerated for up to a week or frozen for months. They’re ideal for parties or for a quick dessert when you’re short on time.
- Visual Appeal: The glossy chocolate shell and the colorful peanut topping make the bars look as good as they taste, turning a simple dessert into a showstopper.
- Ingredient Quality: Using high‑quality chocolate graham crackers and premium vanilla ice cream ensures that each bite is pure bliss. The Magic Shell coating adds a professional touch that elevates the whole experience.
- Portability: The bars hold their shape well, making them perfect for take‑out or for gifting to friends who love indulgent treats.
- Low Fat, High Satisfaction: While indulgent, the recipe keeps the calorie count moderate, giving you that guilty‑pleasure feeling without the overload.
Alright, let's break down exactly what goes into this masterpiece…
Inside the Ingredient List
The Flavor Base
The vanilla ice cream is the heart of this bar. It provides a creamy, sweet foundation that balances the richness of the chocolate. When you scoop it into the base, it should be slightly softened—just enough to spread without melting too quickly. If you use a lower‑fat version, the texture will be firmer, which can help the bar hold its shape better when chilled.
The Texture Crew
Chocolate graham crackers are the crunchy backbone of the bar. They add a buttery crunch that breaks the creamy smoothness into bite‑size pieces. The peanuts bring a nutty crunch and a salty contrast that elevates the overall flavor profile. Together, they create a satisfying mouthfeel that keeps you coming back for more.
The Unexpected Star
Magic Shell chocolate coating is the secret weapon that makes this recipe shine. It’s a smooth, glossy coating that sets quickly, giving the bar an instant “store‑bought” finish. The coating also helps seal in moisture, preventing the ice cream from seeping out. If you can’t find Magic Shell, you can melt a high‑quality chocolate bar and drizzle it over, but the texture won’t be as crisp.
Everything's prepped? Good. Let's get into the real action…
The Method — Step by Step
- First, line a 9x9 inch square pan with parchment paper. Press the parchment firmly into the corners so it doesn’t lift later. This will create a non‑stick surface for the base and make cleanup a breeze.
- In a large bowl, crush the chocolate graham crackers until they resemble coarse crumbs. Use a rolling pin or a food processor—just enough pressure to break them into small pieces without turning them into fine dust.
- Add the softened vanilla ice cream to the cracker crumbs. Stir gently with a spatula until the mixture is evenly moistened. The batter should hold together when pressed; if it’s too loose, add a splash of milk or a teaspoon of powdered sugar.
- Press the batter into the prepared pan, forming an even layer about 1 inch thick. Use a flat spatula to smooth the surface. This will be the foundation that supports the rest of the ingredients.
- Sprinkle the red‑skin peanuts evenly over the top. Gently press them into the batter so they’re partially embedded. The peanuts will pop when you bite, adding a delightful crunch.
- Drizzle the hot fudge sauce over the peanuts. The sauce should coat each nut and seep into the cracks between the crackers. The heat of the fudge will caramelize slightly, creating a glossy glaze.
- Fold in the Magic Shell chocolate coating. It’s best to do this in a small bowl, melting it gently in the microwave for 20‑30 seconds. Drizzle the melted coating over the entire surface, letting it cascade down the sides. The coating sets in a few minutes, forming a firm shell.
- Refrigerate the pan for at least 2 hours, or until the coating is fully set and the bar is firm. If you’re short on time, a quick 30‑minute chill will work, but the texture will be slightly softer.
That’s it — you did it. But hold on, I've got a few more tricks that'll take this to another level…
Insider Tricks for Flawless Results
The Temperature Rule Nobody Follows
The key to a perfect shell is temperature control. If the ice cream is too cold, it will freeze the hot fudge too quickly, creating a hard, uneven coating. Let the ice cream sit at room temperature for 5 minutes before mixing. This slight softening allows the fudge to spread evenly and creates a smoother finish.
Why Your Nose Knows Best
Smell the mixture before setting it in the fridge. A faint caramel scent indicates the hot fudge has caramelized slightly, which is what gives the bar its sweet depth. If the aroma is overly sweet, let it sit a bit longer; if it’s too bland, add a pinch of sea salt to lift the flavors.
The 5‑Minute Rest That Changes Everything
After pouring the Magic Shell coating, give the bar a 5‑minute rest before chilling. This brief pause allows the coating to settle and the flavors to meld. The result is a more cohesive texture and a glossy finish that’s hard to resist.
The Peanut Perfection Technique
When adding peanuts, press them lightly into the batter so they’re not too loose. Loose peanuts will float to the top and create a lumpy texture. The slight embedding ensures each bite delivers a balanced crunch.
The Quick Chill Trick
If you’re in a hurry, place the pan in the freezer for 15 minutes. The rapid freeze sets the coating quickly, preventing the ice cream from melting. Just be careful not to over‑freeze; the bar should still be pliable.
Creative Twists and Variations
This recipe is a playground. Here are some of my favorite ways to switch things up:
Coconut Crunch Edition
Swap the peanuts for toasted coconut flakes and use coconut‑flavored ice cream. The result is a tropical treat with a chewy, caramelized coconut finish. It’s perfect for beach parties or summer gatherings.
Dark Chocolate Delight
Replace the vanilla ice cream with a rich dark chocolate ice cream and use dark chocolate graham crackers. The deep, bitter notes complement the sweet fudge, creating a sophisticated flavor profile. It’s a hit with adult crowds.
Salted Caramel Surprise
Drizzle salted caramel sauce instead of hot fudge. The salty caramel balances the sweetness and adds a luxurious texture. This version is ideal for dessert tables where you want to impress with something extra.
Berry Bliss Variation
Fold in a handful of fresh raspberries before setting the bar. The berries add a burst of tartness that cuts through the sweetness. Cover the top with a thin layer of white chocolate for a polished look.
Nutty Banana Boost
Add sliced bananas to the base and top with chopped walnuts. The banana’s natural sweetness pairs well with the peanut flavor, while the walnuts add a crunchy texture. This variation is great for a healthier twist.
Minty Fresh Twist
Incorporate a few drops of peppermint extract into the ice cream mixture. The mint provides a refreshing aftertaste that balances the richness of the chocolate. This version is especially popular during holiday seasons.
Storing and Bringing It Back to Life
Fridge Storage
Store the bars in an airtight container in the refrigerator for up to 5 days. Keep them covered to prevent the coating from absorbing odors from other foods. When ready to serve, let them sit at room temperature for 5 minutes to soften slightly.
Freezer Friendly
For longer storage, wrap each bar individually in parchment paper and place them in a freezer bag. They’ll keep for up to 3 months. When you’re ready to eat, thaw in the refrigerator overnight, then let them sit at room temperature for 10 minutes.
Best Reheating Method
If the bars have become too hard after freezing, warm them in a microwave on low power for 10‑15 seconds. Add a tiny splash of water before reheating; the steam helps restore the original melt‑in‑your‑mouth texture. Avoid overheating, or the coating will become sticky.