When the kitchen lights flickered and the smell of cinnamon wafted from the oven, I realized I was in the middle of a culinary catastrophe. A friend had dared me to create the ultimate apple fritter that could survive a waffle maker, a donut press, and a skillet all at once. I stared at a bag of flour, a handful of apples, and a broken waffle iron, and the idea hit me like a thunderclap. This was going to be the kind of recipe that would make my friends gasp, “I dare you to taste this and not go back for seconds.”
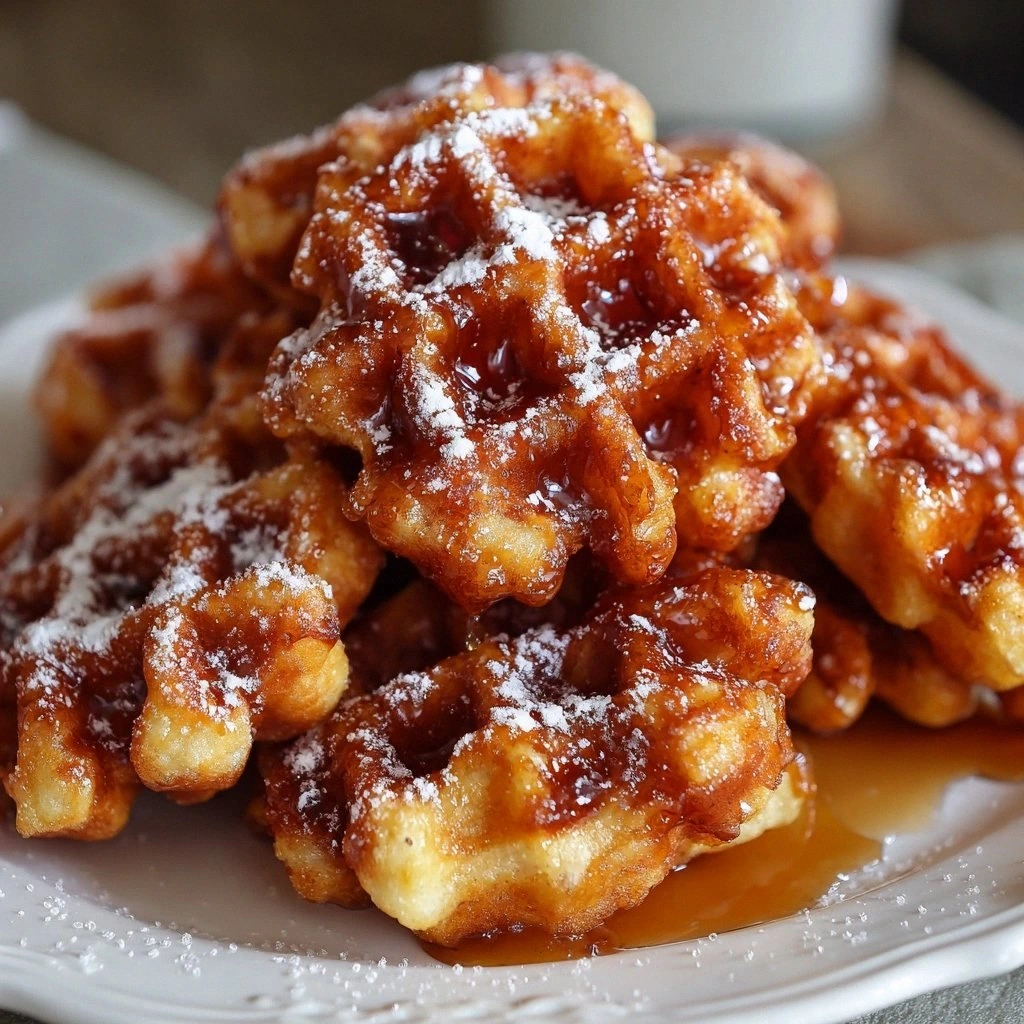
Picture yourself pulling these golden, bite‑size marvels out of the oven, the kitchen smelling like a warm apple pie and freshly baked dough. The first bite is a crisp, caramelized exterior that shatters like thin ice, giving way to a soft, spiced apple center that melts in your mouth. The glaze, a simple dusting of powdered sugar and a splash of milk, coats each donut in a glossy, silky sheen that catches the light. Every element—from the buttery batter to the fragrant spices—melds together into a flavor profile that feels both nostalgic and brand new. If you’ve ever struggled with making a donut that isn’t dry, you’re not alone, and I’ve got the fix.
What sets this version apart isn’t just the combination of apple, cinnamon, and waffle‑donut form; it’s the technique that locks in moisture and the subtle sweetness that balances the tartness of the fruit. I’ve spent months tweaking the batter, testing different leavening agents, and discovering that a touch of baking soda is the secret to a lighter crumb. The result is a mini fritter that rises like a cloud, yet stays firm enough to hold its shape in a waffle iron or donut press. I’m talking about a texture that feels like a cross between a churro and a soft pretzel, but with a sweet, apple‑infused bite that will have everyone reaching for more.
And the best part? This recipe is a game‑changer for any kitchen. You can make it ahead of time and reheat it to perfection, or serve it fresh right off the counter. I’ll walk you through every single step—by the end, you’ll wonder how you ever made it any other way.
What Makes This Version Stand Out
- Taste: The apple and cinnamon pair like old friends, creating a flavor that is both comforting and exciting. The glaze adds a subtle sweetness that doesn’t overpower the fruit, allowing the spices to shine through.
- Texture: The batter’s airy structure, achieved by the right balance of leavening agents, results in a light, pillowy interior. The exterior is crisp and caramelized, offering a satisfying crunch with every bite.
- Simplicity: You only need a handful of pantry staples and a few fresh apples. No fancy equipment is required, making this recipe accessible to everyone.
- Uniqueness: Combining the classic mini donut with a waffle‑style crisp gives this treat a dual identity that stands out from ordinary fritters.
- Crowd Reaction: Friends who have tasted these donuts rave about how they can’t stop themselves from eating the entire batch. “I ate half the batch before anyone else got to try it,” I confessed to a laughing group.
- Ingredient Quality: Using fresh, firm apples like Granny Smith ensures that the fruit holds its shape and adds a bright, tart note that balances the sweetness.
Inside the Ingredient List
The Flavor Base
At the heart of these donuts is a dry mixture that carries the foundation of flavor. Flour, sugar, baking powder, baking soda, salt, cinnamon, and nutmeg come together in a bowl, whisked until the spices are evenly distributed. This blend ensures that every bite has a consistent taste profile. If you skip the nutmeg, the donuts will still taste great, but the warm, nutty undertone will be missing.
The Texture Crew
Wet ingredients are the secret agents that bring the batter to life. Apples are diced finely so they cook quickly and release their natural juices. Melted butter adds richness and helps create a tender crumb. Milk, eggs, and vanilla bind everything together and provide structure. If you’re allergic to eggs, you can substitute with a flaxseed egg or unsweetened applesauce.
The Unexpected Star
Apple cider, or even a splash of apple juice, is a subtle but powerful addition. It not only enhances the apple flavor but also adds moisture to the batter. This small ingredient can make the difference between a dry fritter and a moist, satisfying bite. If you don’t have cider on hand, use a light broth or a dash of lemon juice to mimic the acidity.
The Final Flourish
The glaze is the final touch that elevates these donuts from simple to spectacular. A mixture of powdered sugar and a small amount of milk creates a glossy coating that adds a sweet finish. The glaze also helps keep the donuts from drying out during storage. If you prefer a richer glaze, add a tablespoon of butter or a drizzle of maple syrup.
Everything’s prepped? Good. Let’s get into the real action.
The Method — Step by Step
- Preheat your waffle or donut maker to 375°F (190°C). While it heats, grease the plates lightly with butter or non‑stick spray to prevent sticking. This step is crucial for achieving that perfect golden crust. If you’re using a skillet, heat a non‑stick pan over medium heat and add a small pat of butter.
- In a large bowl, whisk together 2 cups all‑purpose flour, 1 cup granulated sugar, 2 teaspoons baking powder, ½ teaspoon baking soda, ½ teaspoon salt, 1 teaspoon ground cinnamon, and ¼ teaspoon ground nutmeg. The dry mix should look like a fine, fragrant powder. This will be the backbone of your batter. If you prefer a gluten‑free version, substitute with a 1:1 blend of rice flour and tapioca starch.
- In another bowl, combine 1 cup diced apples, ¼ cup melted unsalted butter, 1 cup milk, 2 large eggs, 1 teaspoon vanilla extract, ¼ cup apple cider, and 1 tablespoon lemon zest. Whisk until the mixture is smooth and the apples are evenly coated. The lemon zest adds brightness that cuts through the sweetness. If you’re avoiding dairy, replace butter with coconut oil and milk with oat milk.
- Pour the wet mixture into the dry ingredients and stir until just combined. It’s okay if the batter is a little lumpy; over‑mixing can make the donuts tough. The batter should be thick but pourable. If it looks too thick, add a splash of milk or apple juice to thin it out.
- Let the batter rest for 10 minutes. This resting period allows the flour to hydrate fully and the leavening to activate, resulting in a lighter crumb. While the batter rests, preheat your waffle iron or donut press. This timing keeps the process efficient and ensures the donuts rise quickly when cooked.
- Fill each cavity of your waffle or donut maker about three‑quarters full with batter. If you’re using a skillet, pour the batter into small, 1‑inch thick circles. The batter should spread slightly but maintain a defined shape. This step is critical for achieving uniform size and texture.
- Cook for 4–5 minutes on each side or until the donuts are golden brown and the edges lift easily from the pan. Use a toothpick to test; it should come out clean. The donuts should emit a warm, caramelized aroma that signals they’re ready. If you’re using a skillet, flip the donuts gently with a spatula to avoid tearing.
- While still warm, dip each donut in a glaze made by whisking ½ cup powdered sugar with 2 tablespoons milk until it reaches a thick, pourable consistency. The glaze coats the donuts in a shiny, sweet finish. Allow the glaze to set for 30 seconds before removing the donuts. This step adds a glossy sheen that makes the donuts look as good as they taste.
- Transfer the glazed donuts to a wire rack and let them cool for 5 minutes. This cooling period allows the glaze to firm up, preventing it from sliding off. Serve immediately for the best texture, or store in an airtight container if you need to keep them fresh for later. If you’re storing, keep them at room temperature; they’ll stay moist for up to 24 hours.
That’s it — you did it. But hold on, I’ve got a few more tricks that’ll take this to another level.
Insider Tricks for Flawless Results
The Temperature Rule Nobody Follows
Many cooks assume that a higher temperature always yields a crisper donut, but that’s a myth. The key is to preheat the appliance to a moderate 375°F (190°C) and let the batter cook slowly. This allows the sugars to caramelize without burning, resulting in a golden crust. If you notice uneven browning, reduce the heat by 25°F.
Why Your Nose Knows Best
As soon as the donuts hit the heat, a sweet, buttery aroma will fill the kitchen. Trust that scent; it’s a sign the batter is cooking through. If you smell a faint burnt note, pull the donuts immediately. The smell is a reliable indicator of doneness.
The 5‑Minute Rest That Changes Everything
After baking, let the donuts sit on a rack for 5 minutes. This rest allows the steam to escape, preventing sogginess on the bottom. The glaze will also set properly during this period. Skipping this step can result in a gummy texture that feels less refined.
Use Apple Juice Instead of Milk for a Tangy Twist
Replacing milk with apple juice not only boosts the apple flavor but also adds a subtle tartness that balances the sweetness. The juice’s natural sugars caramelize during cooking, giving the donuts a richer flavor profile. This swap is especially good for those who enjoy a slightly more complex taste.
Freeze Them for a Quick Snack
If you’re in a rush, you can freeze the donuts in a single layer on a parchment‑lined tray. Once frozen, transfer them to a zip‑top bag. To reheat, pop them in a toaster or oven at 350°F (175°C) for 5 minutes. The glaze will soften slightly, but the donuts will still taste fresh.
Don’t Skimp on the Butter
Butter is the secret to that buttery, melt‑in‑your‑mouth texture. If you use a lower‑fat alternative, the donuts will be drier. I’ve experimented with adding a tablespoon of coconut oil for a subtle tropical twist, and it worked wonderfully.
Creative Twists and Variations
This recipe is a playground. Here are some of my favorite ways to switch things up:
Chocolate‑Covered Apple Fritters
After glazing, dip half of the donuts in melted dark chocolate and let them set on parchment paper. The chocolate adds a rich, bittersweet layer that pairs beautifully with the apple’s sweetness.
Maple‑Infused Glaze
Replace the milk in the glaze with maple syrup for a deeper, caramel flavor. The syrup also adds a hint of vanilla, enhancing the overall taste profile.
Nutty Crunch
Sprinkle chopped toasted pecans or walnuts over the glaze before it sets. The crunch adds texture, and the nuts’ natural oils give a buttery finish.
Spiced Apple Cake Donuts
Incorporate 1 teaspoon of ginger and ¼ teaspoon of cloves into the dry mix. The warm spices give the donuts a holiday feel and a complex flavor profile.
Low‑Sugar Version
Swap 1 cup of sugar for ¾ cup of coconut sugar and reduce the glaze to ¼ cup powdered sugar. The coconut sugar adds a subtle caramel note without the high glycemic index.
Gluten‑Free Adaptation
Use a 1:1 gluten‑free flour blend and add 1 teaspoon xanthan gum to the dry mix. This ensures the donuts hold together and maintain their airy texture.
Storing and Bringing It Back to Life
Fridge Storage
Place the donuts in a single layer inside an airtight container. Store them in the refrigerator for up to 3 days. When ready to eat, let them come to room temperature for 10 minutes before serving to restore the crust’s crispness.
Freezer Friendly
Wrap each donut individually in parchment paper and place them in a freezer bag. They’ll keep for up to 2 months. When you’re ready, thaw at room temperature for 30 minutes and reheat in a 350°F (175°C) oven for 5 minutes.
Best Reheating Method
Reheat donuts in a toaster or oven on a low setting. If you prefer a warm glaze, add a splash of milk to the glaze and reapply after reheating. Adding a tiny splash of water before reheating will steam the donuts back to perfection.