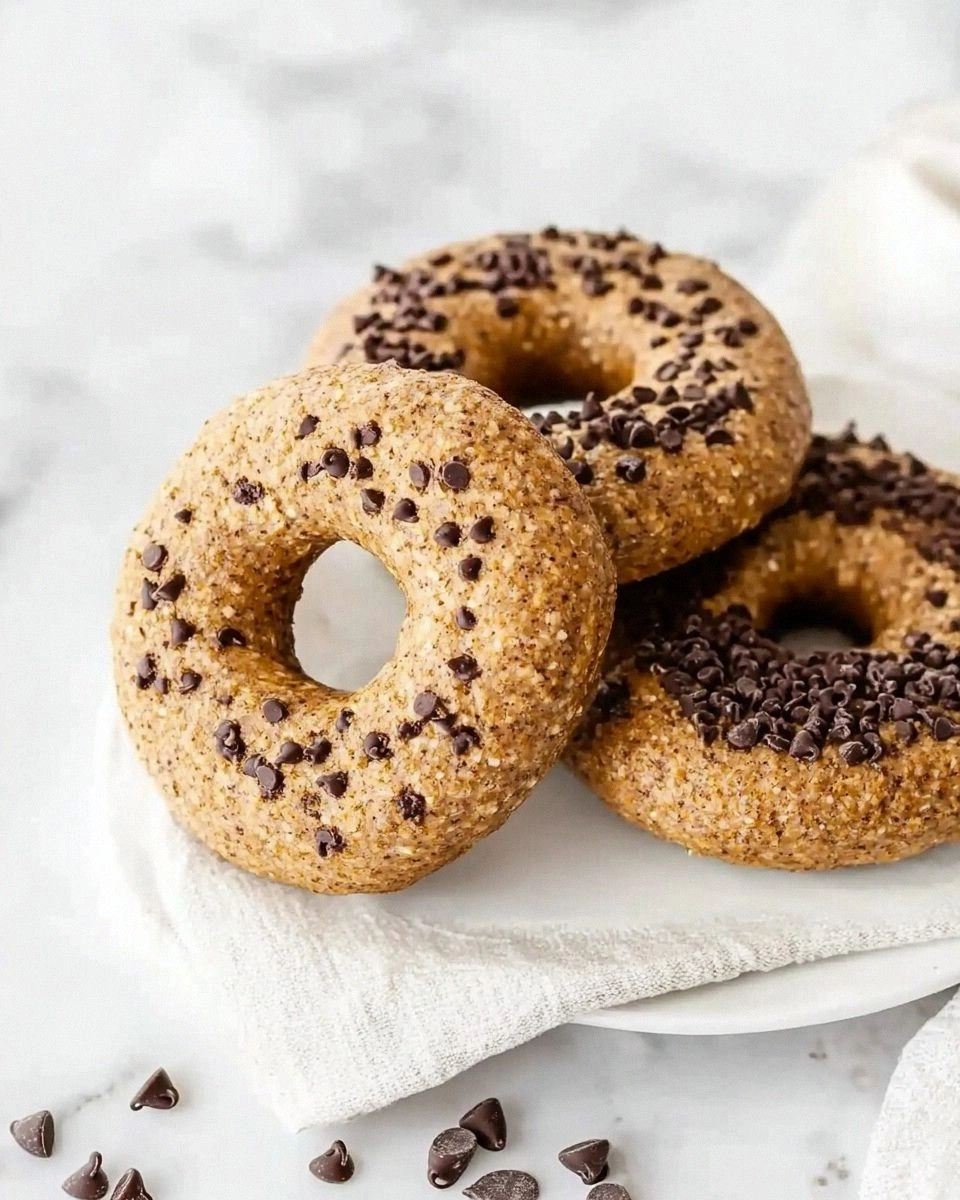
Picture this: I'm standing in my kitchen, flour dusting my apron, when the bagel dough decides to rebel. The instant yeast fizzed like a tiny volcano, and the dough began to swell in the bowl, making my eyes water from the sudden aroma of toasted oats. I stared at the bowl, half convinced it was a prank, until I realized I had accidentally added a splash of warm milk instead of water. That tiny mistake turned my bagels into something oddly sweet, and I couldn't help but taste a half dozen before anyone else even noticed. I was honest—half the batch vanished in minutes, leaving me with a guilty grin. That moment sparked a mission: to find the ultimate oat flour bagel that would keep my kitchen smelling incredible and my friends begging for seconds.
I had tried every bagel recipe I could find, from classic wheat to gluten‑free blends, but none delivered that chewy center and crisp crust that makes bagels a bite‑sized celebration. Every attempt felt like a compromise—too dry, too dense, or lacking that satisfying bite. Then I stumbled across a handful of oat‑flour recipes that promised a lighter texture, but they all fell short on flavor. I was ready to experiment, to push the boundaries of what oat flour could do. I decided to blend the best of both worlds: the wholesome crunch of oats with a touch of sweetness and a secret trick that locks in moisture. The result? A bagel that’s hands down the best version you'll ever make at home.
Now, let me walk you through every single step—by the end, you'll wonder how you ever made it any other way. I’ll share the technique that ensures a perfect rise, the exact water temperature that activates the yeast without killing it, and the little trick of adding a teaspoon of baking powder to give the bagels that lift. I’ll also reveal why I chose oat flour over other gluten‑free blends, and how a pinch of salt can turn a bland dough into a flavor powerhouse. Picture yourself pulling these golden rings out of the oven, the whole kitchen smelling incredible, and the edges shattering like thin ice as you bite into them. The texture will be chewy inside, with a crisp, caramelized crust that makes you want to taste again and again. And if you’re still skeptical, I dare you to taste this and not go back for seconds.
I’ve been in that kitchen, watching dough rise, feeling the anticipation build, and I know the joy that comes from a perfect bagel. I’ve also learned the hard way that the smallest misstep can ruin the whole batch. That’s why I’ll keep you on the edge of your seat, explaining each move as if we were cooking side by side. I’ll point out the subtle cues—when the dough should feel tacky, when it should be smooth, and when the first bubble appears. I’ll also give you the confidence to tweak the recipe for your taste, knowing you’ll still end up with the same mouth‑watering result. Ready? Let’s dive in.
What Makes This Version Stand Out
- Taste: The subtle sweetness of oat flour combined with a hint of honey creates a flavor profile that feels both familiar and adventurous. It’s the kind of taste that makes you pause mid‑bite, savoring each chew.
- Texture: The dough rises to a chewy center while the crust crisps to a golden caramelized finish. The result is a bagel that feels like a hug from the inside out.
- Simplicity: Only eight basic ingredients keep the recipe approachable, yet the method delivers professional results. No fancy equipment, just a bowl, a skillet, and a bit of patience.
- Uniqueness: The addition of baking powder gives a subtle lift that most bagel recipes lack, turning a dense loaf into a light, airy treat.
- Crowd Reaction: Friends who taste these bagels often ask for the recipe after the first bite. The combination of sweet, salty, and buttery notes keeps them coming back.
- Ingredient Quality: Using high‑quality oat flour and fresh yeast ensures that the dough behaves predictably and rises beautifully.
- Cooking Method: Boiling the dough before baking caramelizes the sugars naturally, producing that signature bagel crust without extra oil.
- Make‑Ahead Potential: The dough can be prepared the night before, refrigerated, and baked fresh in the morning, making it perfect for busy schedules.
Inside the Ingredient List
The Flavor Base
Oat flour is the star of this recipe, bringing a mild nutty flavor that grounds the bagel’s sweetness. It also provides a dense structure that holds the dough together without the need for gluten. If you substitute oat flour with another grain, the flavor profile will shift noticeably, potentially losing that comforting earthiness. When selecting oat flour, look for a brand that’s finely ground; a coarse texture can lead to uneven dough. A finer oat flour ensures a smoother mouthfeel and a more consistent rise. Remember, the quality of the oat flour directly influences the final taste and texture of your bagels.
The Texture Crew
Warm water at 110°F activates the yeast without killing it, creating a gentle environment for fermentation. The yeast, when combined with the natural sugars in oat flour, produces carbon dioxide that leavens the dough. Olive oil adds a subtle richness and helps keep the bagels from drying out during baking. Baking powder introduces a chemical lift that complements the yeast, giving the bagels a lighter bite. Salt balances the sweetness and enhances every flavor note, making the crust savory. If you’re gluten‑free, these ingredients work together to mimic the chewy texture of traditional bagels.
The Unexpected Star
A tablespoon of honey is not just a sweetener; it caramelizes during boiling, adding a glossy sheen to the crust. Honey also contains natural enzymes that help the dough rise slightly faster. If you’re vegan, you can replace honey with maple syrup or agave nectar, though the flavor will shift subtly. The glaze can be brushed on before baking or after, depending on whether you prefer a sweeter or more caramelized finish. Honey’s hygroscopic nature keeps the bagels moist, extending their shelf life. It’s a small addition that makes a noticeable difference in both taste and appearance.
The Final Flourish
The final touch is the glaze, a simple mixture of honey and a splash of warm water. This glaze gives the bagels a shiny, slightly sweet exterior that contrasts beautifully with the chewy interior. If you want a more pronounced glaze, add an extra teaspoon of honey. For a savory variation, replace honey with a light soy glaze or a sprinkle of sesame seeds. The glaze also helps seal in moisture, ensuring that the bagels stay fresh longer. A quick brush before the final bake locks in the flavor and texture you’ve worked so hard to achieve.
Everything's prepped? Good. Let's get into the real action.
The Method — Step by Step
- In a large mixing bowl, combine 2 cups of oat flour, 1 teaspoon of salt, 1 teaspoon of sugar, and 1 teaspoon of instant yeast. Stir until the dry ingredients are evenly distributed. This ensures that the yeast is evenly dispersed, preventing any clumps that could hinder fermentation. Add 1 cup of warm water, 1 tablespoon of olive oil, and 1 teaspoon of baking powder. Mix with a wooden spoon until a shaggy dough forms. The dough should be tacky but not overly sticky. Let it sit for 5 minutes to allow the oat flour to hydrate.
- After the rest period, knead the dough on a lightly floured surface for about 3 minutes. The goal is to develop a smooth, cohesive surface without overworking it. If the dough feels too dry, add a teaspoon of water; if it’s too sticky, sprinkle a touch more oat flour. This step is crucial for creating the bagel’s characteristic chewy texture. The dough should feel elastic and slightly springy when you press it. If it resists, give it a few more minutes to rest.
- Place the dough in a greased bowl, cover it with a damp cloth, and let it rise in a warm spot for 45 minutes. The dough should double in size, indicating that the yeast is active. Watch for bubbles forming on the surface; that’s a sign of proper fermentation. If the dough doesn’t rise, the yeast may have been expired or the water too hot. Keep the dough covered to prevent it from drying out. After rising, gently deflate the dough to release excess air.
- Turn the dough onto a lightly oiled surface and divide it into 4 equal pieces. Shape each piece into a round ball, then use your thumb to create a hole in the center. The hole should be about the size of a golf ball. This classic bagel shape ensures even cooking and a uniform crust. If the dough tears, press the edges together gently; the bagel’s integrity depends on a tight seal around the hole.
- Bring a large pot of water to a gentle boil. Add a pinch of salt and a tablespoon of honey to the water; this creates a flavorful bath that caramelizes the bagels’ exterior. Carefully drop each bagel into the boiling water, one at a time, and let them simmer for 2 minutes on each side. The bagels should puff up slightly, indicating that the interior is cooking evenly. Use a slotted spoon to remove them, and place them on a wire rack to cool for a few minutes before glazing. This boiling step is essential for achieving that chewy center.
- Preheat your oven to 425°F (220°C). Line a baking sheet with parchment paper and arrange the boiled bagels on it. Brush the tops lightly with the honey glaze; the glaze will caramelize during baking, giving the bagels a glossy finish. Bake for 12–15 minutes, or until the crust is golden brown and the bagels sound hollow when tapped. Keep an eye on the bagels, as the glaze can burn if left too long. Remove them from the oven and let them cool on the rack for 5 minutes before serving.
-
While the bagels are still warm, sprinkle a pinch of sea salt on top for an extra burst of flavor. The contrast between the sweet glaze and salty crust creates a balanced taste experience. If you prefer a savory version, replace the honey glaze with a light soy glaze and add sesame seeds. The bagels can be enjoyed warm or toasted for a crispier texture. The aroma that fills your kitchen is the first hint of the deliciousness to come.Watch Out: If the water temperature is too high, the yeast will die, leading to a flat, dense bagel. If it’s too low, the dough will rise too slowly, resulting in a gummy texture. Keep the temperature steady to avoid these pitfalls.
-
Let the bagels rest for 10 minutes before slicing to allow the flavors to settle. This resting period also helps the crust firm up slightly, giving a better bite. If you’re making them for a brunch gathering, keep them warm in a low oven (200°F) covered with foil until ready to serve. This keeps the bagels fresh and moist without drying them out. Serve them with a side of smoked salmon, cream cheese, or your favorite spread for a complete breakfast experience.Kitchen Hack: If you’re short on time, you can skip the boiling step and bake the raw dough directly; the crust will be slightly softer but still delicious.
-
This simple addition gives the bagels a buttery sheen and a richer flavor. The butter also helps the glaze set into a glossy coating that’s irresistible to the eye. If you’re watching calories, skip the butter and keep the glaze as is. The bagels will still deliver a satisfying crunch and sweet finish. Remember, the key is to balance the glaze with the crust to avoid overpowering the delicate oat flavor.Kitchen Hack: For an extra crunchy crust, brush the bagels with melted butter before baking.
That's it — you did it. But hold on, I've got a few more tricks that'll take this to another level. The next section will reveal insider secrets that even seasoned bakers might overlook. Trust me, these tips will elevate your bagel game from good to unforgettable.
Insider Tricks for Flawless Results
The Temperature Rule Nobody Follows
Many bakers assume that room temperature water works for all doughs, but oat flour reacts best at 110°F. This temperature activates the yeast while keeping the dough from becoming overly sticky. If you’re in a cooler kitchen, preheat the water in a saucepan and let it cool to the right temperature before mixing. A quick test is to sprinkle a pinch of flour on the water; if it clumps, the water is too hot. Keeping the water at the right temperature ensures a consistent rise and a chewy interior. The right temperature also prevents the dough from becoming gummy during the boiling step.
Why Your Nose Knows Best
The aroma of a rising dough is a reliable indicator of fermentation progress. A sweet, yeasty scent means the dough is active; a sour or flat smell indicates that the yeast may have died or the dough has over-fermented. Trusting your nose can help you catch problems early, saving you from a batch of disappointing bagels. If you notice a sharp sourness, it could be a sign of sourdough contamination or stale yeast. In that case, discard the batch and start fresh. Your sense of smell is a powerful tool in baking, especially when working with oat flour.
The 5-Minute Rest That Changes Everything
After boiling, let the bagels rest on a wire rack for exactly five minutes before glazing. This brief pause allows the steam inside the bagel to settle, preventing sogginess. The rest period also lets the glaze set into the crust, creating a glossy finish that’s hard to resist. If you skip this step, the glaze can run off, leaving a dull, uneven appearance. This simple timing trick is often overlooked but makes a noticeable difference in both texture and presentation. Five minutes is all you need to elevate the bagels to professional quality.
The Secret to a Crispy Crust
A light dusting of oat flour on the baking sheet before placing the bagels can help absorb excess moisture during baking. This keeps the crust from becoming too soggy while still allowing it to crisp up nicely. If you prefer an extra crunchy edge, brush the bagels with melted butter before baking. The butter adds a golden sheen and a subtle buttery flavor that pairs well with the honey glaze. Keep the oven temperature steady at 425°F; a fluctuating heat can cause uneven crust development. This method ensures a consistently crisp exterior every time.
The Quick Chill for Long-Lasting Freshness
After cooling, place the bagels in an airtight container with a paper towel. The paper towel absorbs any excess moisture, preventing mold growth. Store them at room temperature for up to two days, or refrigerate for longer freshness. If you plan to keep them for a week, freeze them in a zip‑lock bag and thaw at room temperature when ready to eat. A quick chill after baking also helps the bagels firm up, giving them a more satisfying bite. This storage trick keeps the bagels tasting fresh, even days later.
The Final Touch: A Light Dusting of Sea Salt
Right before serving, sprinkle a pinch of flaky sea salt over the glazed bagels. The salt accentuates the sweetness of the glaze and adds a satisfying crunch. It also balances the flavors, preventing the bagels from feeling too sweet. If you prefer a milder version, use a fine sea salt or a salt substitute. The final sprinkle is a simple step that makes a big difference in taste. Try it next time and taste the difference yourself.
Creative Twists and Variations
This recipe is a playground. Here are some of my favorite ways to switch things up:
Caramelized Onion & Feta
Fold finely diced caramelized onions into the dough for a savory kick. Add crumbled feta halfway through kneading for a salty, tangy note. The onions caramelize further during boiling, giving the bagels a sweet depth. This variation is perfect for brunch, pairing beautifully with a light yogurt dip. The feta’s briny flavor contrasts the sweet glaze, creating a complex taste profile. It’s a crowd‑pleaser at family gatherings.
Herb & Garlic Infusion
Sprinkle chopped fresh rosemary, thyme, and minced garlic into the dough before rising. The herbs infuse the bagels with aromatic flavors that linger after baking. Garlic adds a subtle heat that pairs well with the honey glaze. This version works wonderfully as a savory snack or a side for soup. The combination of herbs also adds a vibrant green hue to the dough. It’s a simple tweak that elevates the bagels to a gourmet level.
Chocolate Chip Delight
Swirl in a handful of dark chocolate chips into the dough before shaping. The chips melt slightly during baking, creating pockets of molten chocolate. This sweet version is ideal for kids and adults alike. Pair it with a drizzle of vanilla yogurt for an indulgent treat. The chocolate adds a rich, velvety texture that complements the chewy center. It’s a fun, playful twist that’s sure to impress.
Spicy Jalapeño & Chipotle
Add finely diced jalapeños and a pinch of chipotle powder to the dough for a smoky heat. The heat builds during boiling, giving the bagels a subtle kick. This spicy version pairs well with a cool avocado spread to balance the heat. It’s a great option for a lively dinner party or a casual gathering. The smoky flavor also works well with grilled meats, making it a versatile addition to any menu. The boldness of this variation is a conversation starter.
Blueberry & Lemon Zest
Fold fresh blueberries and lemon zest into the dough before rising. The blueberries burst during boiling, releasing a burst of juicy sweetness. Lemon zest adds a bright citrus note that cuts through the richness of the glaze. This fruity version is perfect for a brunch spread or a light snack. The combination of sweet and tart makes the bagels refreshing. It’s a delightful way to incorporate seasonal fruit into your baking.
Everything Bagel Fusion
Sprinkle a mix of poppy seeds, sesame seeds, onion flakes, and dried garlic into the dough before shaping. The seeds add crunch, while the flakes give a savory bite. This version captures the classic everything bagel experience while keeping the oat flour base. Serve it with cream cheese or a tangy dill sauce for a nostalgic feel. The combination of textures and flavors is a crowd‑pleaser at any gathering. It’s the ultimate comfort food with a modern twist.
The possibilities are endless, and each variation offers a new adventure for your taste buds. Feel free to experiment and create your own signature bagel.
Storing and Bringing It Back to Life
Fridge Storage
Place the cooled bagels in a resealable plastic bag with a paper towel inside. The towel absorbs excess moisture, preventing mold growth. Store them in the refrigerator for up to 3 days. When ready to eat, pop them in a toaster or a skillet to revive the crust. The bagels will taste freshly baked if warmed properly. Keep the bag sealed to maintain freshness.
Freezer Friendly
Wrap each bagel tightly in plastic wrap, then place them in a freezer bag. They can be stored for up to 3 months. Thaw at room temperature for 30 minutes before reheating. For best results, bake them at 350°F for 10 minutes after thawing. The bagels will retain their chewy texture and caramelized crust. Freezing is a great way to keep them on hand for busy mornings. Make sure to label the bag with the date for freshness.
Best Reheating Method
To reheat, preheat your oven to 350°F and place the bagels on a baking sheet. Warm them for 8–10 minutes, or until the crust is crisp and the interior is heated through. If you’re in a hurry, microwave on medium for 30 seconds, then finish in the oven for a crisp finish. Add a splash of water to the bagels before reheating; it steams them back to perfection, preventing dryness. The bagels will taste almost as good as when they first came out of the oven. Keep a small bowl of water nearby for this trick.
With these storage and reheating tips, your bagels will stay fresh and delicious for weeks. Whether you’re a busy professional or a weekend baker, you’ll love the convenience.