I was standing in my kitchen on a sweltering July afternoon, the kind where the air feels like warm honey, and I had a half‑finished cheesecake that refused to set. My friend dared me to make something that would scream summer without turning on the oven, and I thought, “Challenge accepted, but also, why am I even trying to bake when the sun is already doing the heavy lifting?” The result? A no‑bake marvel that turned my disaster into a dessert triumph, and I’m still hearing the echo of that first bite reverberating in my mind. I dare you to taste this and not go back for seconds.
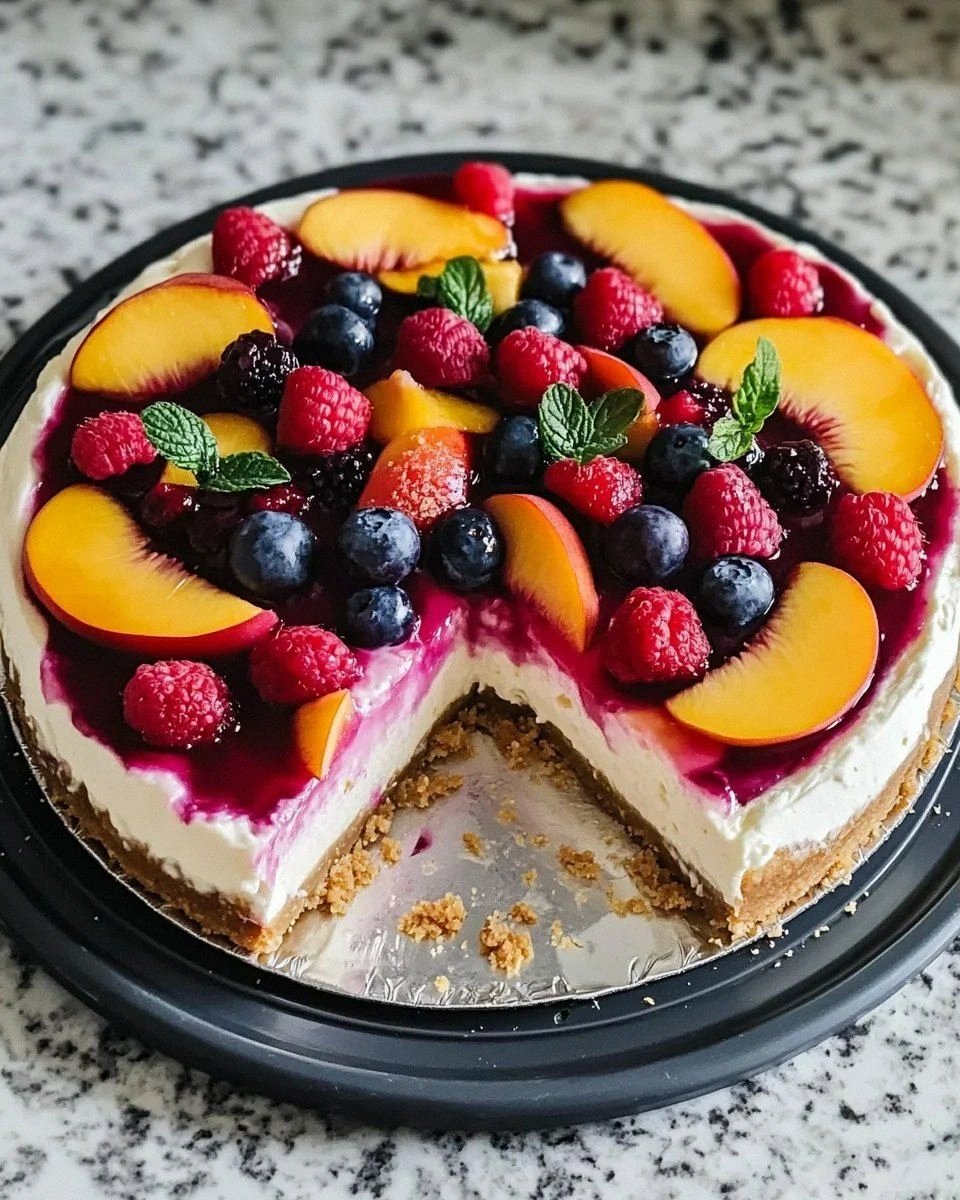
Imagine the moment you pull a chilled cheesecake out of the fridge: the crust cracks just enough to reveal a buttery, golden base, the creamy filling glistens like sunrise on a lake, and a cascade of berries and peaches sits on top, each piece glistening with a subtle glaze that catches the light. The scent is a heady mix of sweet fruit, a whisper of vanilla, and that buttery crumb that makes you think of a beachside bakery. You can almost hear the faint pop of a spoon as it cuts through the silky interior, and you feel the cool, velvety texture against your tongue, followed by a burst of tart‑sweet fruit that makes the whole thing feel like a celebration in a single bite.
Most recipes get this completely wrong. They either demand a stubbornly long chilling time, or they rely on heavy, overly sweet glazes that drown out the natural fruit flavors. I’ve stripped away the excess, kept the technique simple, and added a twist—a light apricot‑lemon glaze that gives the topping a glossy finish without turning it into a sticky mess. The secret is in the balance: just enough sugar to coax the flavors out, but not so much that it becomes cloying, and a dash of almond extract that whispers a nutty undertone, making every mouthful feel layered and sophisticated.
And now the fun part: I’m going to walk you through every single step—by the end, you’ll wonder how you ever made a cheesecake any other way. Okay, ready for the game‑changer? Let’s dive in and create a dessert that will be the star of any summer gathering, whether it’s a backyard BBQ or a quiet evening on the porch.
What Makes This Version Stand Out
- Texture: The crust is buttery and crisp, while the filling stays luxuriously smooth without ever getting grainy—a texture that holds up even after a full day of sunshine.
- Flavor: Fresh peaches and berries burst through a subtle vanilla‑almond backdrop, creating a flavor profile that feels both familiar and exciting.
- Simplicity: No oven, no complicated steps—just a few minutes of mixing, a short chill, and you’ve got a show‑stopping dessert.
- Make‑Ahead: This cheesecake can be assembled a day ahead, letting the flavors meld while you focus on other party prep.
- Visual Impact: The glossy apricot glaze turns the fruit topping into a jewel‑like masterpiece that practically begs for a photo.
- Adaptability: Swap out the fruit or glaze for seasonal variations, and you’ve got a new dessert every time.
- Crowd‑Pleaser: Even the pickiest eaters love the balance of sweet and tangy, and the no‑bake nature means it’s safe for kitchens without a reliable oven.
- Healthier Edge: Using low‑fat cream cheese and fresh fruit keeps the indulgence in check without sacrificing richness.
Inside the Ingredient List
The Flavor Base
The foundation of any great cheesecake is its flavor base, and here we rely on cream cheese and sour cream. Cream cheese provides that rich, tangy backbone, while sour cream adds a subtle silkiness that prevents the filling from feeling heavy. If you skip the sour cream, you’ll notice a firmer texture that borders on the dry side—definitely not what we want for a summer dessert. For a lighter version, try using a blend of low‑fat cream cheese and Greek yogurt, but keep the total volume the same.
The Texture Crew
Graham cracker crumbs, granulated sugar, and unsalted butter form the crust that holds everything together. The crumbs give a sweet crunch, the sugar adds just enough sweetness to balance the butter, and the melted butter binds it all into a cohesive layer. If you’re out of graham crackers, substitute with digestive biscuits or even vanilla wafer crumbs for a slightly different flavor. Make sure the butter is fully melted and slightly cooled before mixing; hot butter will make the crumbs soggy, while cold butter won’t bind properly.
The Unexpected Star
Almond extract is the secret weapon that lifts the entire dessert. Just a half‑teaspoon adds a delicate, nutty aroma that pairs beautifully with the sweet fruit and vanilla. It’s easy to overlook, but skipping it makes the flavor feel flat, especially when the fruit is the star. If you’re allergic or don’t have almond extract, a splash of rum or a pinch of cinnamon can provide a complementary depth.
The Final Flourish
Fresh fruit—ripe peaches, strawberries, raspberries, and blueberries—bring the summer vibe, while apricot preserves (or peach jam) and lemon juice create a glaze that adds shine and a hint of acidity. The glaze not only looks gorgeous but also helps the fruit stay plump and prevents it from drying out. If you prefer a less sweet finish, swap the apricot preserve for a light honey drizzle mixed with a dash of orange zest.
Everything's prepped? Good. Let’s get into the real action…
The Method — Step by Step
Start by crushing the graham cracker crumbs into fine particles; a food processor works best, but a zip‑top bag and a rolling pin do the trick. Once crushed, transfer them to a mixing bowl, add the granulated sugar, and stir to combine. This step is the foundation—if the crumbs are uneven, you’ll get a crust with random soft spots.
Melt the unsalted butter in a small saucepan over low heat, watching it turn a light amber color without browning. Remove from heat and let it cool for about two minutes; this cooling period is crucial because it prevents the butter from melting the crumbs too quickly, which would create a soggy base. Pour the butter over the crumb mixture and stir until every crumb is glossy and clumped together.
Press the crumb‑butter mixture firmly into the bottom of a 9‑inch springform pan. Use the back of a spoon or the base of a glass to create an even layer, making sure the edges are compact. A well‑packed crust will hold the filling without cracking when you slice the cheesecake later.
While the crust chills, soften the cream cheese in a large bowl; you can let it sit at room temperature for 30 minutes or microwave it in 10‑second bursts. Once soft, beat it with an electric mixer on medium speed until it’s creamy and free of lumps—think cloud‑like texture. Add the granulated sugar and continue beating until the mixture lightens in color, indicating the sugar has dissolved.
Add the sour cream, vanilla extract, and almond extract (if using) to the cream cheese mixture. Beat on low speed just until incorporated; over‑mixing can introduce too much air, which may cause the cheesecake to crack when chilled.
If you’ve opted to use eggs for extra stability, whisk the eggs lightly and fold them into the mixture one at a time. The eggs will give the filling a slightly firmer set, but they’re optional for a truly no‑bake experience. Once everything is combined, taste the filling and adjust with a pinch more vanilla or sugar if needed.
Pour the creamy filling over the chilled crust, smoothing the top with a spatula. Tap the pan gently on the counter to release any trapped air bubbles; you’ll hear a faint “pop” that signals a smooth surface.
Refrigerate the cheesecake for at least 4 hours, preferably overnight. The longer it sets, the firmer the texture, and the flavors will meld beautifully. While it chills, prepare the glaze.
For the glaze, combine apricot preserves (or peach jam) with lemon juice in a small saucepan. Heat gently, stirring until smooth and slightly runny—this should take about 2 minutes. The lemon juice cuts the sweetness and adds a bright pop that balances the fruit.
Arrange the sliced peaches, halved strawberries, raspberries, and blueberries on top of the set cheesecake in a decorative pattern. Drizzle the warm glaze over the fruit, allowing it to cascade like a sunrise over a meadow. Let the glaze set for a few minutes before serving.
That's it — you did it. But hold on, I've got a few more tricks that'll take this to another level…
Insider Tricks for Flawless Results
The Temperature Rule Nobody Follows
Always use room‑temperature cream cheese. If you pop it straight from the fridge, the mixture will stay clumpy, and you’ll end up with a lumpy cheesecake that looks like a construction site. Let the cheese sit out for at least 30 minutes, or give it a quick 10‑second zap in the microwave. A smooth base ensures the filling spreads evenly and sets without cracks.
Why Your Nose Knows Best
When the glaze is ready, it will emit a faint citrusy aroma that signals the perfect balance of sweet and tangy. If you can smell the lemon brightening the apricot, you’ve hit the sweet spot. Over‑cooking the glaze will cause it to thicken too much, losing that glossy finish. Trust your nose more than the clock.
The 5‑Minute Rest That Changes Everything
After you drizzle the glaze, let the cheesecake sit uncovered for five minutes before slicing. This short rest allows the glaze to set just enough to stay shiny, while the fruit settles into the filling. Skipping this step often results in a soggy topping that slides off the slice like a wet paintbrush.
Fruit Prep Precision
Slice peaches just before assembling; they release juice quickly and can make the glaze watery if they sit too long. For berries, pat them dry with a paper towel after washing to avoid excess moisture. A dry fruit surface ensures the glaze adheres and the fruit stays plump.
The Chill‑Flip Technique
If you’re serving the cheesecake on a platter rather than the springform pan, gently flip the chilled cake onto the platter after removing the side. Use a wide, flat spatula and a steady hand; the crust should release cleanly if it’s well‑packed and chilled. This technique gives a professional presentation that will wow your guests.
Creative Twists and Variations
This recipe is a playground. Here are some of my favorite ways to switch things up:
Tropical Breeze
Swap the peaches for mango slices and replace the apricot glaze with a passion‑fruit coulis. The tropical notes add an exotic flair that’s perfect for a beachside brunch.
Chocolate Lovers’ Dream
Add 2 tablespoons of cocoa powder to the cream cheese filling and drizzle a dark chocolate ganache over the top instead of the apricot glaze. The bittersweet chocolate balances the sweet fruit beautifully.
Nutty Crunch
Mix finely chopped toasted almonds or pistachios into the crust for an extra crunch, and sprinkle a few whole nuts on the fruit topping for texture contrast.
Autumn Harvest
Replace the summer berries with poached pears and a drizzle of caramel sauce. This version works wonderfully for a cozy fall gathering.
Vegan Vibes
Swap the cream cheese for a vegan cream cheese alternative, use coconut oil instead of butter for the crust, and choose a fruit jam that’s free of gelatin. The result is a plant‑based masterpiece that still delivers on creaminess.
Storing and Bringing It Back to Life
Fridge Storage
Cover the cheesecake with a loose sheet of cling film and store it in the refrigerator for up to 4 days. The glaze may darken slightly, but the flavor will only improve as the fruit marinates.
Freezer Friendly
Wrap the entire springform pan tightly in plastic wrap, then place it inside a freezer‑safe bag. The cheesecake freezes well for up to 2 months. Thaw overnight in the fridge before serving, and give it a quick fresh fruit topping to revive the bright colors.
Best Reheating Method
If you need to warm the cheesecake slightly (perhaps for a summer dinner), place a thin slice of the cake on a microwave‑safe plate, add a tiny splash of water, and heat for 5‑7 seconds. The steam revives the creamy texture without melting the crust.