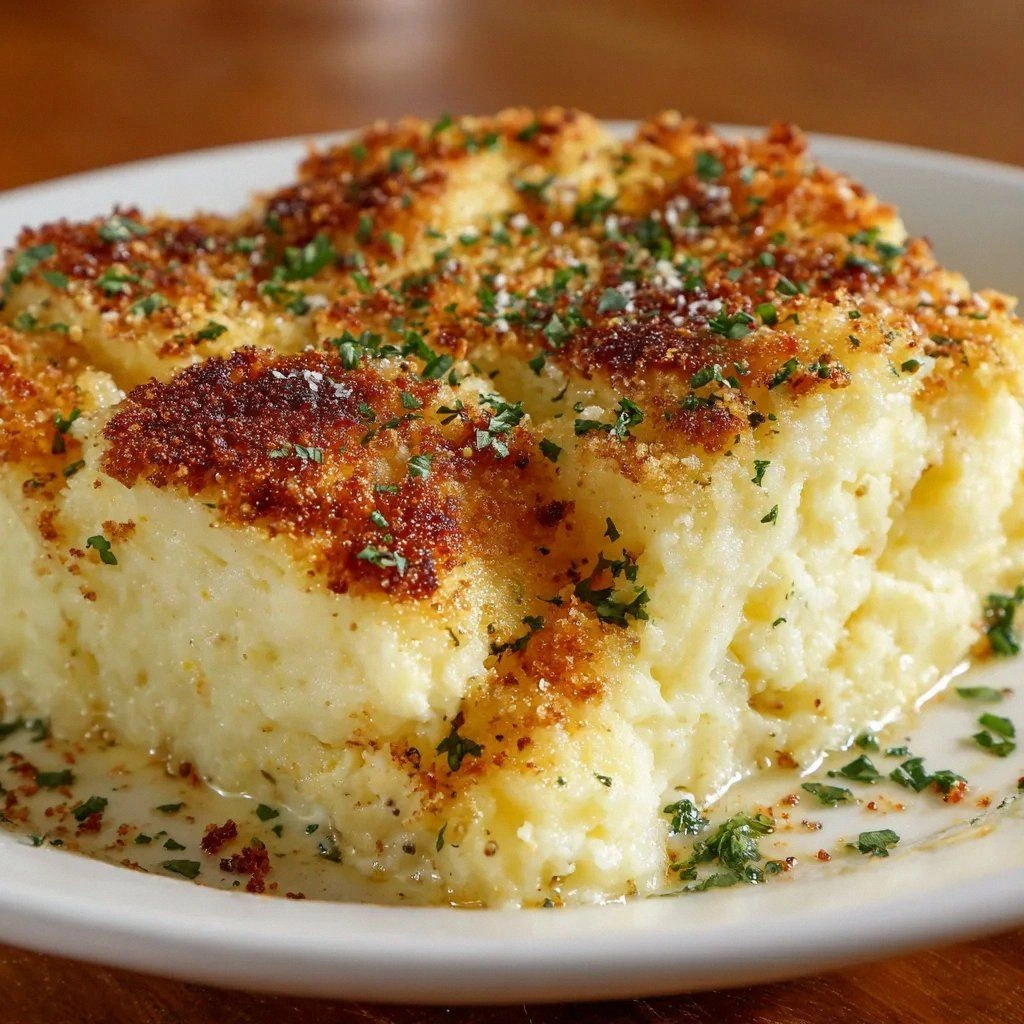
I still remember the night I tried to impress my friends with a side dish that would make them say, “What’s that?” The kitchen was a battlefield: potatoes boiled, mashed, seasoned, and then—oh, the moment of truth—baked until the surface turned golden and crackly. I watched the steam rise like a cloud of anticipation, and the aroma of butter and Parmesan filled the air, turning the whole apartment into a savory cathedral. My friends’ eyes widened, and I could hear the faint sigh of “wow” as the first bite hit their tongues.
That night taught me a hard lesson: mashed potatoes are not just mashed potatoes. They’re a canvas waiting for a bold, crunchy, cheese-laden masterpiece. The secret lies in the crust—an armor of breadcrumbs, Parmesan, and butter that sings with every bite. It’s a texture contrast that turns a humble side into a showstopper. I dared you to taste this and not go back for seconds, because once you’ve had that first crack, the rest of the dish feels like a gentle echo of the same deliciousness.
What makes this version stand out from the endless array of mashed potato recipes? First, it’s not about heavy cream or flour; it’s about the simplicity of flavor. Second, the crust is engineered to be crisp, not soggy, thanks to a precise blend of breadcrumbs and melted butter. Third, the use of sour cream gives a tang that balances the richness of Parmesan. Fourth, the addition of garlic and onion powders gives a warm, aromatic depth that makes the dish feel like a hug. Finally, the recipe is so easy to scale and adapt that it can be a crowd-pleaser at a dinner party or a comforting family dinner.
Picture yourself pulling this out of the oven, the whole kitchen smelling incredible, a golden crust that crackles like thin ice, and a creamy interior that feels like velvet. The dish is so versatile that it can accompany anything from roast beef to a vegetarian main. I promise you, by the end of this guide, you’ll wonder how you ever made mashed potatoes any other way. Let me walk you through every single step — by the end, you’ll wonder how you ever made it any other way.
What Makes This Version Stand Out
- Flavor: The bold combination of Parmesan and garlic powder creates a savory punch that elevates the humble potato.
- Texture: The breadcrumb and butter crust delivers a satisfying crunch that contrasts perfectly with the silky mash.
- Convenience: You can use store‑bought mashed potatoes, saving time while still achieving a gourmet result.
- Visual Appeal: The golden crust and bright Parmesan flakes make the dish Instagram‑ready.
- Make‑Ahead Friendly: Assemble the crust, bake, and then refrigerate or freeze for later use.
- Budget‑Friendly: The ingredients are pantry staples, keeping the cost low without compromising flavor.
- Family‑Approved: The mild yet robust taste is a hit with kids and adults alike.
- Seasonal Flexibility: Works as a comforting fall dish or a light summer side, depending on how you pair it.
Alright, let's break down exactly what goes into this masterpiece. And before we dive into the ingredients, here’s a quick kitchen hack that will save you time and effort.
Inside the Ingredient List
The Flavor Base
Mashed Potatoes: The star of the dish! Whether you hand‑cook them or use a store‑bought brand, the foundation of this recipe is the smooth, buttery mash. If you skip the potatoes, you lose the creamy backdrop that lets the crust shine. A good mash should be free of lumps; otherwise, the crust will be uneven and the texture will feel gritty. For best results, use a potato variety with a high starch content, such as Russet or Yukon Gold, to achieve that silky finish.
The Texture Crew
Breadcrumbs: They create the crunchy topping that contrasts beautifully with the creamy potatoes. If you forget to toast them lightly before mixing, the crust might stay damp and lose its crispness. To get an extra crunch, toss the breadcrumbs in a drizzle of melted butter and a pinch of salt before adding them to the crust mixture. You can also experiment with panko for a lighter, airier texture. Remember, the breadcrumbs are the bridge between the savory mash and the golden crust.
The Unexpected Star
Sour Cream: It brings creaminess and a slight tang, making the potatoes even more luscious. Without sour cream, the mash can taste flat and overly buttery. If you’re dairy‑free, a splash of coconut milk or a dairy‑free yogurt can provide a similar creamy texture. The key is to fold the sour cream into the mash while it’s still warm, allowing it to melt into the mixture smoothly. The result is a silky interior that melts in your mouth.
The Final Flourish
Grated Parmesan Cheese: This adds a rich, nutty flavor and creates that irresistible crispy crust. A generous amount of Parmesan also contributes to the golden color and gives the crust a savory depth. If you’re looking for a sharper cheese flavor, try adding a handful of Pecorino Romano. Be sure to use freshly grated cheese; pre‑grated cheese often contains anti‑caking agents that can affect the crust’s crispness. The cheese is the final touch that elevates the dish from ordinary to extraordinary.
Everything's prepped? Good. Let's get into the real action.
The Method — Step by Step
- Preheat your oven to 375°F (190°C). While the oven warms, line a baking sheet with parchment paper to prevent sticking. This step ensures that the crust will develop a uniform golden color and stay crisp. Don’t rush the preheat; a properly heated oven is crucial for even baking.
- If you’re using fresh potatoes, peel and cube them into 1‑inch pieces. Place the cubes in a pot of cold, salted water and bring to a boil. Cook for 15–20 minutes until the potatoes are fork‑tender. Drain well and return to the pot to let steam evaporate; this reduces excess moisture that could make the crust soggy.
- Mash the potatoes with a potato masher or ricer until smooth. Add the sour cream, melted butter, garlic powder, onion powder, salt, and pepper. Stir until everything is fully incorporated and the mixture is silky. Taste and adjust seasoning; you want a balanced flavor that isn’t too salty or too bland.
- In a small bowl, combine the breadcrumbs, grated Parmesan, and a drizzle of melted butter. Toss until the crumbs are evenly coated. This coating is what gives the crust its buttery, golden crunch. If you prefer a lighter crust, sprinkle the breadcrumbs in a thin, even layer.
- Spread the mashed potatoes onto the prepared baking sheet in a single even layer, about 1‑inch thick. Use a spatula to smooth the surface and create a flat base for the crust. The even layer ensures that the crust will bake uniformly and the interior will stay creamy.
- Evenly distribute the breadcrumb‑cheese mixture over the mashed potatoes, pressing gently to adhere. Make sure every corner is covered; the crust needs to touch the entire surface to form a cohesive, crunchy shell. The butter in the breadcrumb mix will help the crust brown beautifully.
- Bake in the preheated oven for 25–30 minutes, or until the top is golden brown and the edges begin to pull away slightly. The aroma will be irresistible, and the sound of the crust popping will signal that it’s ready. Keep a close eye on the last few minutes to avoid over‑browning.
- Remove the dish from the oven and let it rest for 5 minutes before serving. This brief rest allows the flavors to settle and the crust to set, preventing it from sliding off. When you slice into it, the interior should be creamy, and the crust should stay intact.
- Serve hot, optionally garnishing with a sprinkle of extra Parmesan or a few fresh herbs for color. Pair with your favorite protein or a simple salad for a balanced meal. The dish is so versatile that it can stand alone as a hearty side or be elevated into a main course with a protein addition.
That’s it — you did it. But hold on, I've got a few more tricks that'll take this to another level. Stay tuned for insider tips that will make your dish even more memorable.
Insider Tricks for Flawless Results
The Temperature Rule Nobody Follows
Many people bake mashed potato dishes at 350°F, but that temperature can cause the crust to brown unevenly. Baking at 375°F allows the outer layer to crisp while the interior stays moist. Keep the oven door slightly ajar during the last few minutes to let steam escape, preventing sogginess. This small adjustment can make the difference between a mediocre side and a showstopper.
Why Your Nose Knows Best
Before you even taste the first bite, your nose can tell you if the dish is ready. A subtle, buttery aroma with a hint of toasted cheese signals that the crust is perfectly browned. If you smell an overly metallic or burnt scent, pull it out immediately. Your nose is a reliable judge of doneness, so trust it.
The 5‑Minute Rest That Changes Everything
Letting the dish rest after baking is often overlooked. During this brief pause, the steam inside condenses, making the interior even creamier. It also allows the crust to firm up, so it doesn’t crumble when you cut into it. A quick 5‑minute rest can elevate a good dish to a great one.
Use a Baking Sheet with a Grid
A flat, heavy‑duty sheet ensures even heat distribution. If you’re using a light sheet, the bottom can burn while the top remains undercooked. A grid or perforated sheet allows air to circulate, helping the crust crisp on all sides. This trick is especially useful if you’re baking multiple sheets at once.
Keep the Potatoes Warm
If you’re using pre‑cooked mashed potatoes, keep them warm on a low heat setting while you assemble the crust. This prevents the potatoes from cooling and becoming dense. A warm base also helps the breadcrumb crust adhere better, creating a unified, crunchy surface.
Creative Twists and Variations
This recipe is a playground. Here are some of my favorite ways to switch things up:
Herb‑Infused Crust
Add chopped fresh rosemary or thyme to the breadcrumb mixture for a fragrant twist. The herbs pair beautifully with the Parmesan, adding a green pop of flavor. This variation works great with roasted chicken or pork tenderloin. The fresh herbs also add a subtle earthiness that balances the richness.
Spicy Jalapeño Mash
Dice a jalapeño and fold it into the mashed potatoes before baking. The heat will linger in the crust, giving a subtle kick that contrasts with the creamy interior. Pair this version with a cool yogurt dip to tame the heat. It’s a perfect choice for those who love a little spice.
Cheddar‑Parmesan Combo
Swap half the Parmesan for sharp cheddar for a deeper, sharper flavor. The cheddar melts into the mash, creating a slightly tangy undertone. This combo is especially delicious when served alongside a hearty steak. The cheddar also adds a slightly crunchy texture if left on top.
Garlic‑Butter Crust
Infuse the butter in the breadcrumb mixture with minced garlic. The garlic butter will give the crust an intense, savory aroma. This variation is perfect for garlic lovers and pairs well with roasted vegetables. The buttery garlic flavor will elevate the dish to a gourmet level.
Vegan Version
Replace the butter with olive oil and the sour cream with a plant‑based yogurt. Use nutritional yeast in place of Parmesan for a cheesy flavor. The breadcrumbs can be made from gluten‑free bread or oat flour. This vegan twist keeps the dish creamy, crispy, and full of flavor.
Breakfast‑Style Mash
Stir in a splash of milk and a pinch of nutmeg before baking. The nutmeg adds a warm, sweet aroma reminiscent of breakfast. Serve with a fried egg or a drizzle of maple syrup for a sweet‑savory combo. This variation turns the dish into a comforting brunch side.
Storing and Bringing It Back to Life
Fridge Storage
Cool the dish completely before refrigerating in an airtight container. Store for up to 3 days. When ready to serve, reheat in the oven at 350°F for 10–12 minutes until the crust is crisp again. The crust may soften slightly, so a quick bake restores its crunch.
Freezer Friendly
After cooling, wrap the dish tightly in plastic wrap and then in aluminum foil. Freeze for up to 2 months. Thaw overnight in the refrigerator before reheating. Reheat at 375°F for 20–25 minutes, or until the crust is golden and the interior is hot.
Best Reheating Method
Add a splash of water to the bottom of the baking dish to create steam, which prevents the mash from drying out. Cover loosely with foil and bake until heated through. This technique keeps the interior moist and the crust crisp. For a quick microwave option, microwave on medium power for 2 minutes, then finish in the oven for crispness.