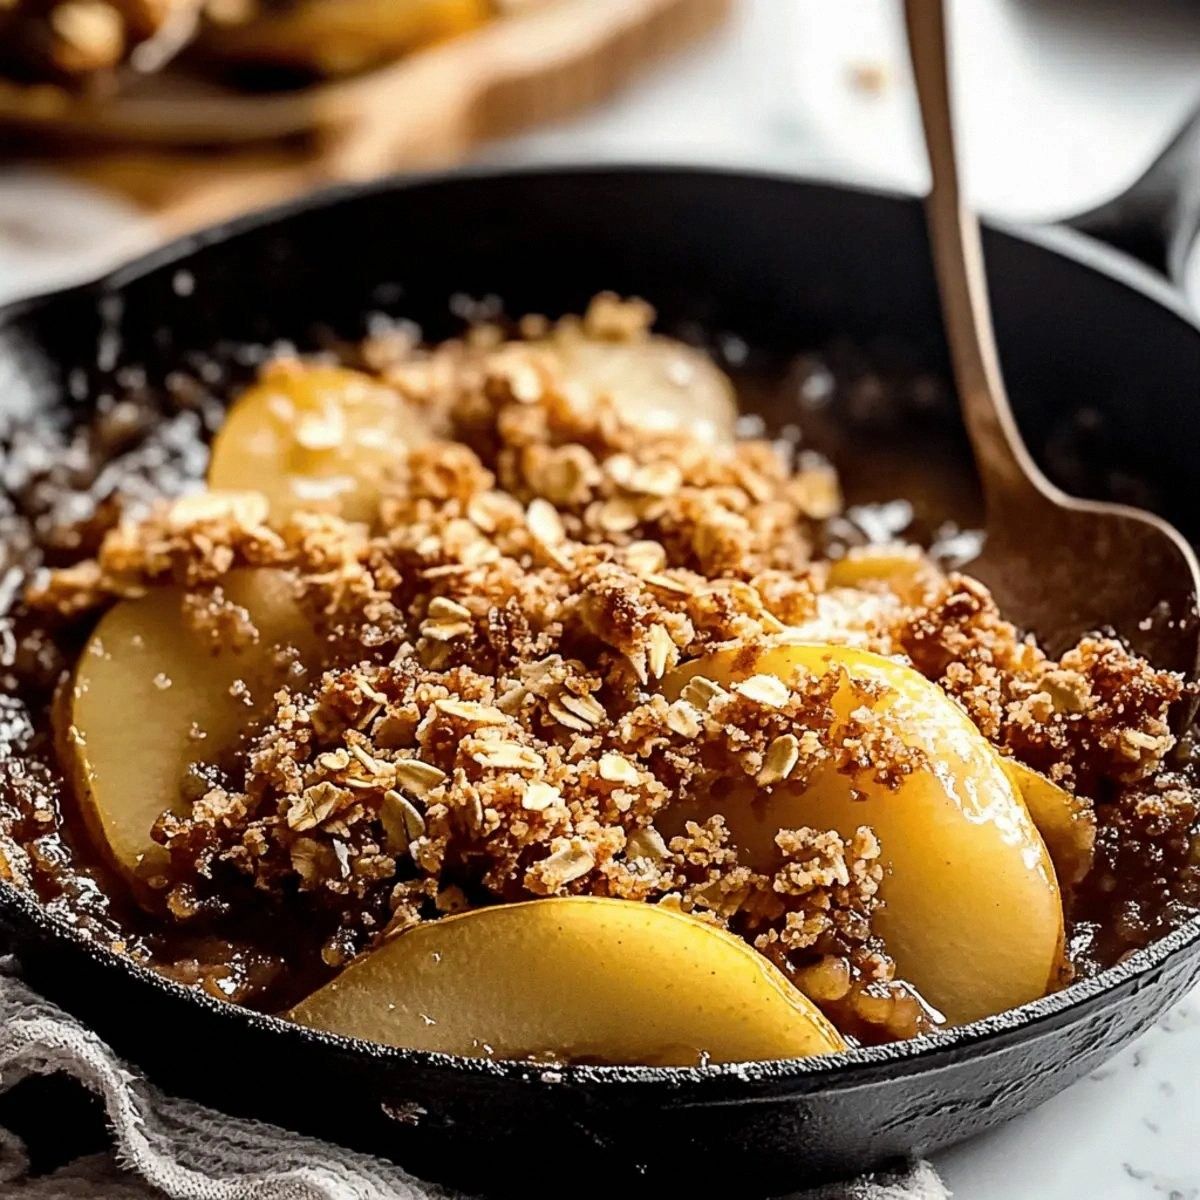
Picture this: it's a Tuesday night, the wind is howling outside like it's auditioning for a horror movie, and you're standing in your kitchen wearing mismatched socks because laundry day is a myth. You're craving something warm, something that hugs your soul, something that makes you forget about that work deadline tomorrow. You could make cookies, but that feels like commitment. You could make a pie, but who has that kind of energy? Then, like a culinary superhero in cast iron form, this skillet pear crisp swoops in to save your evening.
I discovered this recipe during what I like to call my "desperate dessert phase" — that special time when you've eaten all the chocolate chips straight from the bag and you're considering spooning brown sugar onto toast. My friend Sarah had texted me "make something with pears" because she'd brought home fifteen pounds from her neighbor's tree and didn't know what to do with them. Fifteen pounds. That's not a typo. That's a pear emergency, and I was the dessert paramedic on call.
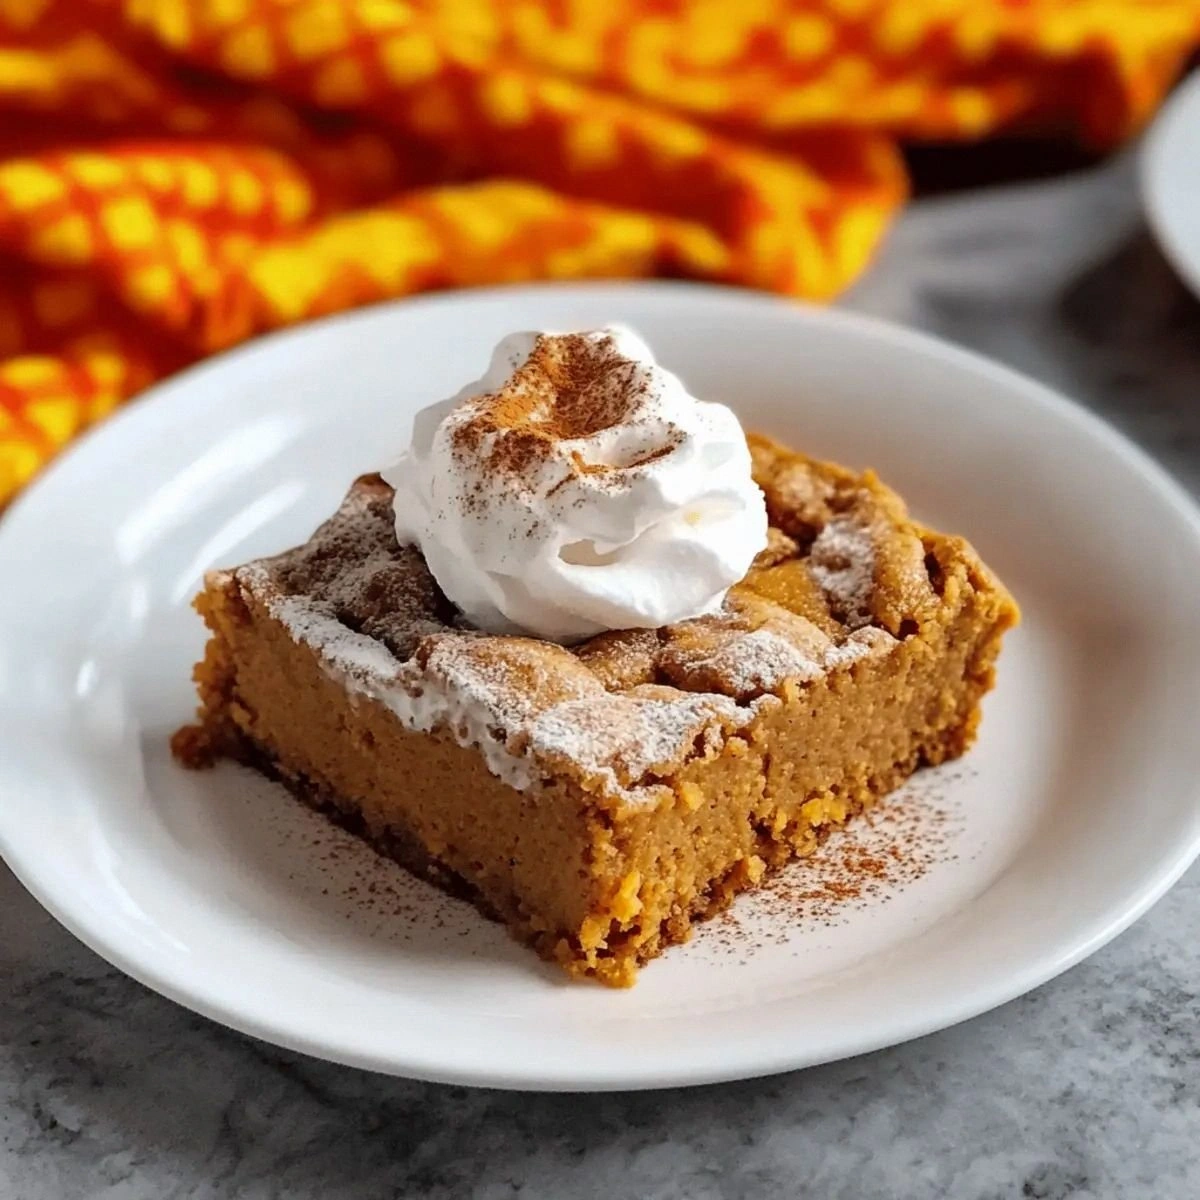
What started as a "throw everything in a pan and hope for the best" moment turned into the recipe that now has my neighbors knocking on my door at 9 PM, claiming they "smelled something amazing." This isn't just another fruit crisp recipe — this is the one that will ruin all other crisps for you forever. The edges get caramelized and chewy like the best parts of a crème brûlée, while the center stays molten and jammy. The topping? Buttery, oat-y perfection that shatters like thin ice when you crack through it with your spoon.
Here's the kicker: it takes 45 minutes from zero to hero, uses one pan, and makes your house smell like you hired a professional baker to live in your basement. I dare you to taste this and not go back for seconds. Actually, I dare you to make it through the cooling period without "testing" at least three spoonfuls. Let me walk you through every single step — by the end, you'll wonder how you ever made it any other way.
What Makes This Version Stand Out
Speed Demon: While other crisps demand you pre-bake the fruit or make separate toppings, this beauty comes together in one pan. The pears cook right in the same skillet you bake in, which means those caramelized edges from the stovetop become the foundation for deep, complex flavors in the oven.
Texture Paradise: Most recipes get this completely wrong — they dump everything together and hope for the best. Here's what actually works: we layer the topping so some sinks into the fruit, creating these pudding-like pockets, while the rest stays crispy on top. You get three textures in every bite: soft fruit, creamy filling, and crunchy topping.
Ingredient Minimalism: Six ingredients, people. Six. And you probably have five of them right now. No fancy vanilla beans, no obscure flours, no "where do I even find that" items. Just honest, pantry-staple magic that tastes like you spent hours sourcing ingredients at a farmer's market.
Cast Iron Alchemy: The skillet isn't just for show — it creates this magical temperature gradient that no baking dish can replicate. The bottom stays hotter, creating those jammy, almost-caramelized pear bits, while the top gets perfectly golden. It's like having two desserts in one.
Make-Ahead Champion: This crisp actually improves overnight. The flavors meld, the topping stays crunchy, and you can reheat individual portions in the microwave for 30 seconds. Future pacing: imagine having dessert ready for the entire week, tasting fresh-baked every single time.
Crowd Control: I've served this to people who "don't like pears," to toddlers who "don't eat fruit," to my father-in-law who "doesn't do dessert." They all asked for the recipe. If you've ever struggled with picky eaters, you're not alone — and I've got the fix.
Seasonal Flexibility: While pears are the star here, this method works with any firm fruit. Apples in fall, peaches in summer, frozen berries when you're desperate. The technique stays the same, the magic stays intact.
Alright, let's break down exactly what goes into this masterpiece...
Inside the Ingredient List
The Flavor Base
The pears are obviously the headliners here, but not all pears are created equal. You want Bartlett or Bosc — Bartletts melt into honeyed silk, while Boscs stay firmer with a more complex, almost spicy flavor. Avoid those rock-hard supermarket pears that taste like sweetened styrofoam. Your pears should smell like fall and give slightly when pressed near the stem. Underripe pears will stay crunchy and never develop that jammy quality we're after.
The sugar isn't just for sweetness — it's the key to that glossy, almost candied sauce that forms around the fruit. I use regular granulated because it melts cleanly, but brown sugar works if you want deeper caramel notes. Don't cut the sugar thinking you're being healthy; it balances the pears' natural acidity and creates the syrup that makes this dish spoon-licking good.
The Texture Crew
Old-fashioned oats are non-negotiable. Instant oats turn to mush, steel-cut stay too chewy, but old-fashioned give you that perfect bite — tender with just enough resistance. They absorb the pear juices while staying distinct, creating these little oat pearls throughout the topping. If you only have quick oats, you can use them, but reduce the butter by a tablespoon since they're more absorbent.
Flour is the glue that holds our topping together, but here's where we get clever. Regular all-purpose works fine, but if you want to level up, substitute 2 tablespoons of flour with almond flour. It adds this subtle nuttiness that makes people ask "what's that amazing flavor?" without being able to place it. The flour creates those delightful clumps in the topping — the parts everyone fights over.
The Unexpected Star
Butter. Good butter. Not the rock-hard stick that's been in your fridge since the Clinton administration. You want it cold but pliable, able to cut through the dry ingredients like you're making pastry. The butter creates steam pockets as it melts, giving you those crispy, lacy edges that shatter under your spoon. I use salted because I like the contrast, but unsalted works — just add a pinch more salt to the topping.
The Final Flourish
Cinnamon is obvious, but nutmeg is the secret handshake here. Just a pinch — too much and it tastes like potpourri, but the right amount adds warmth and complexity that makes people cozy without knowing why. Fresh grated nutmeg is worth the investment; the pre-ground stuff tastes like sawdust in comparison. Store your whole nutmeg in the freezer; it'll last longer than your last relationship.
Everything's prepped? Good. Let's get into the real action...
The Method — Step by Step
- Start with your cast iron skillet over medium heat. Add the butter and let it melt until it starts to foam — this is the moment of truth. The foam means the water is evaporating, leaving behind pure butterfat that'll give us incredible flavor. Swirl the pan so the butter coats the bottom evenly. That sizzle when it hits the pan? Absolute perfection.
- While the butter melts, slice your pears. Don't get fancy here — rough slices about 1/4-inch thick work best. Too thin and they disappear into mush, too thick and they stay crunchy. I leave the skins on because they add color and texture, plus I'm lazy. If your pears are soft enough to dent with your thumb, they're perfect. If you need a chainsaw, they're not ready.
- When the butter stops foaming and starts to smell nutty, add your pears in a single layer. Hear that immediate sizzle? That's the sound of magic happening. Don't stir for the first 2 minutes — let them develop those gorgeous caramelized edges. Okay, ready for the game-changer? Sprinkle the sugar over the pears now, not later. The sugar hits the hot butter and starts making caramel immediately, creating this glossy coating that'll make you weep with joy.
- Cook the pears for about 8 minutes total, flipping once. They should be golden at the edges but still holding their shape. The kitchen should smell like you're living inside a pear tart. If you see the sugar starting to smoke, reduce the heat — we want caramel, not carbon. The pears will release their juice and it'll look like too much liquid, but stay with me here — this is worth it.
- While the pears cook, make your topping in a bowl. Combine oats, flour, cinnamon, and nutmeg. Cut in the cold butter using your fingers or a pastry cutter until it looks like coarse crumbs with some pea-sized pieces. Don't overwork it — those butter chunks are your ticket to crispy perfection. The mixture should clump when squeezed but break apart easily.
- Sprinkle the topping over the pears in an even layer. Don't press it down — let it stay loose and craggy. Those nooks and crannies will catch the caramel and create textural variety. If some topping falls between the pears, that's perfect. It'll absorb the juices and become almost pudding-like in places.
- Transfer the whole skillet to a preheated 375°F oven. This next part? Pure magic. Bake for 20-25 minutes until the topping is golden brown and the edges are bubbling like lava. Your house will smell like you've been baking all day. Don't walk away from the stove here — the difference between perfect and burnt is about 90 seconds.
- Let it rest for 5 minutes when it comes out. I know, I know — hot fruit crisp is calling your name. But those 5 minutes let the sauce thicken and the topping set. Plus, you won't burn your tongue off, which means you can actually taste what you made. Trust me on this one.
That's it — you did it. But hold on, I've got a few more tricks that'll take this to another level...
Insider Tricks for Flawless Results
The Temperature Rule Nobody Follows
Here's what separates good home cooks from great ones: we check the temperature of our fruit. Use an instant-read thermometer and aim for 190°F in the center of the fruit layer. Below 180°F and you get crunchy pears with raw-tasting topping. Above 200°F and you're heading towards pear butter. That sweet spot gives you tender fruit that still holds its shape and a topping that's crispy, not soggy. I've been honest — I ate half the batch before anyone else got to try it because I couldn't stop "testing" the temperature.
Why Your Nose Knows Best
Forget timers — your nose is the most sophisticated kitchen tool you own. When the topping is ready, it'll smell like the best oatmeal cookie you've ever had, with hints of caramel and toasted nuts. If you smell fruit and sugar but no toasty notes, give it 3 more minutes. If you smell anything approaching burnt, get that skillet out immediately. A friend tried skipping this step once — let's just say it didn't end well for her smoke detector or her dinner party.
The 5-Minute Rest That Changes Everything
I know I mentioned resting earlier, but this deserves its own moment. During those 5 minutes, something incredible happens: the starches in the pear juice gelatinize, turning thin fruit syrup into glossy, spoon-coating sauce. The topping continues to crisp as steam escapes, and the whole thing becomes more than the sum of its parts. Picture yourself pulling this out of the oven, the whole kitchen smelling incredible, and having to wait. It's torture, but it's the difference between good and unforgettable.
The Ice Cream Equation
Serve this warm with cold vanilla ice cream. Not room temperature, not "sort of cold" — properly frozen ice cream. The contrast makes the warm fruit taste warmer, the cold ice cream taste creamier, and creates this sauce as they melt together that's basically liquid gold. One scoop per person is a lie. Plan for two, or you'll be fighting your guests for the last bite.
Creative Twists and Variations
This recipe is a playground. Here are some of my favorite ways to switch things up:
The Bourbon Street Version
Add 2 tablespoons of bourbon to the pears after they've cooked for 5 minutes. The alcohol cooks off, leaving behind this incredible depth that makes people ask if you used brown butter. Which, honestly, you could also do — brown the butter before adding the pears for nutty, toffee notes that pair perfectly with the bourbon. This version is dangerous — I've seen grown adults lick their plates.
The Breakfast Champion
Stir 1/4 cup of Greek yogurt into the topping mix. It makes the topping slightly tangy and more biscuit-like, turning this into a legitimate breakfast option. Add some chopped pecans for crunch, and suddenly you're eating fruit and oats for breakfast like a responsible adult. The yogurt also keeps the topping tender for days, not that it'll last that long.
The Tropical Escape
Swap pears for firm mangoes and add 1/2 teaspoon of ground ginger to the topping. The mangoes get this incredible honey-like sweetness when cooked, and the ginger adds warmth without being obvious. Use coconut oil instead of butter for a dairy-free version that tastes like you're on vacation. Serve with coconut ice cream and watch your winter blues disappear.
The Adult Only
Add 1/4 cup of chopped dark chocolate to the topping and serve with espresso poured over the top. The bitter coffee cuts through the sweetness, the chocolate adds richness, and suddenly this is a sophisticated dessert that belongs on a restaurant menu. If you've ever struggled with dinner party desserts, you're not alone — and I've got the fix.
The Comfort Food Mashup
Mix 2 tablespoons of peanut butter into the topping. It melts and creates these incredible pockets of peanut butter goodness throughout the crisp. Use honey-roasted peanuts instead of regular oats for half the amount. This tastes like someone took your favorite peanut butter cookies and your grandmother's fruit crisp and made them have a beautiful baby.
The Spice Market
Replace the cinnamon with 1/2 teaspoon each of cardamom and allspice. Add a pinch of black pepper — just a pinch! — for warmth. This version tastes like something you'd find in a Moroccan spice market, complex and intriguing. The pepper isn't obvious, but it makes the other spices taste more like themselves.
Storing and Bringing It Back to Life
Fridge Storage
Cover the cooled skillet with foil or transfer to an airtight container. It keeps for up to 5 days in the fridge, but let's be real — it won't last that long. The topping will soften slightly, but a quick reheat brings back the crunch. Store it in the skillet if you have room; cast iron retains cold well, so it chills evenly and stays fresh longer.
Freezer Friendly
This freezes beautifully for up to 3 months. Let it cool completely, then wrap individual portions in plastic wrap and freeze. Reheat from frozen at 350°F for 15-20 minutes. The topping stays surprisingly crispy, and the fruit doesn't get mushy. Pro tip: freeze portions in muffin tins for perfect single servings. Future pacing: imagine having dessert ready in 15 minutes on a random Wednesday night.
Best Reheating Method
The microwave works in a pinch, but the oven is where magic happens. Reheat at 350°F for 10-12 minutes until warmed through. Add a tiny splash of water before reheating — it steams back to perfection. The topping crisps up again, the fruit gets jammy, and it's almost like you just made it. Almost. I'll be honest — I usually just eat it cold straight from the fridge at 2 AM.