I was standing in my kitchen, staring at a half‑empty bottle of coconut rum and a bag of white chocolate liqueur, when a friend dared me to create the ultimate party shot. I thought, “Why not?” and set the table for a midnight experiment that would later become the highlight of every gathering I host. The air filled with the sweet, tropical aroma of coconut, the sharp citrus tang of rum, and the decadent promise of chocolate. The moment the first glass clinked, I realized I had stumbled onto a new flavor frontier—one that could turn any ordinary evening into an unforgettable celebration.
Picture yourself pulling this out of the freezer, the whole kitchen smelling like a beach resort and a chocolate factory rolled into one. The shots sit in the light like tiny snowballs, each one a glossy, frothy sphere of indulgence. When you take a sip, the coconut cream coats your palate like velvet, the rum adds a warm, spirited kick, and the white chocolate liqueur lingers with a subtle sweetness that makes you want a second round. I dare you to taste this and not go back for seconds.
What makes these snowball cream shots truly stand out isn’t just the combination of flavors—it’s the way I’ve balanced texture, chill, and finish to create a drink that feels like a dessert in a glass. I’ve learned that the trick is in the ratio of spirits to cream and in the final flourish of whipped cream and toasted coconut. Most recipes get this completely wrong, either over‑whipping the coconut or under‑chilling the mix, resulting in a flat, unmemorable sip. With my version, every shot is a creamy, chilled masterpiece that melts in your mouth and leaves a lingering, tropical aftertaste.
If you’ve ever struggled with making a shot that feels both sophisticated and approachable, you’re not alone—and I’ve got the fix. I’ll be honest—after I perfected the recipe, I ate half the batch before anyone else got to try it. But the moment they tasted it, the room erupted in cheers, and the shots became the unofficial signature of every party I throw. This is hands down the best version you'll ever make at home.
What Makes This Version Stand Out
- Flavor: The combination of coconut rum and white chocolate liqueur creates a complex yet harmonious profile that feels both tropical and indulgent.
- Texture: The use of coconut cream gives a velvety mouthfeel that balances the alcohol’s sharpness.
- Chill: Ice isn’t just an ingredient; it’s a tool that tempers the spirit and keeps the shot refreshingly cold.
- Finish: Whipped cream and shredded coconut add a final layer of richness and a pleasant crunch.
- Simple Prep: All you need is a blender, a few minutes, and a handful of ingredients—no complicated steps.
- Make‑Ahead: The shots hold up well in the fridge, so you can prep them hours ahead of a party.
Inside the Ingredient List
The Flavor Base
Coconut rum or vanilla vodka is the backbone of this shot, providing the tropical warmth that defines the flavor profile. If you prefer a more subtle kick, opt for vanilla vodka; it offers a smooth, rich taste that lets the coconut and chocolate shine. Skipping the spirit will leave you with a sweet, non-alcoholic treat, but the spirit adds depth and a satisfying finish. When choosing your base, look for a rum that has a clean finish—anything too heavy will overpower the delicate coconut notes.
The Texture Crew
White chocolate liqueur is the secret to the creamy, indulgent mouthfeel. It melts into the coconut cream, creating a silky blend that coats the palate like velvet. If you can’t find white chocolate liqueur, a splash of chocolate syrup mixed with a dash of milk will do, but the result will be less refined. The coconut cream or coconut milk is equally important; coconut cream gives a thicker, richer texture, while coconut milk offers a lighter, more refreshing feel. For the best results, use a full‑fat coconut cream.
The Unexpected Star
Ice is the unsung hero that keeps the mixture chilled and ensures a smooth, frothy consistency. Don’t underestimate the power of a good ice cube—crushed ice will create a more slushy texture, while larger cubes will chill the mixture more slowly. If you want a slushy finish, blend the mixture with a handful of crushed ice; if you prefer a smoother shot, use larger cubes or a few frozen berries to add a subtle flavor twist. The ice also helps to dilute the alcohol slightly, making the shot easier to sip.
The Final Flourish
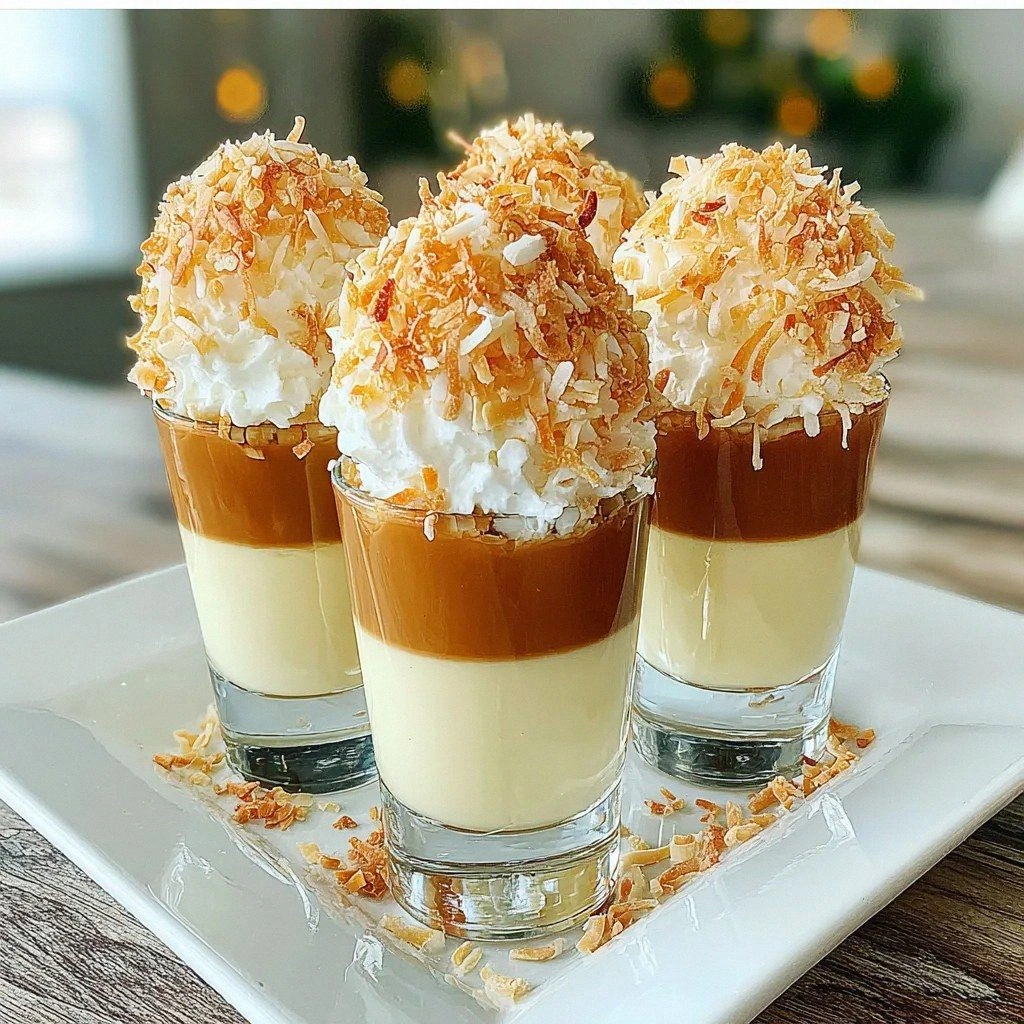
Whipped cream and shredded coconut are the finishing touches that elevate these shots from good to unforgettable. The whipped cream provides a light, airy texture that contrasts with the dense coconut base, while the toasted coconut adds a delightful crunch and an extra burst of coconut flavor. Toasting the coconut for 2–3 minutes in a dry pan until it turns golden will bring out its nutty aroma and add a subtle caramel note. If you’re looking for a low‑calorie option, skip the whipped cream and use a dollop of coconut yogurt instead.
Everything's prepped? Good. Let's get into the real action.
The Method — Step by Step
- Start by chilling your shot glasses in the freezer for at least 15 minutes; cold glasses keep the mixture from warming too quickly. While the glasses are cooling, gather all your ingredients and set them on the counter. The ritual of arranging everything before you begin is a small but satisfying moment of anticipation. This step is simple, but it sets the tone for the rest of the process.
- Add two cups of ice into a high‑speed blender; the ice will create the frothy base and help keep the mixture chilled. If you prefer a slushier texture, use crushed ice instead of cubes. The blender will work its magic in about 20–30 seconds, turning the ice into a fine, snow‑like consistency. Watch the color shift from clear to milky white—this is the moment of truth.
- Pour in one cup of coconut rum (or vanilla vodka) and one cup of white chocolate liqueur; the spirits add depth and a subtle kick that balances the sweetness. Stir the mixture gently to combine; you’ll notice a sweet aroma that’s almost intoxicating. The key here is to keep the blender running until the mixture is smooth and uniform, with no ice crystals visible.
- Add one cup of coconut cream (or coconut milk); this will give the shots their signature creamy texture. Blend again until the coconut integrates fully and the mixture is silky. The result should be a thick, frothy liquid that resembles a chilled dessert.
- Taste a small spoonful to check the balance—if it’s too sweet, a splash of rum or a pinch of salt can cut the sugar. If it’s too strong, add a little coconut milk to mellow the alcohol. Adjusting the flavor at this stage saves you from a batch that’s too boozy or too bland.
- Pour the blended mixture into the pre‑chilled shot glasses, filling each about three‑quarters full. The mixture should pour smoothly and create a perfect, glossy surface. The glasses should feel cold to the touch, hinting at the refreshing sip that awaits. This step is where the visual appeal starts to shine.
- Top each shot with a generous swirl of whipped cream; the airy topping will contrast the dense coconut base and add a light, indulgent finish. Use a piping bag if you have one, or simply spoon the cream onto the shot. The whipped cream should sit on top without mixing into the liquid, creating a two‑tone effect.
- Sprinkle a light dusting of toasted shredded coconut over the whipped cream; the coconut adds a crunchy texture and an extra burst of flavor. Toast the coconut for 2–3 minutes until it turns golden and fragrant; this small step elevates the overall taste experience. The final garnish should look inviting and slightly rustic.
- Place the glasses in the refrigerator for at least 30 minutes to allow the flavors to meld and the mixture to set. The cold will help the whipped cream maintain its structure and keep the shot chilled. While they’re cooling, you can prepare any additional garnishes or set the table for your guests.
- Serve immediately from the fridge; the shots will be at their peak when they’re cold and freshly topped. Encourage your guests to take a sip and feel the contrast between the creamy coconut base, the sweet liqueur, and the airy whipped cream. Remind them that each shot is a mini dessert, not just a drink.
That’s it — you did it. But hold on, I've got a few more tricks that'll take this to another level. These insider tips will help you perfect the balance and elevate the presentation.
Insider Tricks for Flawless Results
The Temperature Rule Nobody Follows
Keeping everything cold is essential; even a slight rise in temperature can cause the coconut cream to separate. Chill all liquid ingredients in the fridge for at least an hour before starting, and keep the blender’s lid on to prevent heat buildup. A friend once skipped this step and ended up with a lumpy, uneven mixture that tasted like a failed smoothie. The lesson? Temperature is the silent hero that keeps your shots silky.
Why Your Nose Knows Best
Smell the mixture as you blend; if it starts to develop a sour or off note, it’s time to stop and re‑evaluate. A fresh coconut liqueur will emit a sweet, nutty aroma, while a stale one will have a slightly metallic scent. Trusting your nose ensures that each shot is aromatic and flavorful. I’ve always kept a small bottle of fresh coconut liqueur on hand to test before mixing.
The 5-Minute Rest That Changes Everything
After pouring the mixture into the glasses, let them sit for 5 minutes before topping with whipped cream. This short rest allows the mixture to settle, making the whipped cream sit on top rather than sinking. It also gives the flavors a chance to meld, resulting in a more harmonious sip. I’ve found that this simple pause makes a noticeable difference in the final taste.
The Garnish Game
Instead of plain shredded coconut, try adding a pinch of sea salt or a drizzle of caramel sauce on top of the whipped cream. The salt enhances the sweetness, while the caramel adds a caramelized depth. These small additions can transform a simple shot into a gourmet experience. Experiment and find your favorite combination.
The Quick Chill Trick
If you’re short on time, place the shot glasses in a bowl of ice water for 5 minutes before pouring. This technique quickly cools the glasses, ensuring that the shots stay colder for longer. I’ve used this trick during busy parties where the guests are eager to taste, and it saves both time and effort.
Remember, these tricks are not just tips—they’re the difference between a good shot and a legendary one.
Creative Twists and Variations
This recipe is a playground. Here are some of my favorite ways to switch things up:
Tropical Twist
Swap the coconut rum for a pineapple rum and add a splash of fresh pineapple juice. The result is a bright, tropical flavor that’s perfect for summer parties. The pineapple adds a zesty kick that balances the sweetness of the coconut.
Minty Fresh
Add a few fresh mint leaves to the blender for a cooling, herbaceous note. Garnish with a mint sprig on top of the whipped cream for a refreshing finish. Mint pairs beautifully with coconut, creating a palate‑cleaning effect.
Caramelized Coconut
Toast the shredded coconut in a pan with a pinch of brown sugar until caramelized. Use this as the garnish for a richer, caramel‑coconut flavor. The sweet crunch adds a delightful texture to each shot.
Coffee Kick
Add a shot of cold brew coffee to the mixture for a mocha‑like twist. The coffee’s bitterness balances the sweetness and adds depth. This variation is a hit with coffee lovers who want a sophisticated drink.
Spiced Vanilla
Infuse the vanilla vodka with a cinnamon stick before blending. The subtle spice adds warmth and complexity, making the shot feel like a cozy winter treat.
Chocolate Lover’s Edition
Replace the white chocolate liqueur with dark chocolate liqueur for a richer, bittersweet flavor. The dark chocolate pairs well with coconut cream, creating a decadent dessert shot that satisfies any chocolate craving.
Storing and Bringing It Back to Life
Fridge Storage
Store the shot glasses in the refrigerator for up to 48 hours. Keep the glasses sealed with a lid or wrap them in plastic wrap to prevent them from absorbing fridge odors. When ready to serve, give them a quick chill on ice to ensure they’re perfectly cold.
Freezer Friendly
For longer storage, freeze the shot mixture in silicone molds or ice cube trays. Once frozen, transfer the cubes to a freezer bag and keep them for up to three months. Thaw at room temperature for a few minutes before pouring into fresh shot glasses.
Best Reheating Method
To revive a frozen shot, place it in a bowl of warm water for 5 minutes; this gently melts the mixture without overheating. Add a splash of coconut milk to restore the creamy texture if it has become too thick. This simple technique brings the shot back to its original silky state.