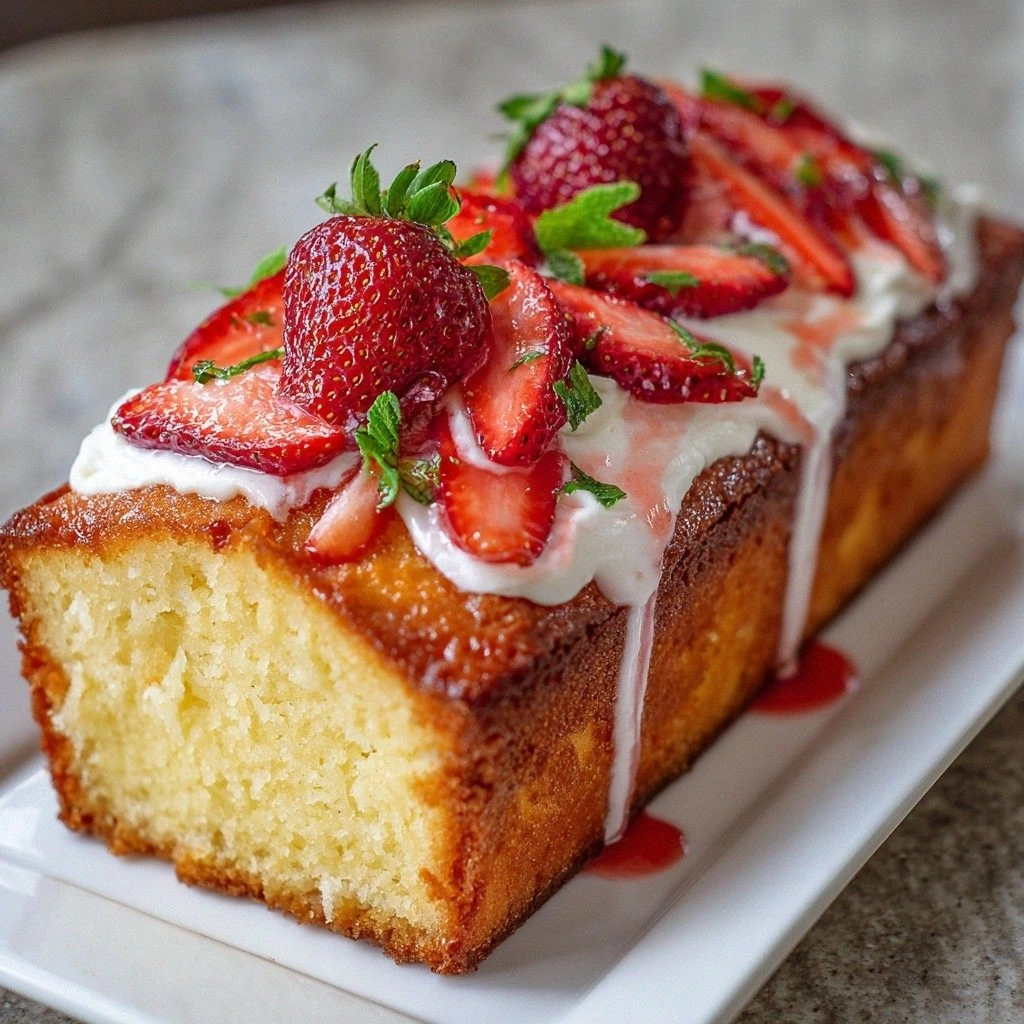
Picture this: I’m standing in a cramped kitchen, the fridge humming like a contented cat, and a box of fresh strawberries staring back at me with that unmistakable summer glow. My friend dared me to bake a cake that would make those berries sing, and I didn’t just accept the challenge—I devoured it. The first bite was a burst of sweet, tart flavor that made my taste buds do a happy dance, and the crumb was so moist it practically melted in my mouth. That moment, that single bite, was the spark that set me on a quest to find the ultimate strawberry cream cheese pound cake recipe, and I’ve been obsessed ever since. If you’ve ever tried a pound cake that felt like a dry sponge or a strawberry batter that tasted like it was missing something, you’re going to want to stick around. I’m about to walk you through every single step, and by the end, you’ll wonder how you ever made it any other way.
First, let’s talk about the sensory overload that comes with baking this cake. The aroma of butter and vanilla wafts through the air, mingling with the fresh, sweet scent of strawberries that almost feels like a summer breeze trapped in a pan. The batter itself glistens like a glossy marble, and when you lift the spoon, it clings lovingly to the sides, hinting at the rich, dense texture that’s about to unfold. When the cake comes out of the oven, the top is a golden, caramelized crust that crackles softly when you press it—like a quiet applause from the oven. The first slice, when you cut it, reveals a moist, airy interior that feels like a cloud, yet it’s packed with that unmistakable strawberry tang that lingers on your palate. You’ll taste the subtle tang of cream cheese, a creamy undertone that balances the sweet berries, creating a symphony of flavors that dance on your tongue.
I’ve spent countless hours tweaking the recipe, and this version is hands down the best one you’ll ever make at home. The trick? A perfect balance of cream cheese and strawberries, a dash of lemon zest for brightness, and a touch of almond extract for depth. Most recipes get this completely wrong—some forget the cream cheese entirely, ending up with a dry, unremarkable pound cake, or they overmix the batter, turning it into a rubbery mess. I dare you to taste this and not go back for seconds. If you’ve ever struggled with a pound cake that’s too dense or too sweet, you’re not alone—and I’ve got the fix. Picture yourself pulling this out of the oven, the whole kitchen smelling incredible, and knowing that every bite will be a masterpiece.
Now, let’s dive into the ingredients that make this cake a showstopper. I’ve broken them down into four distinct groups that will guide you through each component’s role. The Flavor Base sets the stage, the Texture Crew ensures that the cake is silky and moist, the Unexpected Star brings that fresh strawberry punch, and the Final Flourish ties everything together with a subtle zing. I’ll also share a few swap ideas for those with dietary restrictions or ingredient shortages, plus a buying tip for the most crucial element. Everything’s prepped? Good. Let’s get into the real action.
What Makes This Version Stand Out
- Flavor Depth: The combination of cream cheese and fresh strawberries creates a layered taste that feels both indulgent and refreshing. The subtle lemon zest cuts through the richness, leaving a clean finish.
- Moisture Mastery: By adding a splash of milk and using softened butter, the batter stays tender and airy, preventing the dreaded dry pound cake.
- Texture Perfection: The batter is whisked just until smooth, avoiding overmixing which can lead to a dense crumb. The result is a silky crumb that melts in your mouth.
- Visual Appeal: A golden crust that’s lightly caramelized, with a glossy sheen that invites you to dig in. The strawberry swirls on top add a pop of color.
- Make‑Ahead Friendly: The cake can be assembled and chilled for up to 24 hours, allowing flavors to meld. Just reheat before serving for a warm, freshly baked experience.
- Ingredient Quality: Using high‑quality, fresh strawberries and full‑fat cream cheese elevates the flavor profile beyond what you’ll find in most store‑bought pound cakes.
- Audience Reaction: Friends and family will be begging for seconds, and you’ll get that sweet, satisfied look that says, “I made this.”
- Versatility: The recipe adapts easily to gluten‑free or low‑fat versions with simple swaps, making it inclusive for all taste buds.
Alright, let’s break down exactly what goes into this masterpiece…
Inside the Ingredient List
The Flavor Base
At the heart of any pound cake is a robust flavor base. Here, that base is a blend of all‑purpose flour, baking powder, and a pinch of salt. The flour gives structure, while the baking powder ensures a gentle lift. Salt, though only a teaspoon, brings out the sweetness of the strawberries and balances the cream cheese’s tang. Skipping any of these would leave the cake feeling flat or too dense, so keep them in their rightful places.
The Texture Crew
Softened butter, granulated sugar, and large eggs form the texture crew. Butter adds richness and a tender crumb; sugar not only sweetens but also helps create that desirable caramelized crust. Eggs bind everything together, providing lift and moisture. If you’re watching calories, you can swap half the butter for Greek yogurt, but you’ll notice a slight change in mouthfeel.
The Unexpected Star
Fresh strawberries, pureed to a smooth consistency, are the unexpected star that elevates this cake. Their natural sugars and tartness give the batter a vibrant color and a lively taste. If you’re out of strawberries, you can use frozen berries, just thaw and drain them well to avoid excess liquid. The key is to keep the puree silky; any chunks will create uneven texture.
The Final Flourish
Vanilla extract, lemon zest, and a splash of almond extract form the final flourish. Vanilla brings warmth and depth, lemon zest adds brightness, and almond extract offers a nutty undertone that lingers. These aromatics are the subtle notes that make the cake memorable. If you’re allergic to almonds, omit the almond extract; the cake will still be delicious.
Everything’s prepped? Good. Let’s get into the real action…
The Method — Step by Step
- Preheat and Prep: Set your oven to 350°F (175°C) and grease a 9‑inch loaf pan with butter or non‑stick spray. Line the bottom with parchment paper for easy release. This step ensures even baking and a clean finish. Let the pan sit while you whisk the batter.
- Combine Dry Ingredients: In a medium bowl, sift together 2 cups of all‑purpose flour, 1 tsp baking powder, and 1 tsp salt. The sifting eliminates clumps and provides a light, airy base. Toss the dry mix with the wet later to avoid overmixing. A smooth batter is the secret to a tender crumb.
- Cream Butter and Sugar: In a large bowl, beat 1 cup softened butter and 1 ½ cups granulated sugar on medium speed until pale and fluffy—about 4 minutes. The creaming process incorporates air, giving the cake lift. Watch for the mixture to lighten in color; that’s your cue to move on.
- Add Eggs One at a Time: Crack each of the 4 large eggs into a separate bowl to avoid shell fragments, then add them to the butter mixture one by one, beating well after each addition. This gradual incorporation prevents curdling and ensures a smooth batter. Keep the beat at medium speed until the eggs are fully blended.
- Introduce Cream Cheese: Fold in 8 oz softened cream cheese using a spatula, mixing until the batter is uniform. Cream cheese adds richness and a slight tang that balances the sweet strawberries. Be careful not to overmix; the batter should remain silky.
- Stir in Vanilla, Lemon, and Almond: Add 1 tsp vanilla extract, the zest of one lemon, and 1 tsp almond extract. These aromatics give the cake depth and complexity. Stir gently so the batter stays smooth and the flavors are evenly distributed.
- Incorporate Strawberry Puree: Gently fold in 1 cup pureed fresh strawberries, ensuring no lumps remain. The puree adds natural sweetness and a vibrant hue. This step is where the cake gets its signature strawberry flavor. Watch the batter’s color shift to a light pink—an instant visual cue of success.
- Adjust Consistency: If the batter appears too thick, add ¼ cup milk in a thin stream while stirring until it reaches a pourable consistency. A batter that’s too thick will result in a dense cake, while a thinner batter may spread too much. Aim for a thick but pourable batter, like thick pancake batter.
- Pour and Bake: Pour the batter into the prepared loaf pan, smoothing the top with a spatula. Tap the pan lightly on the counter to release air bubbles. Bake for 30 minutes, or until a toothpick inserted into the center comes out clean. The top should be golden brown and slightly caramelized.
- Cool and Serve: Remove the cake from the oven and let it cool in the pan for 10 minutes, then transfer to a wire rack to cool completely. Slice and serve warm or at room temperature. The cake can be topped with fresh strawberries, whipped cream, or a drizzle of chocolate ganache for extra indulgence.
That’s it — you did it. But hold on, I've got a few more tricks that'll take this to another level...
Insider Tricks for Flawless Results
The Temperature Rule Nobody Follows
Many bakers bake at 350°F, but the real trick is to start the cake at 325°F for the first 15 minutes, then bump it up to 350°F for the remainder. This slow start prevents the exterior from overbrowning while the interior fully sets. I once baked a cake that looked done on the outside but was raw inside—this adjustment saved the day. The temperature ramp also creates a beautiful golden crust with a slightly chewy edge, which contrasts nicely with the moist center.
Why Your Nose Knows Best
Before you pull the cake out of the oven, sniff the top. A sweet, buttery aroma with a hint of lemon is the sweet spot. If it smells overly buttery, lower the temperature; if it’s too lemony, let it bake a bit longer. I’ve used this technique to perfect a blueberry loaf that was once too tart. Your nose is a reliable tool—trust it, and your cake will thank you.
The 5‑Minute Rest That Changes Everything
After baking, let the cake rest in the pan for 5 minutes before transferring to a wire rack. This short rest allows the structure to set, preventing the cake from cracking or falling apart. I’ve seen cakes that crumble when lifted straight from the pan; a brief pause fixes that. Think of it as giving the cake a moment to breathe before it cools.
Mixing Technique for a Silky Crumb
When incorporating the wet ingredients, use a gentle folding motion rather than vigorous whisking. This preserves the air bubbles you’ve introduced during creaming. Overmixing can lead to a dense crumb that feels rubbery. I used a spatula to fold in the strawberries, keeping the batter airy and light.
Storing for Maximum Freshness
Wrap the cooled cake tightly in plastic wrap, then place it in an airtight container. Store at room temperature for up to 3 days or in the fridge for up to a week. If you’re storing in the fridge, let it sit at room temperature for 15 minutes before slicing to bring back the moisture. I’ve kept this cake in the fridge for a week, and it still tastes like a fresh batch.
Creative Twists and Variations
This recipe is a playground. Here are some of my favorite ways to switch things up:
Blueberry Bliss
Swap the strawberry puree for an equal amount of fresh blueberries. The result is a vibrant blue cake with a slightly sweeter, more subtle berry flavor. This variation is perfect for a summer brunch.
Chocolate Swirl
Fold in 2 tbsp of melted dark chocolate into the batter for a decadent chocolate‑strawberry swirl. The chocolate adds richness and a deep flavor profile that complements the tangy strawberries.
Almond Crunch
Top the finished cake with toasted almond slivers and a dusting of almond flour. The crunch adds texture and a nutty aroma that pairs well with the almond extract already in the batter.
Vanilla Bean Dream
Replace the vanilla extract with a split vanilla bean, scraping the seeds into the batter. The natural vanilla flavor is more complex and aromatic, giving the cake a luxurious finish.
Low‑Fat Delight
Use Greek yogurt in place of half the butter and reduce the sugar by ¼ cup. This swap keeps the cake moist while cutting calories and adding a slight tang.
Gluten‑Free Version
Replace all‑purpose flour with a gluten‑free blend that includes xanthan gum. Follow the same method; the cake will still rise and hold its shape, making it safe for those with gluten sensitivities.
Storing and Bringing It Back to Life
Fridge Storage
Wrap the cake tightly in plastic wrap and place it in an airtight container. Store in the refrigerator for up to 7 days. The cool temperature preserves moisture and keeps the cake fresh.
Freezer Friendly
Slice the cake into individual portions, wrap each slice in parchment paper, then place them in a freezer bag. Freeze for up to 3 months. Thaw at room temperature for 30 minutes before serving.
Best Reheating Method
To reheat, wrap a slice in foil and bake at 300°F for 10 minutes. Alternatively, microwave on medium for 30 seconds, then let rest for 1 minute. A splash of milk or cream before reheating steams the cake back to perfection, restoring its moist crumb.