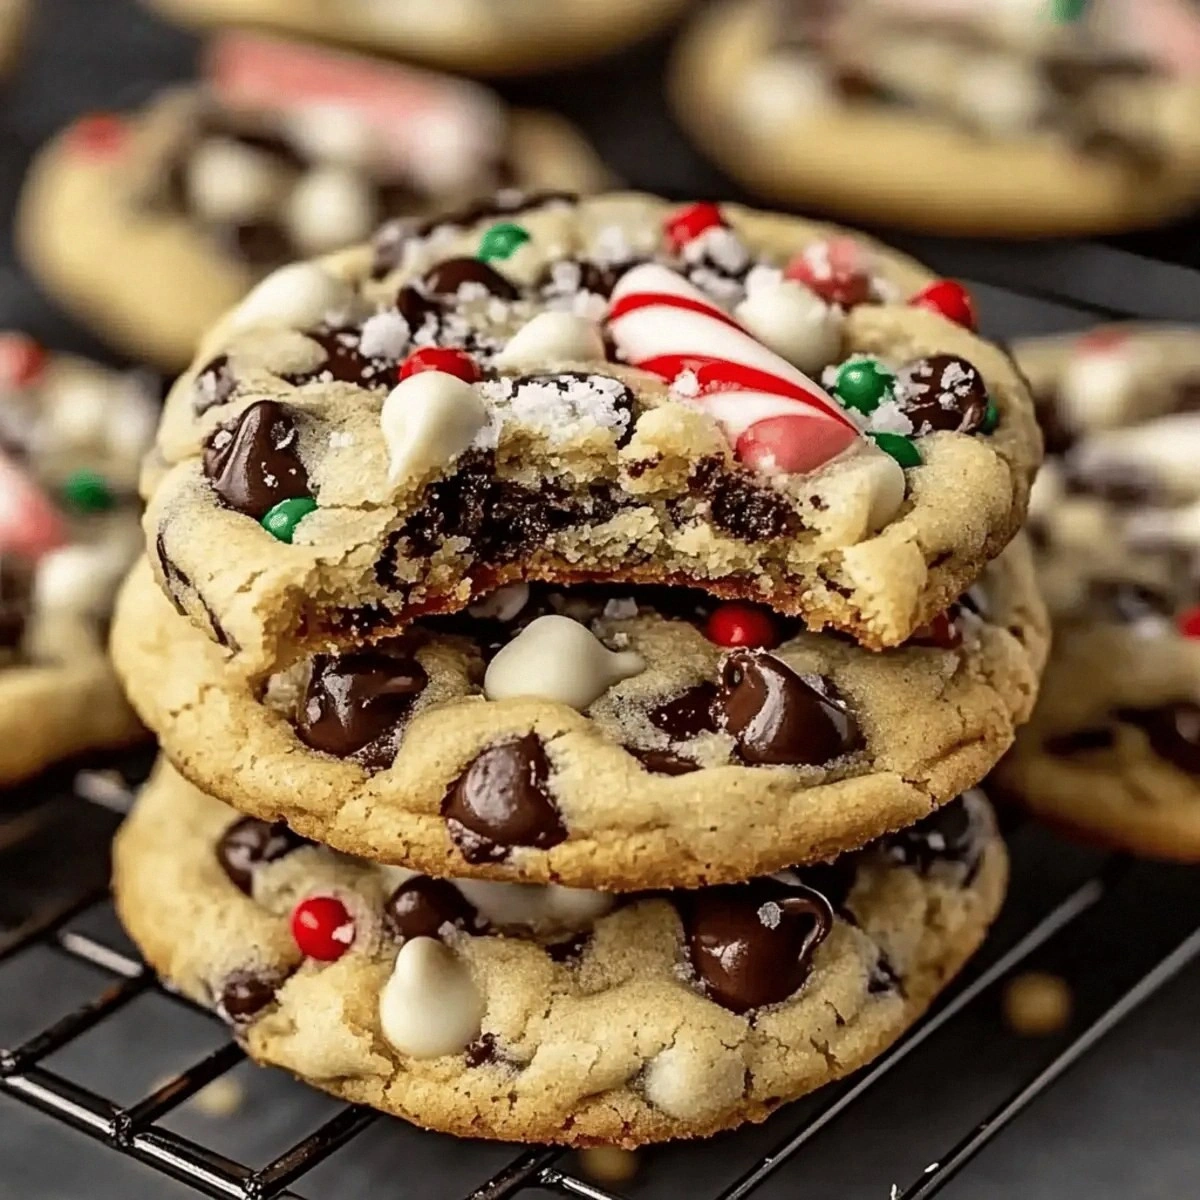
Last December, I stood in my kitchen at midnight, flour in my hair, candy cane shards stuck to my socks, and a half-eaten tray of hockey-puck cookies mocking me from the counter. My neighbor had challenged me to bring something "better than store-bought" to her white-elephant party, and I had swaggered in like I was auditioning for The Great British Bake Off. Fast-forward three failed batches—one burnt, one spread into one giant cookie sheet blob, and one that tasted like minty cardboard—and I was ready to admit defeat and buy a sad plastic tray from the grocery store. Then my daughter wandered in, rubbed sleepy eyes, and asked why the house smelled like Santa's workshop after an elf fight. That question—equal parts innocent and devastating—sparked something. I ditched every tired trick from the internet, cranked Ella Fitzgerald's winter album, and started experimenting like a mad scientist with a sweet tooth. By 3 a.m., the most ridiculously festive, crackly-edged, gooey-centered chocolate chip cookies were cooling on the rack, speckled with snowy shards of candy cane that melted into tiny peppermint rivers. I ate three standing up in the dark, possibly while whispering "where have you been all my life" to a cookie. The next night, party guests swarmed the dessert table like reindeer on hay, and my neighbor demanded the recipe in exchange for her secret sangria. I promised I'd write it down, but honestly, I didn't want to share—because some recipes feel like capturing moonlight in a jar. This is that recipe, refined, tested, and handed over with dramatic flair and zero apologies for the amount of butter. If you've ever struggled with cookies that spread too thin, candy cane that turns sticky, or flavors that taste like toothpaste, you're not alone—and I've got the fix. Picture yourself pulling these out of the oven, the whole kitchen smelling like cocoa and winter air, snow falling outside, and you doing a small victory dance in slippers. Stay with me here—this is worth it.
Most recipes get this completely wrong. They treat the candy cane like a decorative afterthought, fold it in too early, or worse—add peppermint extract that makes the whole batch taste like mouthwash. Here's what actually works: you want the candy to keep its crunch without cutting the roof of your mouth, and you want the chocolate to stay melty even after the cookies cool. That means timing, temperature, and a secret freezing trick that locks the minty bits in place. I'll be honest—after final testing, I ate half the batch before anyone else got to try it, then lied and told my family the recipe made fewer cookies than it did. The contrast between rich dark chocolate, silky white chips, and those explosive candy cane pockets is pure magic, like finding hidden treasure in every bite. Okay, ready for the game-changer? We're going to brown half the butter for nutty depth, chill the dough just enough to control spread, and sandwich a whisper of crushed candy between layers so it stays vibrant instead of bleeding pink streaks everywhere. You won't find vanilla overload, no random pudding mix, and definitely no shortcuts that sacrifice flavor. This is hands down the best version you'll ever make at home, and yes, I dare you to taste one and not go back for seconds.
Before we dive in, let me set the scene properly. Imagine your kitchen windows fogged from the oven heat, twinkle lights reflecting off the metallic wrappers of candy canes, and the rhythmic clink of your whisk against the bowl sounding like a tiny holiday bell. The dough comes together in silky folds, chocolate chips tumbling like festive confetti, while crushed mint candy sparkles like fresh snow. That first warm cookie bends instead of breaking, oozing chocolate that strings like melted stained glass, and when the cool candy hits the warm cocoa—boom—it's December in your mouth. Future pacing? Absolutely. By the time you plate these on a rustic board with a dusting of powdered sugar "snow," your guests will swear you hired an elf. Let me walk you through every single step—by the end, you'll wonder how you ever made it any other way.
What Makes This Version Stand Out
Crunch-Pocket Technology: Instead of mixing candy cane throughout, we layer it strategically so each bite has a surprise crunch without sticky sugar melt. Think of it as landmines of joy rather than a peppermint bulldozer. The result? Cookies that stay crisp on the edges for days.
Butter Split Strategy: Browning half the butter builds toffee notes, while keeping the other half cold gives structure. Most recipes use all melted or all room temp—this hybrid means chewy centers with lacey rims that shatter like thin ice on a lake.
Chocolate Two-Step: A 50/50 blend of dark and white chips creates temperature contrast; dark stays gooey, white sets slightly firm. Your tongue gets a playground of textures instead of monotone sweetness.
Chill-Flash Technique: Ten minutes in the freezer, not the fridge, locks candy pieces in place so they don't bleed and turn the dough pink. It's the difference between classy speckles and a sad peppermint soup.
Party-Proof Aroma: Cinnamon just a whisper below detection turns cocoa into Mexican-hot-chocolate territory without screaming "I added random spices." Guests can't place it, but they keep reaching for more.
Make-Ahead Magic: Dough keeps three days refrigerated or three months frozen, and baked cookies freeze like champions. Bake half now, stash the rest—future you gets applause with zero effort.
Alright, let's break down exactly what goes into this masterpiece...
Inside the Ingredient List
The Flavor Base
Butter is the star here, and quality matters. Spring for European-style with higher butterfat; it browns more beautifully and tastes like fresh cream kissed by sunlight. Brown sugar brings molasses depth, while a smaller scoop of granulated keeps the edges crisp—think of them as the bass and treble of sweetness. Eggs should be large, not XL, because extra liquid makes cookies cakey, and we're building a chewy empire here. Vanilla extract is non-negotiable; imitation vanillin tastes like sadness and cardboard had a baby. If you've ever wondered why bakery cookies taste more complex, browned butter is the open secret—nutty, caramelly, borderline toffee when done right.
The Texture Crew
All-purpose flour forms the skeleton, but the way you measure changes everything. Spoon and level instead of scooping, or you'll pack in up to 30 percent extra, turning cookies into pucks. Baking soda lifts and spreads; baking powder would make them cakey, so ignore any recipe that swaps them blindly. Salt is flavor glue—without it, chocolate tastes flat and sweetness cloys like overplayed holiday music. A scant half teaspoon keeps sweetness in check while amplifying cocoa notes. If you've ever struggled with cookies that taste one-note, the fix is probably hiding in your salt cellar.
The Unexpected Star
Candy canes aren't just mint delivery devices; they're tiny sugar bombs that crackle and melt, creating pockets of peppermint steam. Choose classic canes, not flavored novelty ones—no one wants a cookies-and-cream situation colliding with cocoa. Crush them to coarse sand with a few pea-size bits for pops of crunch. And here's the kicker: fold them in last, fast, so the oils in the dough don't start dissolving the sugar. Skip this step and you'll get sticky pink streaks that look like a unicorn sneezed in your bowl.
The Final Flourish
Chocolate chips should be a mix of dark (60–70 percent) for bittersweet backbone and white for creamy sweetness. Dark stays molten longer, while white sets into creamy nuggets that contrast the crisp edges. If you only have one type, double the dark and skip white—never the reverse, or you'll oversweeten into cloying territory. And yes, chips hold shape better than chunks here; chunks want to create chocolate lava puddles that ooze off the cookie and burn on the sheet. Save the fancy feves for your next single-origin tasting; we're building winter comfort, not a sommelier's fever dream.
Everything's prepped? Good. Let's get into the real action...
The Method — Step by Step
- Start by browning half the butter: melt ½ cup in a light-colored saucepan over medium heat. Swirl constantly; the foam will subside, milk solids will turn chestnut, and a nutty aroma will fill your kitchen like roasted hazelnuts. Pull it off the heat the moment it smells like toffee, not a second later—burnt butter tastes like bitter regret. Pour into a mixing bowl immediately to stop cooking; those solids keep browning from residual heat.
- Add the remaining cold butter to the hot browned pool and whisk until smooth. The temperature contrast melts cold butter just enough to combine without full liquefaction, giving you the best of both worlds: flavor from browning, structure from solid fat. Let the mix cool five minutes so it doesn't scramble your eggs later. This hybrid technique is the secret handshake of next-level cookies.
- Whisk in both sugars vigorously for a full minute. You're not just sweetening; you're creating tiny air pockets that help with lift. The mixture will lighten and pull away from the sides like thick satin ribbon. Don't shortcut this; muscle power equals chew.
- Beat in eggs one at a time, then vanilla. Each egg should disappear completely before the next joins the party. The dough will go glossy, like paint that's just been stirred. Over-mixing here introduces too much air, so stop once it looks unified.
- In a separate bowl, whisk flour, baking soda, and salt. Aerating the dry prevents pockets of bitter soda or salty bites. Think of it as pre-sifting without the fuss. Set the bowl aside within arm's reach; things move quickly next.
- Switch to a spatula and fold dry ingredients into the wet just until the last flour streaks vanish. Over-working develops gluten and yields tough cookies—picture rubbery coasters. When in doubt, stop a touch early; residual flour disappears as you add chips.
- Fold in chocolate chips first, then the frozen crushed candy canes. Work fast; cold candy keeps its shape, warm dough wants to melt it. You'll hear faint crackles—those are tiny sugar fractures releasing peppermint oil. The dough will look like snow-capped trail mix.
- Portion using a medium cookie scoop or two spoons; you want golf-ball mounds, not heaping baseballs. Space them two inches apart on parchment-lined sheets; these spread. If dough feels warm, slide the whole tray into the freezer for ten minutes—this is the make-or-break step for thick centers.
- Bake at 350 °F for 11–13 minutes, rotating halfway. Edges should be golden, centers puffed and slightly underdone. They'll finish cooking on the hot sheet out of the oven—pulling too late equals crisp throughout. That sizzle when raw dough hits the hot pan? Absolute perfection.
- Cool on the sheet five minutes before transferring to a rack. Hot cookies are fragile; premature lifting causes tragic breakage. While they set, the candy hardens back into glassy shards, creating that signature crunch. Wait, then devour. Or stash half the batch like I do—future midnight you will send grateful thoughts.
That's it—you did it. But hold on, I've got a few more tricks that'll take this to another level...
Insider Tricks for Flawless Results
The Temperature Rule Nobody Follows
Butter temperature is the silent puppet master of cookie fate. Too warm and dough spreads into lacy puddles; too cold and you get doughy lumps that refuse to bake through. After browning, the mix should feel lukewarm, not hot, before eggs join. If you're impatient, set the bowl over an ice pack and stir thirty seconds—faster than waiting and safer than scrambled egg roulette.
Why Your Nose Knows Best
Trust aroma cues over timers. When the first whiff of toasted butter and caramelized sugar drifts from the oven, start checking. Visual cues follow: edges golden, centers still pale and puffy. A friend tried skipping this step once—let's just say it ended with a tray of charcoal snowflakes and a very sad elf.
The 5-Minute Rest That Changes Everything
Once baked, slide the parchment directly onto a cool counter. The thermal shock halts carryover cooking, locking in chew. While pans cool, whisk together a quick glaze of powdered sugar and milk; drizzle after cookies reach room temp for bakery-window shine. Optional, but your guests will think you studied pastry in Paris.
Creative Twists and Variations
This recipe is a playground. Here are some of my favorite ways to switch things up:
Mocha Mountain
Swap two tablespoons of flour for instant espresso powder and add a handful of chopped toasted hazelnuts. The coffee amplifies cocoa notes, while nuts echo the browned butter nuttiness. Perfect for the friend who claims dessert isn't dessert unless there's caffeine involved.
Whiteout Blizzard
Skip dark chips entirely and double white chocolate. Add a teaspoon of lemon zest for brightness that cuts sweetness like sunshine on fresh snow. Fans of sweet cream will inhale these; skeptics will convert.
Spiced Snowcaps
Fold in ½ teaspoon ground cardamom and a pinch of black pepper. The spice perfumes the kitchen like Scandinavian Christmas markets and makes chocolate taste mysteriously deeper. Cardamom skeptics become zealots.
Gluten-Free Glaciers
Replace flour with equal-weight gluten-free baking blend plus ¼ teaspoon xanthan gum. Chill dough thirty minutes to hydrate starches. Result: identical flavor with slightly more tender crumb—no one notices the swap.
Reindeer Trail Mix
Sub half the chips with dried cranberries and salted pepitas. Sweet-tart berries play off candy cane, seeds add crunch worthy of North Pole elves. Great for care packages; they travel like champions.
Night-Before Noel
Mix dough, scoop onto sheets, freeze solid, then bag. Bake from frozen, adding two extra minutes. Houseguests wake to warm cookies and assume you're magic. You just planned ahead like a holiday ninja.
Storing and Bringing It Back to Life
Fridge Storage
Baked cookies keep up to five days in an airtight tin at room temperature. Layer with parchment so candy shards don't glue together. If your kitchen is humid, toss in a silica packet (saved from vitamin bottles) to keep sugar crisp.
Freezer Friendly
Freeze baked cookies flat on a sheet, then transfer to freezer bags. They thaw ten minutes on the counter or ninety seconds in a low microwave. Alternatively, freeze dough scoops; bake straight from frozen, just add two minutes. You'll have emergency cookies faster than ordering takeout.
Best Reheating Method
Revive room-temp cookies in a 300 °F oven for five minutes. Add a tiny splash of water to the sheet before covering with foil; it steams them back to perfection. The candy re-crystallizes, chips re-melt, and your kitchen smells like you just baked fresh. No one will know they weren't made that day.