I was standing in the kitchen, staring at a burnt batch of brownies that had turned into a brownish, sticky mess, and I thought, “This is how dessert disasters happen.” The oven was too hot, the timer was set wrong, and the chocolate had gone from glossy to a hard, bitter slab. That night, I craved something sweet, comforting, and actually edible, and I decided to rewrite the whole story. I pulled out my pantry, grabbed a handful of Medjool dates, a jar of tahini, and a bag of dark chocolate chips, and I imagined a new dessert that could save the day.
Picture the kitchen air thick with the scent of toasted oats and nutty almonds, the sound of a blender whirring like a tiny motorbike, and the sight of a glossy mixture that glistens under the kitchen light. I can almost taste the first bite—sweet, slightly salty, with a chocolate undertone that feels indulgent but not overwhelming. My fingers are slick with coconut oil, and my apron is stained with maple syrup, but the anticipation is worth every sticky moment. I’ve found that when you let the ingredients sing together, the result is a treat that feels both luxurious and wholesome.
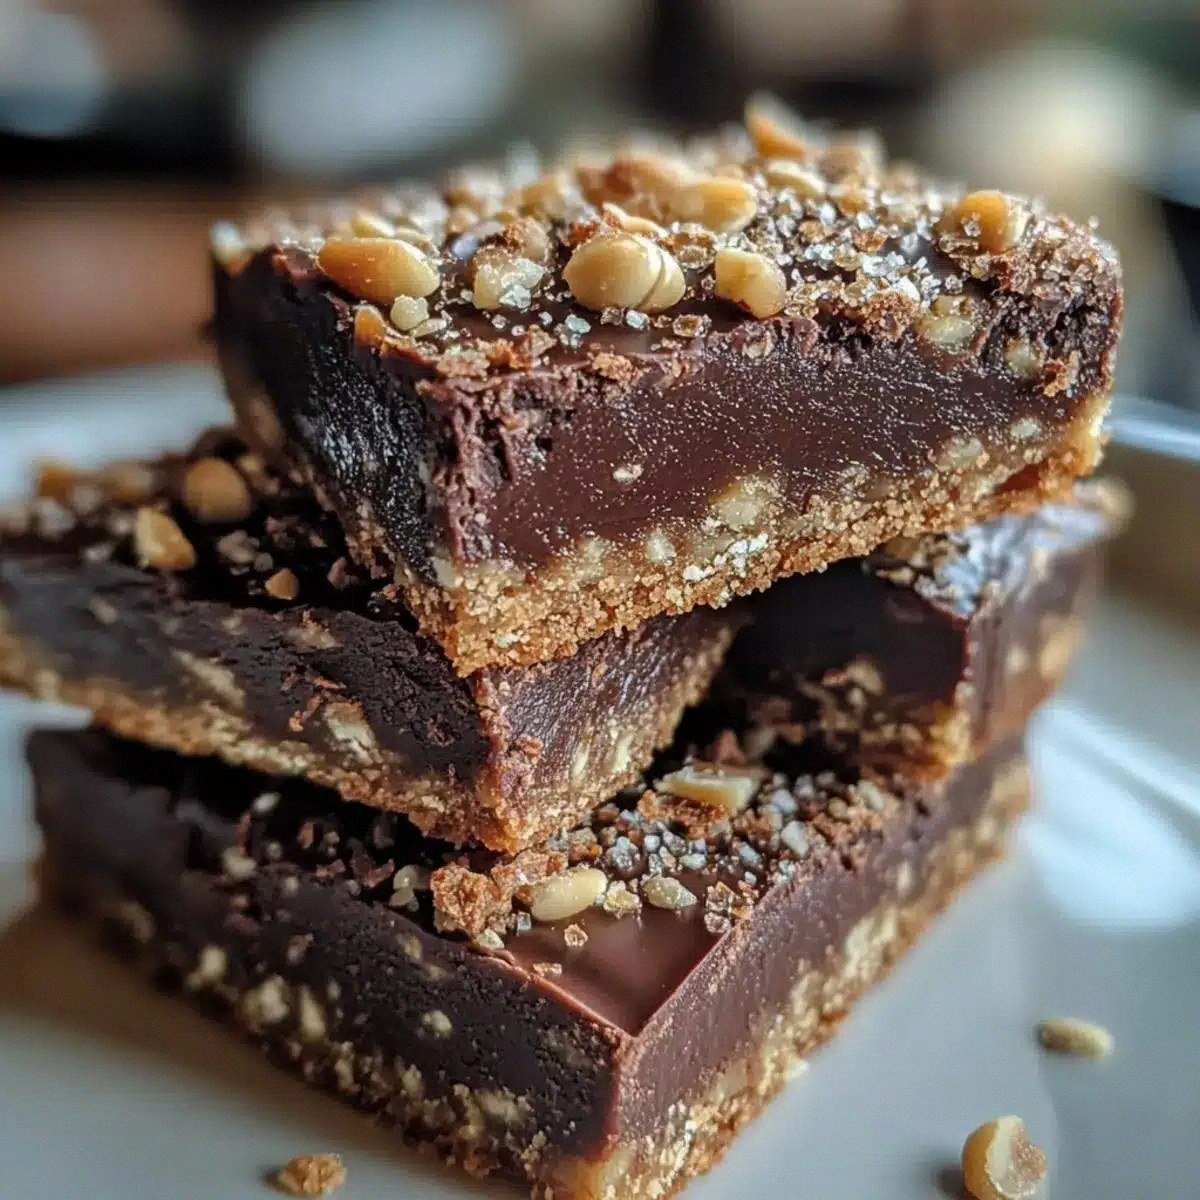
This version of Tahini Chocolate Date Squares is hands down the best you’ll ever make at home because it balances flavor, texture, and nutrition in a way that no other recipe does. The dates provide natural sweetness and a chewy bite that contrasts beautifully with the crisp edges of toasted oats. Tahini adds a creamy, slightly peppery depth that coats the mixture like velvet, while the dark chocolate chips give a bittersweet finish that satisfies any chocolate craving. The coconut oil keeps everything together without making the squares greasy, and the maple syrup adds a subtle, caramel-like warmth.
I dare you to taste this and not go back for seconds, because the combination of textures and flavors is addictive in a healthy way. If you’ve ever struggled with sticky, uneven bars, you’re not alone—and I’ve got the fix. The secret? A simple technique that involves preheating the pan and letting the mixture cool just enough before pressing it into the pan. Picture yourself pulling this out of the oven, the whole kitchen smelling incredible, and seeing the glossy squares gleam like polished gems. Let me walk you through every single step—by the end, you’ll wonder how you ever made it any other way.
What Makes This Version Stand Out
- Taste: The blend of dates, tahini, and chocolate creates a complex profile that feels both sweet and savory. Each bite offers a burst of natural sweetness followed by a deep chocolate finish, making it irresistible.
- Texture: The toasted oats give a satisfying crunch, while the dates add chewiness. The tahini creates a silky coating that holds everything together without making it sticky.
- Simplicity: No baking is required—just blend, press, chill, and cut. It’s a one-pan, no-cook recipe that saves time and effort.
- Uniqueness: Using tahini as a binding agent instead of butter or coconut oil gives a nutty flavor that sets it apart from classic chocolate squares.
- Crowd Reaction: Friends rave about the “healthy” label, yet they’re surprised by how decadent it feels. It’s a hit at parties and potlucks.
- Ingredient Quality: Choosing high‑quality, minimally processed ingredients makes the difference between a good snack and a great one.
- Cooking Method: The no‑bake approach keeps the calories down and preserves the natural flavors of each component.
- Make‑Ahead Potential: These squares freeze well and can be served as a quick dessert or snack any time.
Alright, let’s break down exactly what goes into this masterpiece...
Inside the Ingredient List
The Flavor Base
The Medjool dates are the heart of this recipe. They provide natural sweetness and a chewy texture that balances the dry components. If you skip them, the squares will lack depth and will be too dry. For a different flavor, try using pitted dates or dried figs for a slightly more complex sweetness.
The Texture Crew
Rolled oats give the squares a satisfying crunch, while ground almonds add a subtle nutty undertone and help bind everything together. If you’re allergic to nuts, swap the almonds for sunflower seeds or use oat flour. The oats also add fiber, making the treat a bit more filling.
The Unexpected Star
Tahini isn’t just a binding agent—it brings a rich, slightly peppery flavor that complements the sweetness of the dates. The sesame paste also adds healthy fats and protein, turning the squares into a nutrient‑dense snack. If you can’t find tahini, a smooth peanut butter or almond butter works as a substitute, though the flavor profile will shift slightly.
The Final Flourish
Maple syrup adds a subtle caramel note and helps the mixture stick together. It also provides a natural sweetener that is less processed than refined sugar. Dark chocolate chips finish the squares with a bittersweet punch, making the treat feel indulgent without overloading on sugar. If you prefer a different chocolate, try milk chocolate or a vegan chocolate alternative.
Everything’s prepped? Good. Let’s get into the real action...
The Method — Step by Step
- Start by preheating your oven to 350°F (175°C) and lining an 8-inch square pan with parchment paper. While the oven warms, place the Medjool dates and rolled oats in a food processor. Pulse until the mixture resembles coarse crumbs but still holds together when pressed. This step is crucial because it ensures the dates are evenly distributed and the texture is consistent.
- Add the ground almonds, tahini, maple syrup, and vanilla extract to the processor. Blend again until the mixture forms a sticky, cohesive dough. If the mixture feels too dry, add a splash of water or a teaspoon of coconut oil. The goal is a texture that sticks together but isn’t overly wet.
- Transfer the dough onto a clean cutting board and press it firmly into the prepared pan. Use a flat spatula or the back of a spoon to smooth the top. The dough should be packed tightly—imagine a firm, even layer that will hold its shape when sliced.
- Place the pan in the preheated oven and bake for 20 minutes, or until the edges start to turn golden brown. The aroma that fills the kitchen will have you wondering if you’re about to bake a cake. Keep an eye on the edges; they should be crisp but not burnt.
- Remove the pan from the oven and let it cool for 10 minutes at room temperature. While cooling, melt the dark chocolate chips and coconut oil together in a heat‑proof bowl over a pot of simmering water. Stir until smooth, creating a glossy drizzle that will add a decadent finish.
- Once the squares are cool enough to handle, drizzle the melted chocolate over the top. Use a spatula to spread it evenly, ensuring every square gets a thin, even coat. The chocolate will set quickly, so work fast to keep the squares from sticking together.
- Transfer the pan to the refrigerator and chill for at least 30 minutes, or until the chocolate is firm. This step is the moment of truth—if you rush it, the squares will be sticky and difficult to cut.
- Remove the chilled squares from the pan, lift them out using the parchment paper, and cut them into 12 equal squares with a sharp knife. If the squares are stubborn, let them sit at room temperature for a few minutes to soften slightly before cutting.
- Serve immediately or store in an airtight container at room temperature for up to 3 days. For longer storage, keep them in the refrigerator or freezer; they’ll stay fresh and flavorful for weeks.
That’s it—you did it. But hold on, I’ve got a few more tricks that will take this to another level…
Insider Tricks for Flawless Results
The Temperature Rule Nobody Follows
Baking at the correct temperature is essential for a golden edge and a chewy center. Many people bake at 300°F, which results in a dry texture. Keep the oven at 350°F to maintain moisture while still crisping the edges. This small tweak can make the difference between a mediocre and a memorable dessert.
Why Your Nose Knows Best
Smell the batter before you bake. If it smells like toasted nuts and caramel, it’s ready. A sweet, buttery aroma means the dates are perfectly blended. Trust your nose—it’s the most reliable guide.
The 5‑Minute Rest That Changes Everything
After you remove the squares from the oven, let them rest for exactly five minutes before drizzling chocolate. This brief pause allows the structure to set, preventing the chocolate from sinking into the dough. I’ve tried cutting them immediately and the chocolate spread unevenly.
Use a Sharp Knife for Clean Cuts
A dull knife will crush the squares and create uneven edges. A sharp chef’s knife or a serrated bread knife cuts cleanly and preserves the texture. It also makes presentation look polished.
Add a Pinch of Sea Salt
A small amount of sea salt on top of the chocolate enhances the sweetness and brings out the nutty undertones. Sprinkle it lightly before the chocolate sets. This simple addition turns an already great recipe into a gourmet experience.
Keep the Parchment Paper On
Leaving the parchment paper attached when removing the squares helps them hold their shape. It also makes cleanup a breeze. If you’re worried about sticking, lightly coat the parchment with coconut oil before pressing the dough.
Creative Twists and Variations
This recipe is a playground. Here are some of my favorite ways to switch things up:
Coconut Crunch Edition
Swap the ground almonds for shredded coconut and add a handful of toasted coconut flakes to the mix. The coconut adds a tropical flavor that pairs wonderfully with dark chocolate. It’s perfect for a beach‑inspired dessert.
Nutty Chocolate Swirl
Stir in chopped walnuts or pecans before baking. The nuts add crunch and a buttery flavor that complements the chocolate swirl. It’s a classic combination that never fails.
Spiced Delight
Add a pinch of cinnamon, nutmeg, or cardamom to the dough for a warm, aromatic twist. The spices deepen the flavor profile and make the squares feel cozy and comforting.
Vegan Chocolate Chip Surprise
Use dairy‑free chocolate chips and a plant‑based butter substitute if you want a fully vegan version. The flavor remains rich, and the texture stays firm. It’s a great option for guests with dietary restrictions.
Minty Fresh Variation
Add a teaspoon of peppermint extract to the dough and sprinkle crushed peppermint candies on top before the chocolate sets. The mint provides a refreshing contrast to the deep chocolate flavor.
Savory Sweet Fusion
Drop in a tablespoon of finely chopped dried apricots or figs for a sweet‑savory balance. The dried fruit adds chewiness and a subtle tartness that elevates the overall taste.
Storing and Bringing It Back to Life
Fridge Storage
Keep the squares in an airtight container in the refrigerator for up to 5 days. The cold environment preserves the chocolate’s shine and prevents the dates from becoming too soft. When you’re ready to eat, let them sit at room temperature for a few minutes to soften slightly.
Freezer Friendly
For long‑term storage, wrap each square individually in parchment paper and place them in a freezer bag. They’ll stay fresh for up to 3 months. Thaw at room temperature for 15 minutes before enjoying.
Best Reheating Method
If the squares have hardened, place them on a microwave‑safe plate and heat on low power for 10–15 seconds. Add a tiny splash of water before reheating to steam back to perfection. This keeps the chocolate silky and the dates tender.