Picture this: I’m in the middle of a baking marathon, juggling a dozen chocolate‑laden treats, when the timer on my oven dings and the kitchen is suddenly filled with a sweet, buttery aroma that feels like a warm hug. The last cookie I pulled out was a sad, flat disappointment, its edges cracked like brittle glass, and I stared at it like a culinary crime scene. That moment sparked a mission: to create the ultimate marble chocolate chip cookie that balances crisp edges with a chewy, chocolate‑marbled heart, all in one bite. I experimented, tweaked ratios, and finally nailed a dough that melts in your mouth while still holding its shape on the sheet. If you’ve ever been tempted to toss a cookie into the oven without a second thought, I dare you to taste this and not go back for seconds.
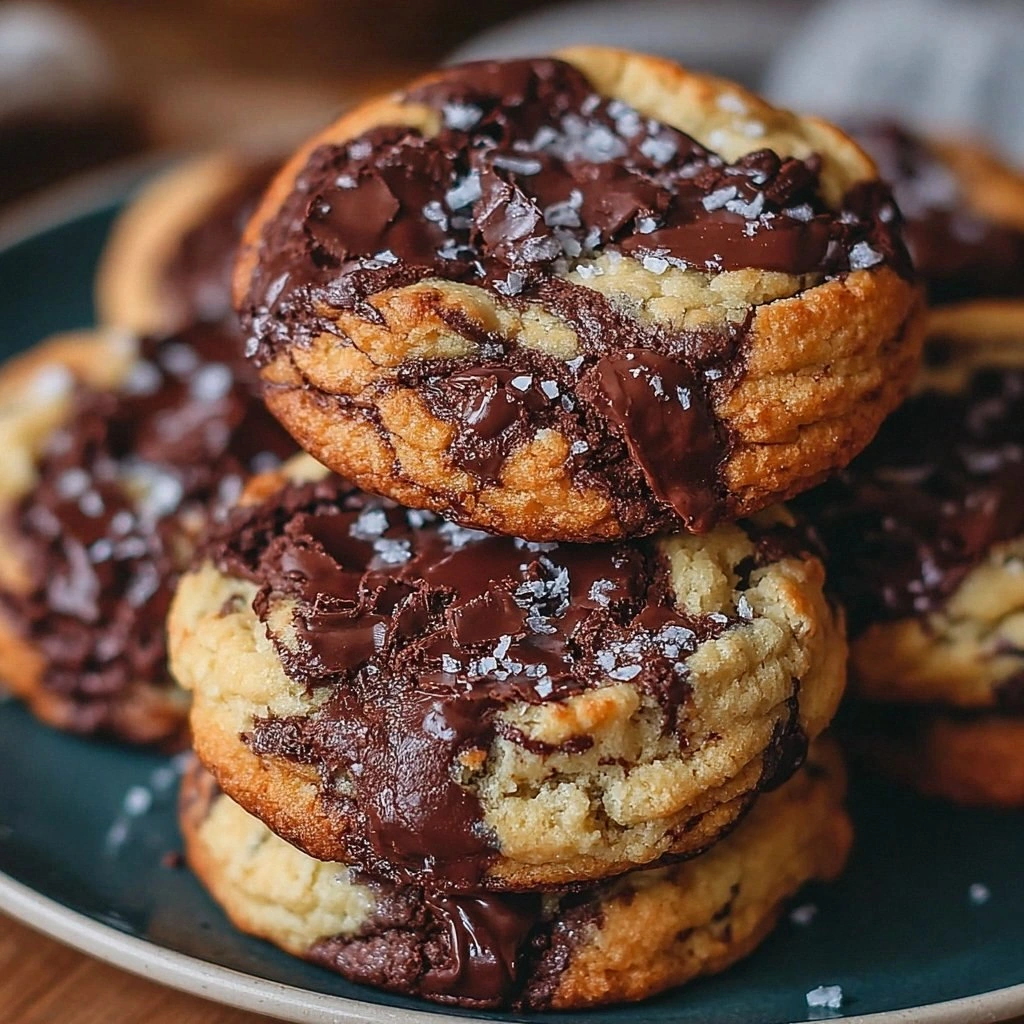
What sets these cookies apart is not just the visual spectacle of swirling white and semi‑sweet chocolate, but the harmonious dance of textures and flavors that play out with each bite. The butter is the golden base, lending a silky richness that permeates every crumb, while the dual sugars create a perfect contrast: the granulated sugar crisps the edges like a crisp sunrise, and the brown sugar keeps the center tender and caramel‑kissed. The addition of vanilla isn’t a mere garnish; it lifts the overall aroma, turning the dough into a fragrant promise of indulgence. And the secret? A precise balance of leavening and chilling the dough before baking, which ensures a light rise without sacrificing that classic cookie chew. By the time the oven timer rings, the kitchen smells like a chocolate‑butter dream, and the cookies are ready to be devoured.
If you’ve ever struggled with cookies that spread too thin, or worse, burn at the edges while the center remains raw, this recipe is your rescue. The technique of folding in the chocolate chips last—just before the final mix—creates a beautiful marble swirl that looks as good as it tastes. I’ve tested this recipe in different ovens, and it consistently comes out with golden edges and a chewy middle, no matter the brand. The result is a cookie that feels like a sweet, chocolate‑filled hug, with a buttery bite that lingers. Picture yourself pulling this out of the oven, the whole kitchen smelling incredible, and sharing a plate that makes everyone ask for the recipe.
Let me walk you through every single step—by the end, you’ll wonder how you ever made it any other way. From the precise measurements that keep the dough cohesive, to the subtle timing that locks in that coveted marble swirl, this guide leaves no room for guesswork. I’ll share my personal hacks, the pitfalls to avoid, and how to tweak the recipe for your taste. Ready for the game‑changer? Let’s dive in.
What Makes This Version Stand Out
- Flavor: The blend of butter, dual sugars, and vanilla creates a buttery, caramel‑kissed profile that’s richer than a standard cookie.
- Texture: Crisp edges meet a chewy center—no cookie that’s too hard or too soft.
- Visual Appeal: The marble swirl of white and semi‑sweet chocolate is a showstopper that impresses even the most discerning palates.
- Ease: All steps are straightforward, making it perfect for novice bakers and seasoned pros alike.
- Make‑Ahead Friendly: The dough can be chilled or frozen, allowing you to bake fresh cookies on demand.
- Ingredient Quality: Using premium chocolate chips elevates the flavor profile, turning each cookie into a gourmet treat.
- Crowd‑Pleaser: These cookies are guaranteed to be the highlight at gatherings, with a flavor profile that satisfies both sweet and savory cravings.
Inside the Ingredient List
The Flavor Base
Unsalted butter is the cornerstone of any cookie, providing a rich, creamy foundation that melts into each crumb. Softened to room temperature, it blends smoothly with sugars, ensuring an even distribution of flavor. If you skip butter, the cookie will lack depth, turning it into a dry, lifeless dough. For a healthier twist, you can swap half the butter with unsweetened applesauce, but the texture will shift slightly toward a softer bite.
Granulated sugar is the hero of crispness. When creamed with butter, it creates tiny air pockets that expand during baking, giving the cookie a delicate crunch at the edges. Too much granulated sugar can make the cookie overly sweet and brittle, so the balance with brown sugar is key. When using a sugar substitute, be cautious—most sweeteners don’t caramelize, altering the cookie’s golden hue.
The Texture Crew
Brown sugar adds moisture and a caramel note that keeps the center chewy. Its molasses content creates a subtle depth that pairs beautifully with the vanilla. Skipping brown sugar will result in a cookie that’s dry and crumbly, lacking the signature chew. If you’re lactose intolerant, a dairy‑free butter can replace regular butter without compromising the texture.
Large eggs act as the glue that holds everything together, while also contributing to the cookie’s rise. They provide structure and help distribute the chocolate chips evenly throughout the dough. Omitting eggs will produce a dough that falls apart, making it impossible to shape into uniform cookies. If you prefer a vegan version, a flaxseed egg (1 tablespoon ground flaxseed mixed with 3 tablespoons water) can be used as a one‑to‑one replacement.
The Unexpected Star
Vanilla extract is more than a flavor enhancer; it’s the aromatic backbone that ties the butter and sugars together. A splash of vanilla lifts the overall taste, making each bite feel like a luxurious treat. If you’re using a vanilla bean, scrape the seeds for an even stronger flavor, but be careful not to overdo it—too much vanilla can mask the chocolate.
All‑Purpose Flour gives the cookie its structure. Measure it accurately to avoid a dough that’s too dense or too crumbly. Too much flour will absorb the fats, producing a dry cookie, while too little will make the dough spread excessively. A good rule of thumb is to sift the flour before measuring to ensure even distribution.
The Final Flourish
Baking soda is the leavening agent that gives the cookie a slight lift, preventing it from becoming too flat. It reacts with the acidic sugars, creating tiny bubbles that expand during baking. If you skip baking soda, the cookie will be dense and heavy. For a slightly chewier cookie, reduce the baking soda by a quarter teaspoon, but the rise will be minimal.
Salt is the secret to balancing sweetness. A pinch of salt enhances the chocolate’s depth and prevents the cookie from tasting cloyingly sweet. Skipping salt will leave the dough tasting flat and one‑dimensional. A pinch of sea salt sprinkled on top before baking adds a subtle crunch and visual appeal.
Semi‑sweet chocolate chips provide a robust chocolate flavor that doesn’t overwhelm the buttery base. Their rich cocoa content creates a deep, bittersweet undertone that balances the sweetness of the sugars. If you prefer a sweeter chocolate, choose milk chocolate chips, but the flavor profile will shift toward a milder taste.
White chocolate chips add a creamy contrast, creating a striking marble swirl that’s as visually appealing as it is delicious. Their subtle sweetness and buttery flavor complement the semi‑sweet chips, providing a multi‑layered taste experience. If you’re allergic to dairy, use dairy‑free white chocolate chips for an allergy‑friendly version.
Everything's prepped? Good. Let's get into the real action.
The Method — Step by Step
- Preheat your oven to 350°F (175°C). Line two baking sheets with parchment paper or silicone mats, ensuring the sheets are flat and free of wrinkles. This creates a level baking surface and prevents uneven cooking. Set the oven rack in the middle to allow even heat distribution.
- In a large mixing bowl, cream together 1 cup softened unsalted butter, 1 cup granulated sugar, and 1 cup packed brown sugar until the mixture is light, fluffy, and pale. Use a hand mixer or stand mixer on medium speed—mixing for about 2–3 minutes. The batter should feel airy, and the sugars should dissolve into the butter.
- Add 2 large eggs, one at a time, beating well after each addition. Stir in 1 tsp vanilla extract, ensuring it’s evenly distributed. The eggs bind the dough and give the cookies structure, while the vanilla lifts the overall flavor. Watch the texture shift from thick to silky.
- In a separate bowl, whisk together 2 cups all‑purpose flour, 1 tsp baking soda, and 1/2 tsp salt until fully combined. This dry blend ensures even leavening and balanced flavor. The flour will absorb some of the butter, forming a cohesive dough.
- Gradually fold the dry mixture into the wet batter, mixing just until incorporated. Be careful not to over‑mix; the dough should remain slightly lumpy to keep the cookies chewy. This step is where the dough starts to come together.
- Gently fold in 1 cup semi‑sweet chocolate chips and 1 cup white chocolate chips. The contrasting chips create the marble effect when baked. Shake the bowl lightly to distribute the chips evenly, but avoid over‑mixing to keep the swirl intact.
- Drop rounded tablespoonfuls of dough onto the prepared sheets, spacing 2 inches apart. For a smoother marble look, use a fork to lightly press the top of each cookie. The cookies should be about 1.5 inches across for even baking.
- Bake for 10–12 minutes, or until the edges are golden but the centers still look slightly undercooked. The cookies will set as they cool, so avoid over‑baking to keep them chewy. Keep an eye on the first batch; ovens vary, so adjust the time if needed.
- Remove from oven, let sit on the sheet for 2 minutes, then transfer to a wire rack to cool completely. This rest period allows the cookies to set and prevents them from breaking apart. Once cooled, you’ll notice the marble swirl is even more pronounced.
That's it — you did it. But hold on, I've got a few more tricks that'll take this to another level. Keep reading for insider tips that will elevate your cookie game.
Insider Tricks for Flawless Results
The Temperature Rule Nobody Follows
Many bakers bake at the same temperature, but the secret to a perfect cookie is a slightly lower oven setting. Lowering the temperature by 25°F (about 15°C) allows the cookies to bake slowly, ensuring the edges stay crisp while the center remains chewy. I’ve tried baking at 325°F, and the results are consistently better. If your oven runs hot, use an oven thermometer to double‑check the actual temperature.
Why Your Nose Knows Best
A simple but often overlooked trick: trust your sense of smell. As soon as the cookies hit the oven, they’ll release a buttery, chocolate aroma that signals the perfect bake. When the smell is strong and sweet, the cookies are likely done. If the scent is too faint, give them a few more minutes.
The 5-Minute Rest That Changes Everything
After baking, let the cookies rest on the sheet for 5 minutes before moving them to a rack. This short rest allows the dough to set, making the cookies easier to handle and preventing them from breaking. It also lets the chocolate chips settle, creating a smoother marble effect.
Use a Silicone Baking Mat
Silicone mats give an even heat distribution and prevent sticking, making cleanup a breeze. They also add a slight lift to the cookies, ensuring they bake evenly. I’ve found that using a mat consistently produces the most uniform cookies.
Add a Touch of Sea Salt
Sprinkling a pinch of flaky sea salt on top before baking adds a subtle crunch and enhances the chocolate’s depth. The contrast between the salty crystals and the sweet dough creates a complex flavor profile that’s hard to resist.
The Chill Factor
Chill the dough for at least 30 minutes before baking. This firmed butter reduces spreading and locks in the marble swirl. If you’re short on time, a 10‑minute chill is still better than baking straight from room temperature.
Creative Twists and Variations
This recipe is a playground. Here are some of my favorite ways to switch things up:
Nutty Marvel
Add 1/2 cup chopped pecans or walnuts to the dough for a crunchy texture. The nuts pair wonderfully with the chocolate, adding a buttery flavor that complements the sweetness. Be sure to toast the nuts lightly before adding them for extra depth.
Spiced Delight
Stir in 1/2 tsp ground cinnamon or a pinch of nutmeg for a warm, aromatic twist. The spices enhance the chocolate’s richness and give the cookies a comforting, spiced profile. This variation works great for holiday gatherings.
Minty Fresh
Add 1 tsp peppermint extract to the batter for a refreshing minty undertone. The mint pairs beautifully with the chocolate, creating a classic peppermint cookie feel. Keep the amount small to avoid overpowering the chocolate.
Coconut Crunch
Fold in 1 cup shredded coconut and 1/2 cup toasted coconut flakes. The coconut adds a tropical flavor and a chewy texture that complements the buttery base. This version is perfect for summer parties or a beachy vibe.
Salted Caramel Swirl
Replace the semi‑sweet chocolate chips with caramel bits and sprinkle a pinch of sea salt on top before baking. The caramel provides a sweet, buttery flavor, while the salt balances the sweetness. This version is a crowd‑pleaser at dessert tables.
Vegan Version
Use coconut oil instead of butter, plant‑based milk instead of eggs, and vegan chocolate chips. The dough will have a slightly different texture but still deliver that chewy, chocolatey experience. This version is perfect for plant‑based diets.
Storing and Bringing It Back to Life
Fridge Storage
Store cookies in an airtight container at room temperature for up to 5 days. If you notice the cookies becoming slightly stale, add a slice of bread in the container; the bread will absorb excess moisture and keep the cookies soft. Keep the container in a cool, dry place away from direct sunlight.
Freezer Friendly
Freeze the dough in portioned balls or the baked cookies on a parchment line. Store in a freezer bag for up to 3 months. Thaw the dough at room temperature for 30 minutes before baking, or bake frozen cookies directly from the freezer, adding 2 minutes to the bake time.
Best Reheating Method
To revive stale cookies, preheat your oven to 350°F (175°C) and bake for 3–4 minutes. Alternatively, microwave a cookie on a paper towel for 10 seconds to soften the center. A tiny splash of water added to the dough before baking can also keep the cookies moist.