I was in the middle of a frantic holiday party prep when I realized my dessert table was missing that one show‑stopper that makes guests gasp, whisper, and then line up for seconds. My go‑to chocolate mousse had collapsed, the gingerbread men were as hard as bricks, and the store‑bought candy canes were looking sad in a plastic bag. That moment of culinary panic sparked a dare from my sister: “Make something that tastes like a winter wonderland without turning on the oven.” I accepted, and after a frantic 20‑minute raid of the pantry, I emerged with a bowl of glossy chocolate, a handful of crushed peppermint, and a vision of snow‑kissed bite‑size treats that would soon become the talk of the season.
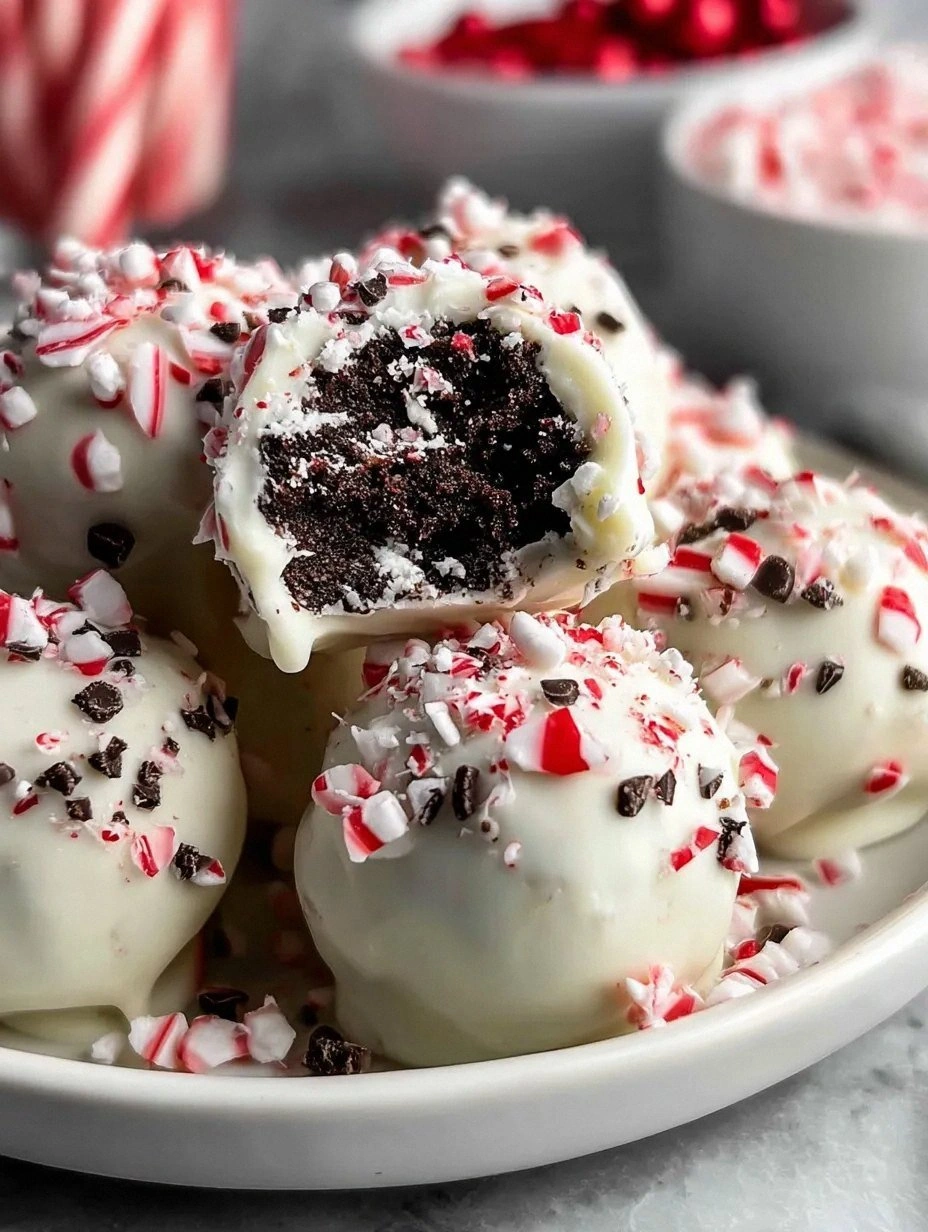
Picture this: a cold December night, the house humming with festive music, and the air tinged with the sharp, refreshing bite of peppermint that makes your nose tingle like you’ve just stepped outside after a fresh snowfall. The first snowball you pick up feels like a soft, buttery marble in your palm, its surface dusted with cocoa that melts into a silky sheen as soon as it meets your tongue. The moment the dark chocolate and white chocolate ribbons intertwine, you hear a gentle snap that reminds you of fresh ice cracking under your boots. The taste is a perfect balance of rich cocoa, sweet cream, and that unmistakable minty punch that makes you think of candy‑cane forests and twinkling lights.
Most peppermint bark recipes either require a full oven, a tempering station, or a confusing set of steps that leave you wondering if you’ve just made a chocolate truffle or a sticky mess. This version, however, is a no‑bake miracle that skips the tempering drama and still delivers that glossy, snap‑ready finish you crave. The secret? A tiny splash of sweetened condensed milk that turns the chocolate into a glossy glaze, plus a quick chill that sets everything in under half an hour. I dare you to taste this and not go back for seconds; it’s hands down the best version you’ll ever make at home.
Let me walk you through every single step — by the end, you’ll wonder how you ever made it any other way. Okay, ready for the game‑changer? The next part? Pure magic. We’ll start with the why, then dive into the ingredients, the method, and finally the tricks that turn a good batch into an unforgettable holiday legend. Stay with me here — this is worth it.
What Makes This Version Stand Out
- Flavor Explosion: The combination of dark and white chocolate creates a layered taste that feels like a peppermint‑kissed dream, while the condensed milk adds a buttery smoothness that coats your palate.
- Texture Harmony: Each bite offers a crisp outer shell from the crushed candy canes, a melt‑in‑your‑mouth interior, and a subtle crumb from the optional graham cracker dust for that perfect bite‑size crunch.
- Zero‑Oven Simplicity: No need to preheat, no need for a tempering pot – just melt, mix, roll, chill, and you’re done. It’s the ultimate shortcut for busy holiday hosts.
- Visual Wow Factor: The snow‑white swirls against deep chocolate look like miniature snowballs, making them perfect for gift bags, platters, or a decorative centerpiece.
- Crowd‑Pleaser: Even the kids who claim they don’t like “grown‑up” desserts can’t resist the peppermint snap, and adults appreciate the sophisticated chocolate balance.
- Ingredient Quality: Using high‑quality chocolate and real peppermint extract (not artificial flavor) makes the difference between “good” and “legendary.”
- Make‑Ahead Magic: These snowballs keep for weeks in the freezer, so you can prep them ahead of time and focus on the main meal on the day of.
- Adaptable Base: Swap dark for milk chocolate, add espresso powder, or incorporate toasted nuts for a personalized twist without breaking the core formula.
Inside the Ingredient List
The Flavor Base
White chocolate chips (2 cups) are the sweet, creamy foundation that lets the peppermint shine without being overpowered. If you substitute with a white chocolate bar, make sure it’s at least 30% cocoa butter for that melt‑in‑your‑mouth feel. Skipping the white chocolate means you lose the buttery backdrop that balances the dark notes, resulting in a one‑dimensional taste.
The Dark Depth
Dark chocolate chips (1 cup) provide the rich, slightly bitter counterpoint that makes the peppermint pop. Choose a chocolate with 60‑70% cacao for the best snap; lower percentages become too sweet and dull the mint. If you’re allergic to cocoa, a high‑quality carob chip can stand in, though the flavor profile will shift toward earthy.
The Sweet Glue
Sweetened condensed milk (½ cup) acts as a glossy binder, turning the melted chocolate into a silky glaze that sets quickly in the fridge. It also adds a subtle caramel undertone that deepens the overall flavor. If you’re watching sugar, you can replace half of it with a sugar‑free condensed milk, but expect a slightly thinner texture.
The Peppermint Punch
Peppermint extract (1 tsp) is the star that delivers that crisp, wintery zing. Use a pure extract rather than flavored oil; the latter can taste artificial and ruin the balance. If you’re a mint‑sensitive soul, start with half a teaspoon and taste before adding more.
The Crunch Crew
Crushed peppermint candy canes (1 cup, plus extra for garnish) give each snowball its signature crunch and a burst of spearmint flavor that crackles under your teeth. For a softer texture, you can blend half the canes into fine crumbs and keep the rest chunky. Skipping the candy canes removes both texture and the iconic red‑white swirl, turning the dish into a plain chocolate truffle.
The Optional Whisper
Finely crushed graham crackers or shortbread cookies (1 cup) add a subtle buttery crumb that mimics a light dusting of snow. This is optional but recommended for those who love a layered mouthfeel. If you’re gluten‑free, substitute with crushed gluten‑free cookies or almond meal.
Everything’s prepped? Good. Let’s get into the real action…
The Method — Step by Step
Gather all your ingredients and line a large baking sheet with parchment paper. This prevents the snowballs from sticking and makes cleanup a breeze. I always like to have a second sheet ready because the mixture can be a little sticky.
Kitchen Hack: Chill the parchment sheet for a minute before you start; the cold surface helps the chocolate set faster once you place the balls.Set a medium‑sized saucepan with a couple of inches of water to simmer, then place a heat‑proof bowl on top, ensuring the bottom doesn’t touch the water. Add the white chocolate chips, dark chocolate chips, and butter to the bowl, stirring gently until everything is melted and smooth. You’ll notice a glossy sheen—this is the moment of truth.
Remove the bowl from heat and whisk in the sweetened condensed milk, peppermint extract, and vanilla extract. The mixture will become slightly thinner, but that’s perfect for rolling later. Taste at this point; you should feel a cool minty snap that tingles the back of your throat.
Watch Out: If the mixture looks grainy, you’ve likely overheated the chocolate. Return it to low heat and stir until it smooths out; overheating ruins the glossy finish.Allow the chocolate blend to cool for about 5 minutes—just enough that it thickens but is still pliable. Meanwhile, place the crushed peppermint candy canes and optional graham cracker crumbs in two separate shallow bowls.
Using a small ice‑cream scoop or a tablespoon, portion out the chocolate mixture and roll it between your palms to form a smooth ball. The temperature of your hands matters; if they’re too warm, the chocolate will melt and lose shape. This next part? Pure magic.
Immediately roll each ball in the crushed candy canes, ensuring an even coating that sticks to the glossy surface. For a double‑layered crunch, dip the first roll in the candy cane crumbs, then give it a quick shake, and roll again. The snowball should look like a tiny, mint‑studded marble.
Place the coated snowballs onto the prepared parchment sheet, leaving a little space between each. Dust the tops with a light sprinkle of cocoa powder for that snowy finish. If you love a dramatic look, drizzle a thin ribbon of melted dark chocolate over the tops before chilling.
Pop the sheet into the refrigerator for 20‑30 minutes, or until the chocolate is firm to the touch. This chilling step is crucial; it sets the glaze and locks in the peppermint crunch. While you wait, you can prep a festive platter or make a quick coffee to enjoy alongside.
Once set, transfer the snowballs to an airtight container. Store them in the freezer for up to a month, or in the fridge for up to two weeks. When you’re ready to serve, let them sit at room temperature for 5 minutes so the chocolate softens just enough to bite through without shattering.
That’s it — you did it. But hold on, I’ve got a few more tricks that’ll take this to another level…
Insider Tricks for Flawless Results
The Temperature Rule Nobody Follows
Never melt chocolate directly over high heat. Keep the simmering water barely bubbling; this gentle heat preserves the cocoa butter crystals, giving you that glossy snap. I once tried a quick microwave melt and ended up with a grainy mess that never set properly.
Why Your Nose Knows Best
When the chocolate mixture is off the heat, trust your sense of smell. A faint buttery aroma signals the perfect moment to add peppermint extract; if you wait too long, the volatile oils evaporate and you lose that punch. I’ve learned to pause, inhale, and adjust the mint level on the fly.
The 5‑Minute Rest That Changes Everything
After rolling each ball, let it rest on the counter for a solid five seconds before coating. This tiny pause lets the surface dry just enough to grab the crushed candy canes without sliding off. A friend tried skipping this step once — the candy canes clung to the spoon instead, and the snowballs looked like sad, naked marbles.
The Double‑Coat Technique
For an ultra‑crunchy exterior, dip each ball first in plain crushed candy canes, then roll it in a mixture of candy canes plus a pinch of cocoa powder. The cocoa adds depth and prevents the coating from looking too sugary under bright lights.
The Secret of the Final Dust
A light dusting of cocoa powder right before chilling not only adds a snowy look but also absorbs any excess surface oil, preventing the snowballs from feeling greasy. Use a fine mesh sifter for an even veil; a clumpy dump will ruin the visual appeal.
Creative Twists and Variations
This recipe is a playground. Here are some of my favorite ways to switch things up:
Espresso‑Kick Snowballs
Add 1 teaspoon of instant espresso powder to the melted chocolate mixture. The coffee notes deepen the chocolate and make the peppermint pop even more, perfect for adult‑only gatherings.
Nutty Snowfall
Stir in ¼ cup of finely chopped toasted hazelnuts or almonds just before the mixture cools. The nuts add a buttery crunch that pairs beautifully with the mint.
White‑Chocolate‑Only Version
Swap the dark chocolate for an extra cup of white chocolate chips and add a pinch of sea salt. The result is a sweeter, creamier snowball that feels like a wintery cloud.
Berry Burst
Fold in 2 tablespoons of freeze‑dried raspberry powder into the chocolate before chilling. The subtle tartness balances the mint and gives a gorgeous pink hue to the interior.
Vegan Delight
Replace butter with coconut oil and use a dairy‑free sweetened condensed milk (available in most health stores). The texture remains silky, and the coconut oil adds a faint tropical whisper that surprises the palate.
Storing and Bringing It Back to Life
Fridge Storage
Place the snowballs in an airtight container with a paper towel at the bottom to absorb any condensation. They’ll stay fresh for up to 14 days, retaining their snap and minty crunch.
Freezer Friendly
For longer keeping, wrap each snowball individually in parchment and then store them in a zip‑top freezer bag. They’ll keep for up to 3 months without losing flavor. When you’re ready to serve, let them thaw in the fridge for 30 minutes.
Best Reheating Method
If the snowballs feel a bit hard after being in the freezer, give them a quick 10‑second zap in the microwave on low power, or place them on a warm plate for a minute. Adding a tiny splash of water to the plate creates a gentle steam that revives the glossy coating without melting the interior.