I still remember the Halloween when my kitchen looked like a crime scene. Red glaze dripped down the sides of my stand mixer, my white apron had suspicious streaks across it, and my neighbor nearly called the cops when she peeked through the window. But here's the thing — I was having the time of my life making what would become my signature Halloween treat. These aren't your grandma's cinnamon rolls, unless your grandma happens to be both a pastry chef and a horror movie enthusiast. The moment I pulled that first pan from the oven, the scent of warm cinnamon and butter mingled with something delightfully sinister, and I knew I'd created something special.
Picture this: it's October 31st, you've got costumed kids banging down your door, and instead of handing out another bag of mass-produced candy, you're pulling out a tray of these blood-red beauties. The dough is so soft it practically melts on your tongue, the filling has that perfect cinnamon kick that makes your taste buds dance, and the "bloody" glaze? Pure theatrical genius. I've served these at office parties where grown adults actually gasped, at family gatherings where even the teenagers put down their phones to grab seconds, and at midnight movie marathons where they disappeared faster than you can say "trick or treat."
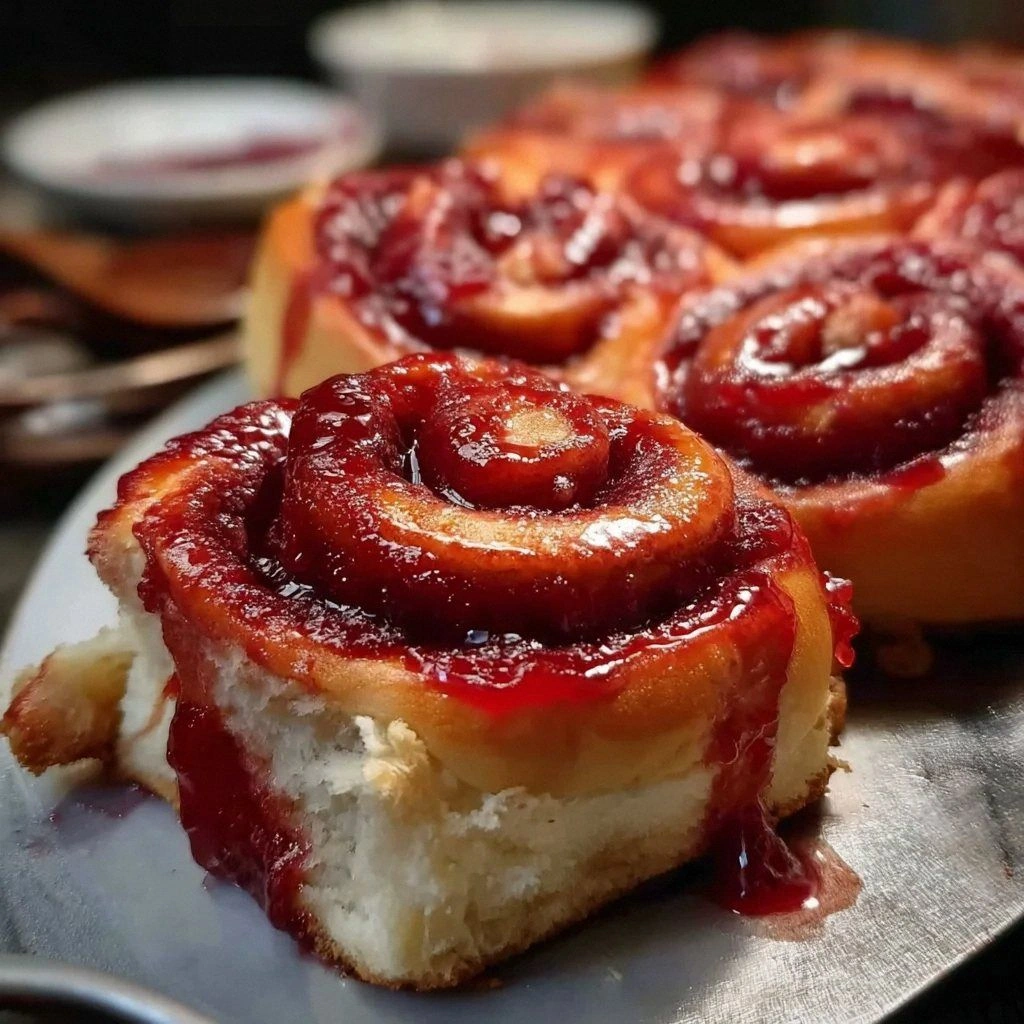
What makes these rolls absolutely killer — pun fully intended — is the contrast between their innocent, fluffy appearance and that dramatic crimson drizzle that makes them look like they've been pulled straight from a vampire's tea party. The secret lies in the technique I'm about to share with you, one that transforms ordinary cinnamon rolls into conversation-starting showstoppers. Trust me, once you master this method, you'll never look at regular cinnamon rolls the same way again. Every October, I get flooded with requests for this recipe, and now I'm spilling all my secrets.
But before we dive into the bloody details, let me warn you: these rolls have addictive properties. I once made a double batch for a party, planning to have leftovers for breakfast the next day. Spoiler alert: there were no survivors. My friends literally formed a protective circle around the serving platter, and I had to physically intervene to save two rolls for photos. The combination of that pillowy dough, the rich cinnamon-sugar swirl, and the dramatic presentation creates something that's part dessert, part performance art. Let me walk you through every single step — by the end, you'll wonder how you ever made it any other way.
What Makes This Version Stand Out
Every food blogger claims their recipe is special, but I'm about to back up my bold statement with some serious delicious evidence. What you're looking at here isn't just another seasonal gimmick — it's the result of three years of obsessive tweaking, testing, and terrorizing my taste testers. I went through twelve different dough variations, seven filling formulas, and four different glaze techniques before landing on this masterpiece. The difference lies in the details, and I've obsessed over every single one so you don't have to.
Taste Explosion: These rolls deliver a flavor profile that hits every note on your palate. The dough itself carries a subtle sweetness that plays beautifully against the warm spice of the filling, while the glaze provides that essential vanilla-cream finish. But here's the kicker — the "blood" drizzle isn't just for show. It's a tangy cream cheese base that cuts through the sweetness and adds depth you didn't know you needed.
Texture Perfection: We're talking about rolls so soft they practically sigh when you pull them apart. The secret? A combination of melted butter in the dough and a specific resting technique that creates those stretchy, tender layers. When you bite into these, you'll experience that magical moment where the exterior gives way to an almost cloud-like interior, with the slight chew from the cinnamon-sugar swirl providing the perfect contrast.
Foolproof Method: I've stripped away all the complicated steps that make traditional cinnamon rolls intimidating. No yeast to worry about, no overnight proofing, no special equipment required. If you can stir, roll, and slice, you can nail this recipe on your first try. I've tested this on kitchen-phobic friends who managed to impress their mother-in-laws — that's how bulletproof this method is.
Visual Impact: Let's be honest — half the fun of Halloween food is the shock factor. These rolls deliver drama in spades. The contrast between the golden-brown rolls and that vibrant red drizzle creates a presentation that stops people in their tracks. I've seen grown adults hesitate for a second before biting in, which just makes the moment when they taste how delicious they are even more delightful.
Quality Ingredients: This recipe celebrates simplicity by using everyday pantry staples in extraordinary ways. No artificial flavors, no weird preservatives, just real butter, real vanilla, and real cinnamon creating real magic. The food coloring is optional but highly recommended for maximum spooky effect — and I've found a natural alternative if you want to avoid synthetic dyes.
Crowd Reaction: I've never served these without getting recipe requests, and I've definitely never had leftovers. People go absolutely feral for these rolls in a way that makes me both proud and slightly concerned for humanity. One friend actually hid a plate in her purse "for the road" and then texted me at 2 AM asking if I'd judge her for eating them all.
Make-Ahead Magic: Here's where this recipe really shines — you can prep everything the night before and just pop them in the oven when you're ready to serve. The dough actually benefits from a brief rest, developing better flavor and texture. This means you can be the Halloween hero without being stuck in the kitchen while everyone else is having fun.
Alright, let's break down exactly what goes into this masterpiece...
Inside the Ingredient List
Great recipes start with understanding your ingredients, and this one's no exception. Each component plays a crucial role in creating the final symphony of flavors and textures. I've tested substitutions, eliminated the unnecessary, and figured out exactly what each ingredient brings to the party. Once you understand the why behind each component, you'll be able to adapt this recipe like a pro and maybe even create your own variations.
The Foundation Builders
All-purpose flour isn't just the structural backbone of these rolls — it's the canvas that lets all the other flavors shine. I'm calling for the regular stuff here, not bread flour or cake flour, because we want that perfect middle ground of structure and tenderness. Too much protein and your rolls become chewy; too little and they fall apart when you try to pull them from the pan. The flour absorbs the liquid from the milk and melted butter, creating that soft, pliable dough that rolls like a dream.
Granulated sugar does double duty in the dough itself, providing both sweetness and tenderness. The sugar crystals cut through the gluten strands as you mix, ensuring your rolls stay tender rather than tough. It also feeds the baking powder reaction, helping create those lovely air pockets that make the dough light and fluffy. Don't be tempted to reduce this — the amount is perfectly calibrated to balance the cinnamon's heat.
Baking powder is our leavening hero, the ingredient that saves you from yeast anxiety. This chemical leavening creates carbon dioxide bubbles when it meets liquid, giving your rolls lift without the waiting game of traditional yeasted dough. Make sure yours is fresh — if it's been sitting in your pantry since last Halloween, treat yourself to a new can. Old baking powder leads to flat, sad rolls, and nobody wants that on their spooky celebration.
Salt might seem like an afterthought, but it's the flavor amplifier that makes everything else taste more like itself. Just a teaspoon transforms sweet dough from one-dimensional to complex and interesting. It balances the sugar, enhances the vanilla, and makes the cinnamon taste more cinnamon-y. Skip it at your peril — unsalted dough tastes flat and oddly sweet in a way that makes your tongue confused rather than happy.
The Moisture Makers
Milk brings everything together, creating the perfect environment for the baking powder to work its magic. The proteins in milk help set the structure of the rolls as they bake, while the natural sugars contribute to that gorgeous golden-brown color. Full-fat milk gives the richest results, but I've made these successfully with everything from skim to oat milk. The key is using it at room temperature so it doesn't seize up the melted butter when you mix everything together.
Melted unsalted butter is liquid gold in this recipe, carrying flavor while keeping the dough tender and rich. The fat coats the flour particles, limiting gluten development and ensuring your rolls stay soft and pillowy. I'm specifying unsalted because we're already adding salt separately, and this gives you complete control over the final seasoning. The butter should be cooled but still liquid — too hot and you'll scramble any proteins, too cool and it'll solidify before incorporating properly.
The Flavor Explosion
Brown sugar in the filling is what separates good cinnamon rolls from legendary ones. That molasses content adds depth and complexity that white sugar simply can't match. As it bakes, the brown sugar melts and combines with the butter to create that gorgeous, sticky caramel that seeps into every swirl. Dark brown sugar gives you more molasses flavor, while light brown keeps things more subtle — both work beautifully here.
Ground cinnamon is obviously the star, but not all cinnamon is created equal. I'm talking about the good stuff — fragrant, spicy Ceylon cinnamon if you can find it, or a high-quality cassia cinnamon if that's what's available. The cinnamon doesn't just add flavor; it creates that nostalgic aroma that makes people wander toward your kitchen like zombies. Fresh cinnamon makes a noticeable difference here, so if yours has been sitting around since last year's pumpkin spice season, it's time for an upgrade.
The Showstoppers
Powdered sugar for the glaze creates that smooth, pourable consistency that makes the "blood" drizzle so dramatically effective. The ultra-fine texture dissolves instantly, creating a glossy finish that catches the light beautifully. Don't substitute granulated sugar here — you'll end up with a gritty, sad glaze that separates and looks nothing like the dramatic effect we're after. The powdered sugar also helps stabilize the glaze, keeping it from becoming too runny as it sits.
Red food coloring is what transforms ordinary glaze into dramatic drips worthy of a horror film set. A little goes a long way — start with just a drop or two and build up to your desired shade of crimson. If you're avoiding artificial colors, beet powder works beautifully and adds an earthy depth that complements the cinnamon perfectly. The key is adding it gradually until you achieve that perfect "fresh wound" color that makes people do a double-take.
Everything's prepped? Good. Let's get into the real action...
The Method — Step by Step
Now we're getting to the good stuff — the actual creation of these spooky-sweet masterpieces. I've broken this down into foolproof steps that even my most kitchen-challenged friends have mastered. The key is following the order and not rushing. Great cinnamon rolls, like great horror movies, need proper pacing to build to that satisfying climax.
- Start by preheating your oven to 375°F (190°C). This is crucial — you want the oven hot and ready the moment your rolls are shaped. While it's heating, grab a 9-inch round cake pan or an 8-inch square baking dish and butter it generously. Don't be shy here; well-buttered pans prevent sticking and create those crispy, caramelized edges that people fight over. I learned this the hard way when my first batch glued themselves to the pan like they were auditioning for a horror movie prop.
- In a large bowl, whisk together your flour, granulated sugar, baking powder, and salt until they're completely combined. This step ensures the leavening is evenly distributed, preventing those sad, flat sections that can happen when baking powder clumps. The mixture should look like fluffy snow — if you see any white streaks, keep whisking. This dry mix is the foundation of your dough, and getting it right here saves you headaches later.
- Make a well in the center of your dry ingredients and pour in the milk and melted butter. Here's where the magic starts happening. Use a wooden spoon to stir everything together, working from the center outwards. The dough will look shaggy and rough at first — resist the urge to add more liquid. Keep stirring until it comes together in a soft, slightly sticky mass. If you've ever made biscuits, this texture will feel familiar.
- Turn the dough out onto a lightly floured surface and knead it gently for about 30 seconds. You're not trying to develop gluten like with yeast bread — just bringing everything together smoothly. The dough should feel soft and pliable, like a baby's cheek. If it's too sticky, dust with a tiny bit more flour, but be conservative. Too much flour leads to tough rolls, and nobody wants to serve hockey pucks at their Halloween party.
- Roll the dough into a rectangle approximately 12 by 8 inches. Don't stress about perfect edges — rustic is part of the charm here. The dough should be about 1/4-inch thick, thin enough to roll easily but thick enough to hold all that glorious filling. If the dough springs back while you're rolling, let it rest for 5 minutes. This relaxes the gluten and makes rolling much easier. Patience pays off here.
- Brush the entire surface of the dough with melted butter, leaving a 1/2-inch border along one long edge. This border helps seal the roll and prevents the filling from leaking out during baking. Be generous with the butter — it's what creates those gorgeous, caramelized swirls. The butter should be liquid but not hot; you want it to spread easily without melting the brown sugar you're about to add.
- Combine your brown sugar and cinnamon in a small bowl, then sprinkle this mixture evenly over the buttered dough. Use your fingers to gently press the filling into the butter — this helps it stick and prevents it all from falling out when you slice the rolls. The filling should be a generous, even layer that reaches all the way to the edges except for that border we left. This is where the flavor lives, so don't be stingy.
- Starting from the long edge without the border, roll the dough into a tight spiral. Think of it like rolling up a yoga mat — you want it snug but not so tight that the filling gets squeezed out. Use your fingers to guide the roll, keeping it even all the way across. When you reach the end, pinch the seam to seal it. This prevents the rolls from unraveling in the oven and creating a sticky mess.
- Slice the roll into 8 equal pieces using a sharp knife or that dental floss trick I mentioned. Place them cut-side up in your prepared pan, leaving a little space between each roll. They'll spread and puff up as they bake, filling in the gaps. If you're using a round pan, arrange them in a circle with one in the center. For a square pan, three rows of three works perfectly. The goal is even spacing so they bake uniformly.
- Bake for 25-30 minutes, until the rolls are golden brown and the filling is bubbling up between the spirals. Your kitchen will start smelling absolutely incredible around minute 15 — resist the urge to open the oven door. The rolls are done when they're puffed and set, and the centers spring back lightly when touched. If they still look doughy, give them another 3-5 minutes. Better slightly overbaked than underbaked when it comes to these beauties.
That's it — you did it. But hold on, I've got a few more tricks that'll take this to another level...
Insider Tricks for Flawless Results
Now that you've mastered the basic technique, let me share the pro secrets that separate good cinnamon rolls from legendary ones. These are the details I've discovered through years of obsessive testing, the little touches that make people close their eyes and sigh when they take a bite. Some of these might seem small, but trust me — they add up to something magical.
The Temperature Rule Nobody Follows
Here's the thing that trips up even experienced bakers: temperature matters at every stage. Your milk should be room temperature, not cold from the fridge. Your melted butter should be cooled to just warm, not piping hot. And your kitchen should be comfortable, not freezing. Cold ingredients shock the dough, leading to tough texture and uneven baking. I learned this the hard way during a particularly frigid October when my rolls came out like cinnamon-scented hockey pucks. Now I set everything out 30 minutes before I start baking, and the difference is night and day.
Why Your Nose Knows Best
Forget timers — your nose is the most reliable indicator of when these rolls are perfectly baked. About 20 minutes in, your kitchen will start filling with the most intoxicating aroma of butter, cinnamon, and caramelizing sugar. When the smell becomes almost overwhelming, that's when you check for doneness. The rolls should be golden on top, with bubbling filling creating sticky pools between the spirals. If you rely solely on timers, you'll miss that perfect window where the outside is set but the inside stays soft and slightly doughy in the best possible way.
The 5-Minute Rest That Changes Everything
This might be the hardest instruction to follow, but it's absolutely crucial: let your rolls rest for 5 minutes after taking them out of the oven. I know, I know — they look incredible and smell even better, and your family is circling like vultures. But those few minutes allow the filling to set up slightly, preventing third-degree sugar burns and ensuring the rolls hold together when you serve them. Plus, this is the perfect time to whip up your bloody glaze and get it ready for that dramatic final flourish.
The Glaze Consistency Secret
The perfect bloody glaze should coat the back of a spoon but still flow easily enough to create dramatic drips. Too thick and it sits there like red frosting; too thin and it runs off the rolls entirely. The sweet spot is what pastry chefs call "ribbon consistency" — when you lift your spoon, the glaze should fall in a steady stream that briefly holds its shape before disappearing back into the bowl. If yours is too thick, add milk a teaspoon at a time. Too thin? More powdered sugar, a tablespoon at a time, until you hit that perfect flow.
Storage That Actually Works
Here's a confession: despite making dozens of batches, I've never had these last long enough to need storage. But I've done the research for you, just in case you have more willpower than my friends and family. The key is letting them cool completely before storing, otherwise condensation turns the glaze into a sticky mess. Wrap them individually in plastic wrap, then store in an airtight container at room temperature for up to 2 days. For longer storage, freeze them unglazed and add the bloody drizzle after reheating — it makes all the difference in texture and appearance.
Creative Twists and Variations
This recipe is a playground. Here are some of my favorite ways to switch things up:
The Pumpkin Patch Version
Add 1/4 cup pumpkin puree to the dough along with a teaspoon of pumpkin pie spice. The pumpkin adds moisture and creates rolls that are even more tender, with a subtle orange hue that makes the red glaze pop even more dramatically. Replace half the brown sugar in the filling with maple sugar for a autumn flavor that's absolutely irresistible. These are like eating pumpkin pie in cinnamon roll form, and they're the first to disappear at fall gatherings.
The Chocolate Lover's Nightmare
Substitute 2 tablespoons of cocoa powder for an equal amount of flour in the dough, creating chocolate spirals that look even more dramatic with the red drizzle. Add mini chocolate chips to the filling for pockets of melted chocolate in every bite. The combination of chocolate, cinnamon, and that tangy cream cheese glaze creates something that tastes like the best chocolate cinnamon toast you've ever had, but elevated to dessert status.
The Caramel Apple Massacre
Fold in 1/2 cup of finely diced, peeled apples to the filling along with a handful of chopped pecans. The apples soften as they bake, creating little pockets of fruit that complement the spice perfectly. Drizzle with caramel sauce along with the red glaze for a caramel apple effect that's absolutely killer. This version tastes like fall exploded in the best possible way, and the textural contrast between the soft apples and crunchy pecans takes these over the top.
The Espresso Martini Edition
Add a tablespoon of instant espresso powder to the dough for a subtle coffee flavor that amplifies the chocolate notes in the brown sugar. Replace the milk in the glaze with strong coffee and add a splash of coffee liqueur for an adults-only version that's perfect for late-night Halloween parties. The coffee flavor isn't overwhelming — it just adds depth and complexity that makes people ask "what's in these?" in the best way.
The S'mores Spectacular
Replace the cinnamon filling with crushed graham crackers, mini marshmallows, and chocolate chips. The marshmallows melt and create gooey pockets, while the graham crackers add that essential s'mores flavor. Use a kitchen torch to toast the marshmallows on top before adding the bloody drizzle. This version tastes like summer camp meets Halloween, and it's absolutely perfect for those who want something different from traditional cinnamon rolls.
The Spicy Vampire
Add a teaspoon of cayenne pepper to the filling along with the cinnamon for rolls that have a serious kick. The heat builds slowly, hitting you after the sweetness fades, and it makes the red glaze seem even more appropriate. These aren't for the faint of heart — or tongue — but they're absolutely addictive for those who like their desserts with danger. Serve with cold milk for the full experience.
Storing and Bringing It Back to Life
Fridge Storage
Despite your best intentions, you might find yourself with leftover rolls. First of all, congratulations on your superhuman willpower. Store them in an airtight container at room temperature for up to 2 days, though honestly, they're best within the first 24 hours. The glaze will start to weep after the first day, creating sticky pools that are still delicious but not quite as photogenic. If you must refrigerate them, warm them up before serving — cold cinnamon rolls are a crime against humanity.
Freezer Friendly
These rolls freeze beautifully, making them perfect for make-ahead Halloween prep. Bake them without the glaze, let them cool completely, then wrap them individually in plastic wrap before freezing. They'll keep for up to 2 months, though I've never managed to leave them alone that long. When you're ready to serve, thaw them overnight in the refrigerator, then warm them in a 300°F oven for 10-15 minutes. Add the bloody glaze fresh for maximum impact and the best texture.
Best Reheating Method
The microwave works in a pinch, but for best results, use your oven. Wrap the rolls in foil with a tiny splash of water — this creates steam that brings them back to life without drying them out. Ten minutes at 300°F should do it, though timing depends on how many you're reheating. The glaze might need a quick stir if it's been sitting, but it should return to its drizzly consistency. Pro tip: reheat them just until they're warm, not hot, for the best texture and flavor.