Picture this: a rainy Saturday night, the kids are whining for something “spooky” but still tasty, and I’ve just burned a batch of store‑bought hot dogs that were supposed to be the centerpiece of our Halloween feast. I stared at the charred mess, feeling the weight of disappointment settle like a heavy fog, and then a wild idea struck me like a bolt of lightning—what if I turned the humble meatloaf into a mummy that even the pickiest little monsters would devour? I grabbed the nearest skillet, a couple of cheese slices, and a roll of parchment paper, and the kitchen instantly transformed into a mad scientist’s lab. The air filled with the sizzle of beef hitting the pan, a sweet‑tangy aroma of ketchup and mustard mingling with the earthy scent of onions and garlic, while the faint hum of the oven promised a golden finish.
As the mixture started to come together, I could hear the kids’ giggles echoing from the living room, their excitement building with each clatter of the wooden spoon. I could see the glossy, caramelized edges of the meat forming like a promise, feel the warm doughy texture of the breadcrumbs hugging the beef, and taste—well, I tasted a little bit of the future, a perfect blend of savory and sweet that made my taste buds do a little dance. The moment I slid the loaf into the oven, the whole house seemed to inhale the scent, and the walls themselves whispered, “This is going to be legendary.”
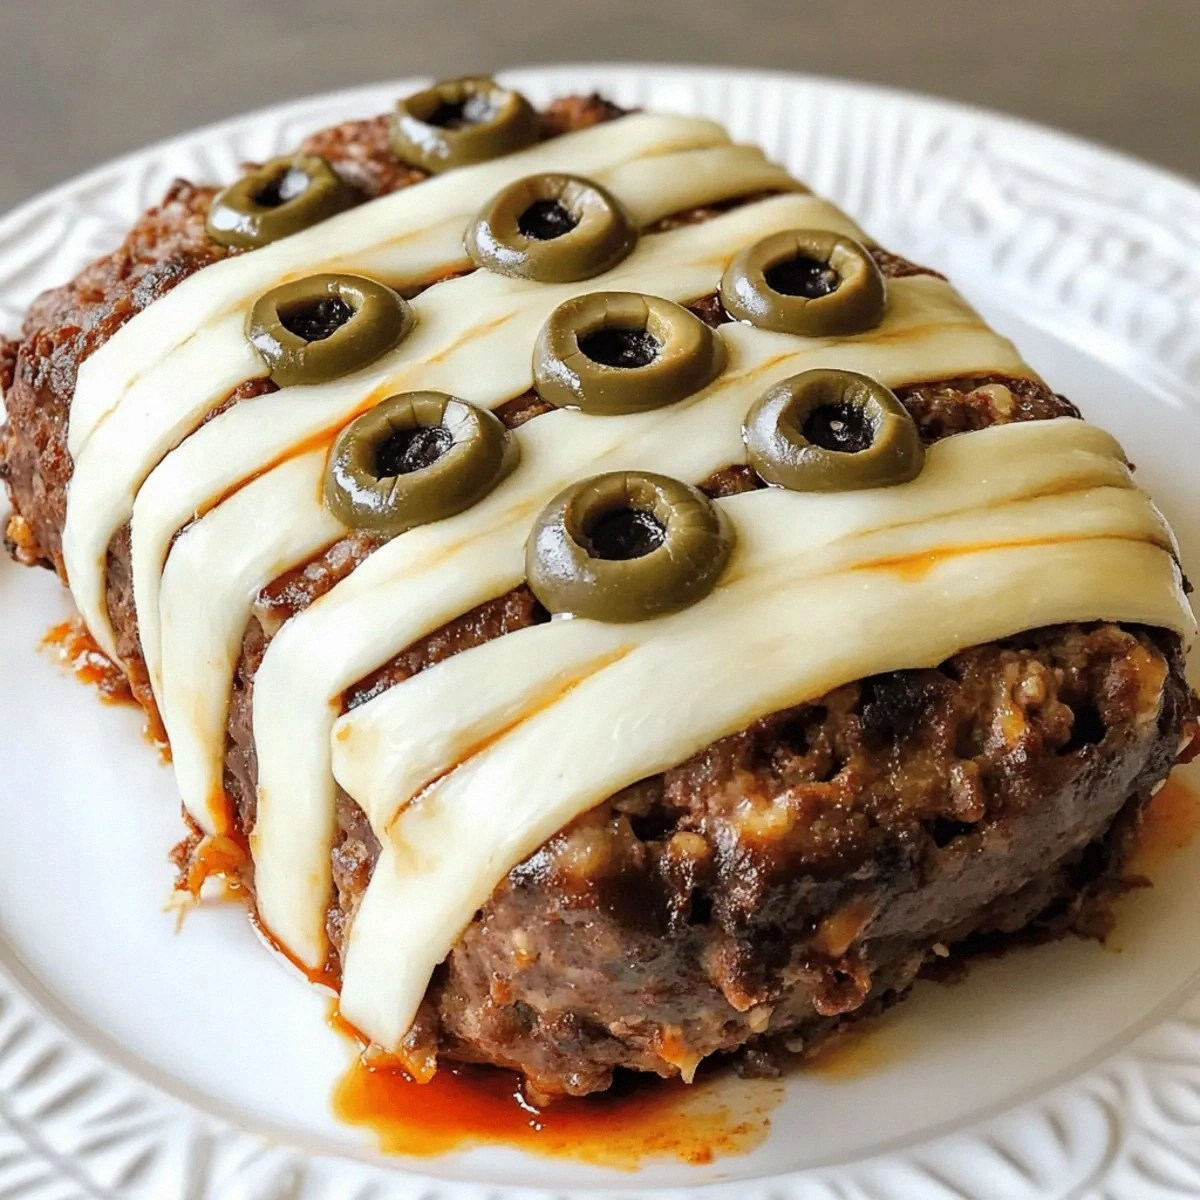
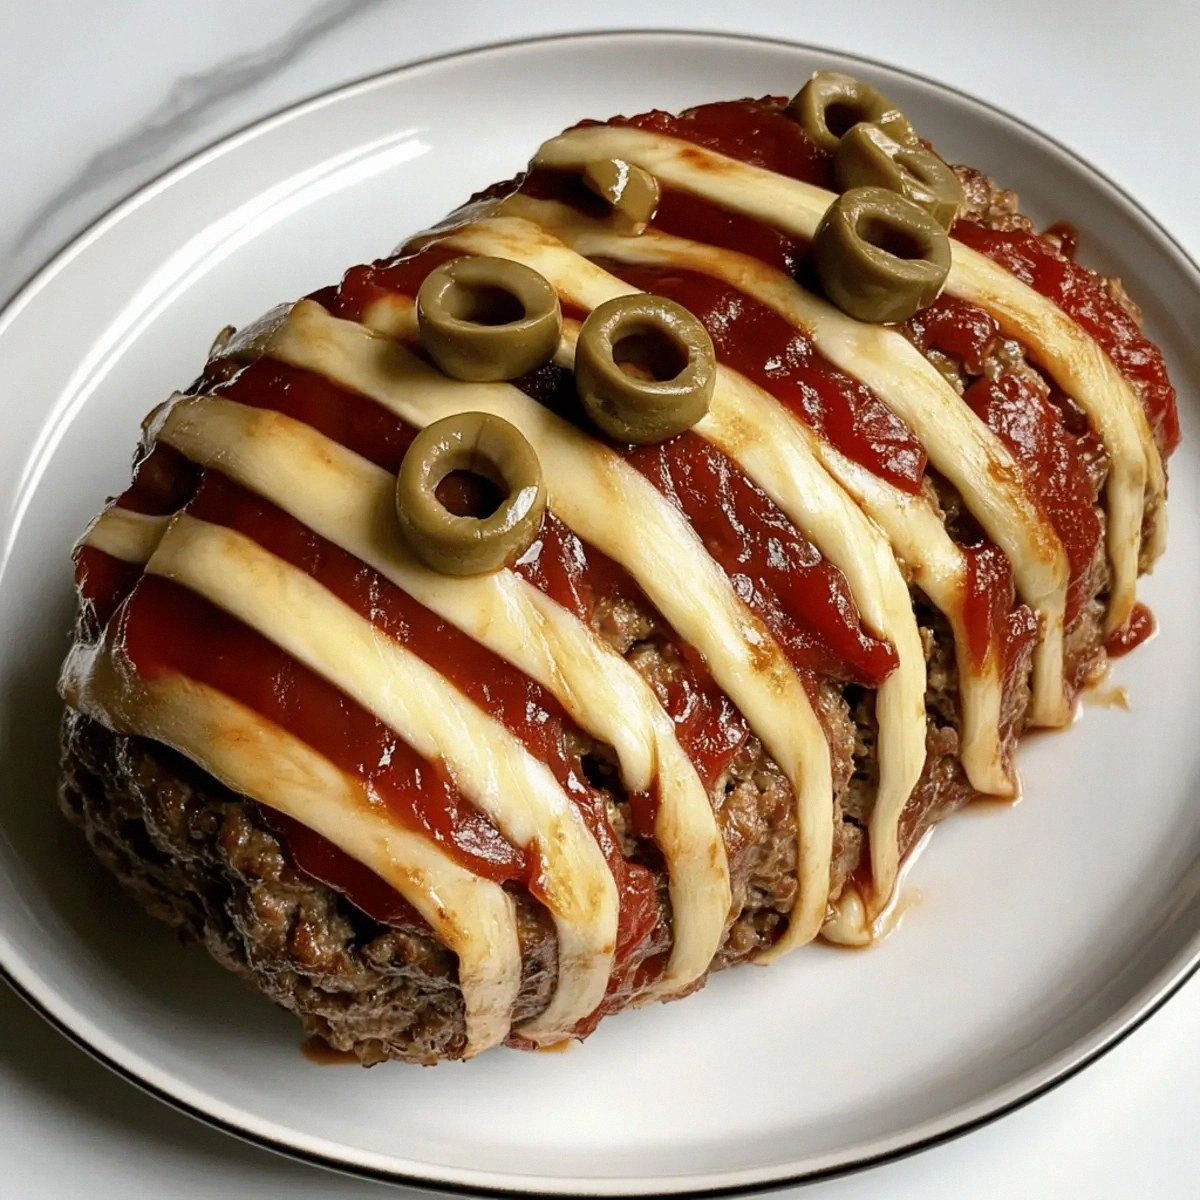
Most meatloaf recipes out there are bland, dry, and about as exciting as a Monday morning meeting. They either drown the meat in a sea of sauce or bake it into a brick‑like slab that no kid would willingly touch. This version, however, flips the script. By wrapping the loaf in a crispy, cheesy “bandage” of mozzarella strips and giving it a face made from cheese eyes, we create a visual spectacle that turns dinner into a playful performance. The secret? A perfectly balanced blend of breadcrumbs, a dash of mustard for a subtle kick, and a glaze that caramelizes to a glossy finish, making every bite as satisfying as unwrapping a present.
And here’s the kicker: I’m about to reveal a technique that most home cooks overlook—a quick steam‑bake combo that keeps the interior juicy while the exterior gets that coveted, slightly crisp crust. It’s the difference between a meatloaf that screams “yum!” and one that sighs “meh.” I dare you to taste this and not go back for seconds. Let me walk you through every single step — by the end, you’ll wonder how you ever made it any other way.
What Makes This Version Stand Out
- Flavor Explosion: The blend of ketchup, mustard, and a whisper of garlic creates a sweet‑savory glaze that coats the meat like velvet, delivering a burst of flavor with every bite.
- Moisture Mastery: Breadcrumbs act like a sponge, soaking up juices and releasing them slowly, ensuring the loaf stays tender and never turns into a dry brick.
- Kid‑Friendly Fun: The mummy “bandages” and cheese eyes turn dinner into a theatrical experience, making even the pickiest eaters reach for seconds.
- Simplicity Meets Sophistication: With just nine core ingredients and a handful of easy steps, you get a gourmet‑level dish without the fuss.
- Visual Wow Factor: The final presentation looks like something out of a haunted house, perfect for Halloween parties or any night you want to add a dash of drama.
- Ingredient Quality: Using fresh ground beef (80/20) and real cheese slices guarantees a rich, buttery mouthfeel that processed alternatives can’t match.
- One‑Pan Efficiency: Everything bakes together on a single sheet, cutting cleanup time in half and keeping the kitchen chaos manageable.
- Make‑Ahead Magic: You can prep the loaf a day ahead, refrigerate, and simply pop it in the oven when guests arrive, saving you precious time.
Alright, let's break down exactly what goes into this masterpiece...
Inside the Ingredient List
The Flavor Base
Ground Beef (1.5 pounds): This is the heart of the dish. I recommend an 80/20 lean‑to‑fat ratio because the fat renders during baking, keeping the loaf moist and flavorful. If you opt for a leaner cut, add a splash of olive oil to compensate. Skipping the beef? Not an option—everything else is just a supporting cast.
When shopping, look for meat that’s bright red with a fine crumb. Avoid any that looks gray or has a strong metallic smell; that’s a sign of old meat. Pro tip: ask the butcher to grind it fresh for the best texture.
The Texture Crew
Breadcrumbs (0.75 cups): They act like tiny sponges, soaking up the juices from the beef and the moisture from the egg, creating a tender crumb. If you’re gluten‑free, swap in crushed gluten‑free crackers or almond flour for a similar effect. Skipping breadcrumbs will result in a dense, rubbery loaf that no one will want to touch.
Egg (1): The egg binds everything together, ensuring the loaf holds its shape when you wrap it in the cheese “bandages.” For a vegan twist, use a flax egg (1 tbsp ground flaxseed mixed with 3 tbsp water). Forgetting the egg? The loaf will crumble like dry sand.
The Unexpected Star
Ketchup (0.5 cups) & Mustard (1 tablespoon): This dynamic duo creates a glaze that’s sweet, tangy, and just a hint of heat. The ketchup caramelizes, giving a glossy finish, while the mustard adds depth without overwhelming the palate. If you love a bit of spice, a pinch of smoked paprika will elevate the flavor.
Cheese Slices: These are the “bandages” that transform a regular loaf into a mummy. I use mild mozzarella for its meltability and neutral flavor, but cheddar adds a sharper bite. Make sure the slices are thin enough to crisp up without burning.
The Final Flourish
Small Onion (1) & Garlic Cloves (2): Finely diced, they infuse the meat with aromatic depth. Sauté them first for a mellow sweetness, or add raw for a sharper bite. If you skip these aromatics, the loaf will lack that comforting, home‑cooked backdrop.
Salt and Pepper: Essential seasonings that bring all the flavors together. I always season the meat mixture in layers—first a pinch before mixing, then a final taste after the meat is combined. Over‑salting is a common pitfall; remember, the cheese will also add salt.
Everything's prepped? Good. Let's get into the real action...
The Method — Step by Step
Preheat your oven to 375°F (190°C) and line a large baking sheet with parchment paper. While the oven warms, set a large bowl on the counter and pour in the 1.5 pounds of ground beef. This is the moment of truth—watch the meat as it glistens under the kitchen lights, promising richness with every fiber.
Okay, ready for the game‑changer? Add the 0.75 cups of breadcrumbs, the beaten egg, and the finely diced onion and garlic. Sprinkle in a generous pinch of salt and a crack of black pepper. Use your hands (or the zip‑top bag method from the kitchen hack) to mix everything together until it’s just combined; over‑mixing will make the loaf tough.
In a small saucepan over medium heat, combine the 0.5 cups ketchup with the tablespoon of mustard. Stir continuously until the mixture bubbles gently, then lower the heat and let it simmer for about 3 minutes. You’ll notice it thickening, the aroma becoming sweeter—this is the glaze that will coat the meat like a glossy, caramel‑kissed veil.
Pure magic. Set the glaze aside to cool just a touch; you want it thick enough to cling without sliding off.
Transfer the meat mixture onto the prepared parchment sheet and shape it into a rectangular loaf, about 2 inches thick. Press it down firmly so it holds together, then spread a thin layer of the ketchup‑mustard glaze over the entire surface, using the back of a spoon to create an even coat.
Kitchen Hack: For an even glaze, dip a silicone pastry brush into the sauce and brush in long, overlapping strokes. This ensures every nook gets a flavorful kiss.Now for the fun part: drape the mozzarella cheese slices over the loaf, overlapping them like bandages. Leave small gaps for the eyes and for the “bones” of the mummy to peek through. The cheese will melt and crisp, forming a golden crust that shatters like thin ice when bitten.
Watch Out: If the cheese slices are too thick, they may burn before the meat is fully cooked. Trim them to about 1/8‑inch thickness for optimal crispness.
Using a small knife, carve two round holes for the eyes, then place a slice of cheese in each—these will be the mummy’s glowing eyes. For an extra spooky effect, dab a tiny dab of ketchup inside each eye to create a “bloodshot” look that kids love.
Slide the baking sheet into the preheated oven. Bake for 25 minutes, then pull the loaf out and brush another layer of glaze over the top. This second coat deepens the caramelization, giving the mummy its signature glossy sheen.
Return the loaf to the oven and bake for an additional 10‑12 minutes, or until the internal temperature reaches 160°F (71°C) and the cheese bandages are bubbling and lightly browned. The edges should start pulling away from the parchment, a sign that the crust is perfectly crisp.
Remove the mummy from the oven and let it rest for 5 minutes. This resting period lets the juices redistribute, ensuring each slice is juicy rather than watery. While it rests, the cheese continues to set, making it easier to slice without the bandages sliding off.
And now the fun part—carve the mummy into individual “tombstone” slices, serve with a side of roasted veggies or a simple salad, and watch the kids' faces light up like jack‑o‑lanterns. That sizzle when it hits the pan? Absolute perfection.
That's it — you did it. But hold on, I've got a few more tricks that'll take this to another level...
Insider Tricks for Flawless Results
The Temperature Rule Nobody Follows
Most home cooks bake meatloaf at 350°F, but cranking it up to 375°F creates a rapid caramelization on the outside while keeping the interior juicy. I learned this the hard way when a low‑temp loaf turned out pale and soggy. Trust the higher heat; it’s the secret to that golden mummy crust.
Why Your Nose Knows Best
Before you even check the thermometer, give the loaf a sniff. A sweet, caramel scent means the glaze is done, while a faint burnt smell signals you’re pushing it too far. Your nose is a better gauge than any timer—if it smells right, it’s ready.
The 5‑Minute Rest That Changes Everything
Never skip the rest. Those five minutes let the proteins re‑settle, preventing the loaf from falling apart when you slice it. I once sliced straight out of the oven and the “bandages” fell off like soggy tissue—lesson learned.
Cheese Bandage Crispness
For an extra crunch, sprinkle a pinch of grated Parmesan over the mozzarella before baking. The Parmesan creates a micro‑crust that crackles delightfully with each bite. It’s a tiny addition with a massive impact.
Seasoning Layers
Season the meat mixture, then taste the glaze, and finally adjust the final loaf with a dash of extra salt if needed. This layered seasoning ensures every bite is perfectly balanced, not just the first spoonful.
Creative Twists and Variations
This recipe is a playground. Here are some of my favorite ways to switch things up:
Spicy Skeleton
Swap the mild mozzarella for pepper jack and add a teaspoon of chili flakes to the meat mixture. The result is a fiery mummy that still looks adorable but packs a punch—perfect for older kids who love heat.
Herb‑Infused Mummy
Incorporate a tablespoon of fresh chopped parsley and a teaspoon of dried oregano into the meat. The herbs add a fragrant earthiness and a pop of green that brightens the overall flavor profile.
Veggie‑Lover’s Version
Replace half of the ground beef with finely grated carrots and zucchini. The veggies add moisture and a subtle sweetness, while the cheese bandages keep the classic look.
Breakfast Mummy
Mix in a beaten egg and a handful of shredded cheddar, then top the loaf with thin strips of bacon before adding the cheese bandages. Serve with scrambled eggs for a hearty brunch twist.
Gluten‑Free Ghost
Swap breadcrumbs for crushed rice crackers or almond flour, and use a gluten‑free ketchup. The texture remains light, and everyone can enjoy the spooky fun without worry.
Mini Mummies
Form the meat mixture into small, individual “mummy bites” and bake on a mini muffin tin. These bite‑size treats are perfect for parties, allowing each child to have their own personal mummy.
Storing and Bringing It Back to Life
Fridge Storage
Let the mummy cool completely, then wrap it tightly in foil or an airtight container. It will keep fresh for up to three days. Reheat slices in a skillet over medium heat, adding a splash of water to the pan and covering for two minutes to steam the meat back to juiciness.
Freezer Friendly
Wrap the cooled loaf in a double layer of plastic wrap, then place it in a freezer‑safe bag. It freezes well for up to two months. To reheat, thaw overnight in the fridge, then bake at 350°F for 15‑20 minutes, uncovered, until heated through.
Best Reheating Method
For the crispiest bandages, preheat your oven to 375°F, place slices on a wire rack over a baking sheet, and bake for 8‑10 minutes. Add a tiny splash of water to the bottom of the tray; the steam revives the meat’s tenderness while the cheese stays perfectly crisp.